Cari Blog Ini

Tampilkan postingan dengan label Default Template. Tampilkan semua postingan

Rabu, 05 Juni 2013

Add | Put Three Tab Gadget/Widget In Blog Layout Sidebar On Blogspot

In this tutorial i will show you how to Add Three Column Tab Gadget in blogger sidebar with three option Followers, Popular Posts, Blog Archive. To install this widget in blogger template is so simple and easy or if you want to add this widget in blog then follow the below tutorial for doing this on your blogger. I also put/install this widget now then i want to share it with my blog readers. To add this widget in blogger is very effective for blog reader they can easily access your blog and easily find what they want on your blog. These three option is not fix you can easily change after adding this widget on blog.

5 Ways How to Make your Blogger Blog Like WordPress Website
How I Make My Blogger Good Looking Best Tricks
How To Make Website Like My Blogger Tricks To Get Best Alexa Rank 

Adding Three Tab Gadget/Widget On Blogger Blogspot:


This widget is one of the best widget because it is not occupies too much space in this widget space is less and three option is added easily which is very best. It also make your blog looking good and your blog look like perfect blog after adding this. The three tab gadget in layout many types but i choose simple and best looking i also make this tutorial so easy and any one add this widget to their blog by using this easy tricks.
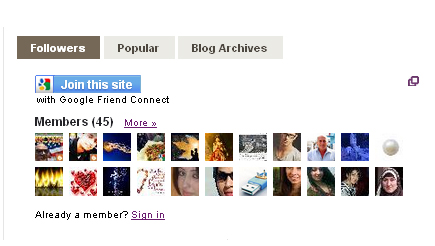
Add | Put Three Tab Gadget/Widget In Blog Layout Sidebar On Blogspot
                                    

Now we are going to start the simple adding Three Tab or Multi Tab Widget on Blogger Blogspot. Follow below tutorial and add easily.

Go to Blogger.com.
Go to Template.
Click on Edit HTML orange button link.
First Download your full blogger template.
Press Ctrl+F in the HTML Body Box.
Paste the below code/tag in the search box and press enter.

]]></b:skin>

When you find this code/tag then pick or copy the below code and paste just above/before the above tag.


/***----- TOB Multi Tabbed Widget ----***/
.tabs-widget{list-style:none;list-style-type:none;margin:0 0 10px 0;padding:0;height:26px}
.tabs-widget li{list-style:none;list-style-type:none;margin:0 0 0 4px;padding:0;float:left}
.tabs-widget li:first-child{margin:0}
.tabs-widget li a{color:#4E4840;background:#EBEBE5;padding:5px 16px;display:block;text-decoration:none;font:bold 12px Arial,Helvetica,Sans-serif}
.tabs-widget li a:hover,.tabs-widget li a.tabs-widget-current{background:#756857;color:#FFF;text-decoration:none}
.tabs-widget-content{}

.tabviewsection{margin-top:10px;margin-bottom:10px;}


Now if you have Default Template or any types of template then find the any code which is given below one by one.


<div class='column-right-inner'>

<div id='sidebar-wrapper'>

<div id='rsidebar-wrapper'>

When you find any one of them then copy below code and paste below any of tag which you find.

Get Google Page Rank With In 1 Month By Simple And Easy Tricks 
Best Blogger Tips And Tricks For My Blog SEO Instantly


<div class='tabviewsection'>
<script type='text/javascript'>
            jQuery(document).ready(function($){
                $(&quot;.tabs-widget-content-widget-themater_tabs-1432447472-id&quot;).hide();
                $(&quot;ul.tabs-widget-widget-themater_tabs-1432447472-id li:first a&quot;).addClass(&quot;tabs-widget-current&quot;).show();
                $(&quot;.tabs-widget-content-widget-themater_tabs-1432447472-id:first&quot;).show();
      
                $(&quot;ul.tabs-widget-widget-themater_tabs-1432447472-id li a&quot;).click(function() {
                    $(&quot;ul.tabs-widget-widget-themater_tabs-1432447472-id li a&quot;).removeClass(&quot;tabs-widget-current a&quot;);
                    $(this).addClass(&quot;tabs-widget-current&quot;);
                    $(&quot;.tabs-widget-content-widget-themater_tabs-1432447472-id&quot;).hide();
                    var activeTab = $(this).attr(&quot;href&quot;);
                    $(activeTab).fadeIn();
                    return false;
                });
            });
        </script>
<ul class='tabs-widget tabs-widget-widget-themater_tabs-1432447472-id'>
<li><a href='#widget-themater_tabs-1432447472-id1'>Followers</a></li>
<li><a href='#widget-themater_tabs-1432447472-id2'>Popular</a></li>
<li><a href='#widget-themater_tabs-1432447472-id3'>Blog Archives</a></li>
</ul>
<div class='tabs-widget-content tabs-widget-content-widget-themater_tabs-1432447472-id' id='widget-themater_tabs-1432447472-id1'>
<b:section class='sidebar' id='sidebartab1' preferred='yes'>
<b:widget id='CustomSearch1' locked='false' title='' type='CustomSearch'/>
<b:widget id='Followers1' locked='false' title='Followers' type='Followers'/>
</b:section>                                      
</div>                           
                               
<div class='tabs-widget-content tabs-widget-content-widget-themater_tabs-1432447472-id' id='widget-themater_tabs-1432447472-id2'>
<b:section class='sidebar' id='sidebartab2' preferred='yes'>
<b:widget id='PopularPosts1' locked='false' title='Popular Posts' type='PopularPosts'/>
</b:section>                                        
</div>                           
                               
<div class='tabs-widget-content tabs-widget-content-widget-themater_tabs-1432447472-id' id='widget-themater_tabs-1432447472-id3'>
<b:section class='sidebar' id='sidebartab3' preferred='yes'>
<b:widget id='BlogArchive2' locked='false' title='Blog Archive' type='BlogArchive'/>
</b:section>                                    
</div>
</div>

Now Save your Template.
Click to View Blog.

Now you have done this trick and your blog look good now if you want to replace gadget with other gadgets then delete the following and replace which you want to add.

Related Articles:


Add | Put HTML Color Code Generator Tool To Your Blogger With Easy Tricks
Add Manually CSS Jqeury Drop Down Menu On Blogger
Add Three Or Four Column Footer Widget/Gadget In Blogger Blogspot
Add Facebook Like Box Widget/Gadget On Blogger
AddAbout Us Page Widget | Gadget On Your Blog Footer Or Sidebar
Add | Put 50 Flag Translator Widget | Gadget On Your Blogger
Easy Trick To Add Twitter Updates Gadget To Blogspot Blogger
Add Recent Post Moving In Down And Upward Direction


Selasa, 04 Juni 2013

Customise Blogger Default Template To Make Professional Template

This tutorial tell you how to Customize Blogger Default Template in Professional Template to make good looking blog and easy to upload the other third party template in your blog. Blogger Blogspot is one of the biggest platform for bloggers to keep blogging and write good stuff on our blog. If you have choose the blogspot for publish your Quality Stuff/Quality Content then i like your choice for choosing this platform. I really appreciate those people who make blog on blogspot or choose Custom Domain after blogspot. I have write many post to make your blog Good Looking to attract more visitors on blog or also write post to make your blog User-Friendly. I give you some tips to make blog better for Search Engine or User-Friendly.

First i start my post with customization of blogger template to changes in professional template then i give you some tips and techniques to make it Search Engine Friendly or User-Friendly.

Customization Of Blogger Blogspot Default Template Into Professional Template:


Before customization you should select the best and more beautiful template which blogger platform provide us by signing up in Blogger.com. If you select the third party template for your blog then you can not customize your blog with your choice that's why always use the blogger default template it has lot of benefits like if you want to run Google Adsense Account on your blog means you want to show Google Ads on your blog then first you apply for it and after approval you put ads on blog and if you can not use User-Friendly Template for blogger or not make your blog Search Engine Friendly then you never get Adsense account because Google Adsense like those template which is user friendly or search engine friendly.

Customise Blogger Default Template To Make Professional Template 1
Customise Blogger Default Template To Make Professional Template

Start Customization In Blogger.com:


First Make blog on blogger blogspot if you not already make then click below link to make blog on blogspot with simple steps start to end. Now when you make blogspot then ready to customization of your blog.

Make Your Own Free Blog At Blogger.Com

Go to Blogger.com.
Go to Template.
Click the Orange Button with Customise link.
Here you can see these below five heading for customization of your blog.

  1. Templates
  2. Background
  3. Adjust widths
  4. Layout
  5. Advanced 


Customization With Template In Blogger Blogspot: 


First choose your desire Template for blogger by just one click. But my suggestion is always choose these two template for blogger first Simple or second is Awesome Inc.

Simple Template Option:


In Simple Template Option there are many option for customization and you also select to many design by click on Simple and many template appear in simple template option. You should choose any one of them.

Awesome Inc Template Option:


By selecting Awesome Inc Template you also choose any one of design for your blog in this template option your blog background is transparent and it also user friendly but not like Simple template. Simple Template is best option in my view. I discuss these template having big reason if you want to join Adsense or want a title of Adsense Publisher because when you apply for Adsense and submit your application Adsense Engineer first look Blogger Template does it is User-Friendly or not.


Customization With Background In Blogger Blogspot:


For customization in Background of template is so simple. You can just Add or Remove background image by choosing this option and also select the main background theme color. This option is not very important you can choose your desire image for background.


Customization With Adjust Widths In Blogger Blogspot:


This option is very important in blogger customization template because if you can not fit your blog in your browser page then it is not looks good looking blog and visitors of your blog can not understand your blog template and may be they left your blog immediately/quickly. If you want to customize it then first you customize the fourth option Layout and then we adjust our blog width.

Customization With Layout In Blogger Blogspot:


Layout is one of the best option in blogger we can easily add Page Layout or Page Element with our choice. I have also select the third option of layout for my blog. For understand it view below headings.

Third Layout Option:


One Header.
One Post Body Page.
Two Right Sidebar.
Two Footer Layout.

But i customize my blog later by adding new Three Column Footer for better results or add more gadget to make my blog beautiful or user friendly.

Start Layout Tutorial:


Click on Layout link and select which Page Layout want to add on your blog template to make your blog user friendly my suggestion is choose simple layout like Header, Post Body or just one right or left side bar for adding gadget and just two or three footer layout. Now go in 3rd Option Width and adjust your width according to your new Page Layout option. Make your blog width which is fit on your browser and check your blog in all browsers means in Firefox, Google Chrome, Internet Explorer or Opera.

Customization With Advanced In Blogger Blogspot:


In Advanced option you can see to many option for make your blog user friendly or good customization of your blog. Like below you can see these main headings in advance option.

  1. Page Text.
  2. Backgrounds.
  3. Links.
  4. Blog Title.
  5. Blog Description.
  6. Tabs Text.
  7. Tabs Background.
  8. Post Title.
  9. Date Header. 
  10. Post Footer.
  11. Gadgets.
  12. Images.
  13. Accents.
  14. Mobile Button Color.
  15. Add CSS. 

These are the fifteen option in Advanced Setting. We can easily make our blog which one we find.

Page Text:


First Option in advanced is Page Text by using this option we can customize the Page Text Font or also the Color or text. We make text also in Bold option and select the size of our blog post text.

Backgrounds:


We easily customize or select the Outer Background Color, Main Background Color and Header Background Color by using this option. Outer Background Color means the border line of text page. Main Background color option means text background or blog post background color. Header Background color means your Blog Title Background color which one of you select.


Links:


Links option is use for any type of link you make on your blog like your Blog Archive, Tags, Labels, RSS feed  or any one of them. Link color is use to select the color of text link, Visited color is the option which tell blog reader this links or this post is already read by him means if you visited a blog or you click one post link and then you visit this blog again the this option tells you it is already read you. Hover Color means if some one drag his mouse one post or any link then it will highlighted by your selected color.

Blog Title:


Blog Title color is easily change by just using this option. If you want to change the blog title font then go to Font and select your desire font. After that go to Title Color and change color of your blog title with your desire color and also select the size of color upto 80px.

How Manage Blogger Title Tags to Improve SEO

Blog Description:


In Blog Description option you can easily change the color of your  blog description.

How To Added Meta Tag In Your Blogger For Better Optimization

Tabs Text:


Tabs Text is the option if you want to change the color of tab text then use this option and change the tab text color with your desire color option.You can also select the desire font of the tabs.

Add Manually CSS Jqeury Drop Down Menu On Blogger

Tabs Background:


Tabs Background option is for change the color of tab background.

Post Title:


By using Post Title option you can easily Text, Size or effect of the font for post title.

How I Can Optimize the Post Title Mean My Post Show First


Date Header:


By using Date Header Option you can change the color of Date Text or Date Background.

How To Set | Change Desire Blog Post Date And Time In Blogger

Post Footer:


By using Post Footer option you can highlight the footer of your every blog post and also highlight the labels or link to this post. See in below picture/image.

Add | Put | Embed Three Or Four Column Footer Widget/Gadget In Blogger Blogspot

             
Customise Blogger Default Template To Make Professional Template 2
You can make changes in post footer by changing Text Color, Background Color and Shadow Color.

Text Color:
Text Color means link, labels, or date and time color which you can setup with your own choice easily.

Background Color:
Here you can easily change the background color just selecting your desire color like my post footer color is grey you can adjust with your own color.

Shadow Color:
It is same as border color which give the effect of shadow. It is normally black in color and give the good effect of shadow.


Gadgets:


In the Gadgets option you can changes the fonts and the size of Heading or Title of gadgets. Also you can changes the alternate color of the gadgets title.

Gadget For Blogger To Make Perfect Blog

Images:


In the Images option you set easily the Border Color/Border Lines of images which is in your blog post and also you give the color of Caption Text Color with you desire color easily. Like i give Caption Text Color in my blog post images black.

How I Remove Or Change Blogger Post Image Border In Blogspot

Accents:


In Accents option you can give the Separate Line Color and also give the desire color of Tabs Borders.

Mobile Button Color:


Mobile Button Color is new option in blogger template customization here you select the color of button for mobile device.

Add CSS:


Add CSS option is now not use in add css option it is already done in Blogger Template by going Template > Edit HTML > Here we can easily add our CSS coding. If you also use then this is so simple.

Now Click on Orange Button locate on top right side corner Apply To Blog.
Save Blog and view your Customize Blog.


Related Articles:


Best Blogger Tips And Tricks For My Blog SEO Instantly
Quantity | More | Best Tricks To Use Custom Robots Tags Selection Blogger
How I Can Use Crawlers And Indexing Tool In Blogger
How I Can Make One Most Important Tip For SEO In My Blog
How to Remove 404 Errors in Blogger Blogspot
How Can I Make Earning With My Blogger Blogspot
How to Verify My Blogger Blogspot in Webmaster Tools
You Put Chitika Ads to Blogger Blogspot with Simple Steps