When you create blogspot/blogger blog and choose use their default template, the navbar gadget will show on your blog page by default. But, if you use third party template, though mostly the designer include them, it's hidden.
The navbar can be useful, it's a shortcut to your dashboard, a quick click to Sign in /Sign out, you can search other blog, share interesting blog, and randomly stumble

Senin, 29 Juli 2013
Best Ways To Improve Or Increase Blogging Skills Using Most Quality Article Writing Tricks
In this tutorial i will give you some best points which increase your Blogging Skills and Blogging Ideas. If you want to do this and also increase your Blog Traffic or Blog Earnings then read this article carefully and pick your best skills.
 |
| Best Ways To Improve Or Increase Blogging Skills Using Most Quality Article Writing Tricks |
Thanks to the net, plenty of skilled and aspiring writers have found an outlet with that they'll channel their written expressions and innermost thoughts. Even higher, blogging will open up someone to a range of opportunities to satisfy likeminded folks, presumably flip his writing into an expert economic venture and generate a following which will even range the thousands or additional. however before this could be actual , one should detain mind 3 helpful tips that are designed to boost one's blogging skills.
How To Add Categories Link To Your Blogger Blog
SEO Tips How Keyword Take Your Website On Rank
How To Add Categories Link To Your Blogger Blog
SEO Tips How Keyword Take Your Website On Rank
Very Get To Understand Your Sort Of Blogging:
This can be a really crucial step, as a result of establishing your own sort of blogging is what is going to distinguish you from alternative writers out there. the sole thanks to do that is to easily keep writing and be according to your voice (jargon and humor included) across a number of topics.
How I Can Write 100% Original Content For Blogger
How I Can Write 100% Original Content For Blogger
Establish An Issue For Your Diary Website:
So as to understand what your niche/website or forte very is, try and assess your interests and also the things that you simply fancy writing concerning. as an example, if you fancy writing concerning topics like take care of animals, the surroundings and healthy living, you'll wish to focus your theme on ecology and property development. that specialize in one theme will facilitate develop your experience a few specific topic and attract either folks with an equivalent interests as yours to your diary. additionally, having one unifying theme can provide your diary a sander feel to that, with connected and continuous streams of ideas.
Easy | Best | Simple Tricks To Make Money From Youtube | Chitika
How I Make My Blogger Good Looking Best Tricks
Easy | Best | Simple Tricks To Make Money From Youtube | Chitika
How I Make My Blogger Good Looking Best Tricks
Enhance your diary with extra visual image like streaming videos, attention-grabbing connected photos and playable music. diary guests also are visual creatures WHO rely upon multimedia system resources like those mentioned to sustain their interest and a focus. build their keep a additional gratifying one by doing this.
Best Blogger Tips And Tricks For My Blog SEO Instantly
Simple | Easy Tutorial For Transfer Blogspot To Website
Best | Top Blog Marketing Tips Given To Successful Blogger And Free Tips Marketing Your Blog
Best | Latest Blogging Suggestion And Advice For Benefits In Business SEO Professionals
How Optimize Blogger | Website To Increase Or Make Money With Blogging Tricks
Best | Easy Tricks To Monetize Your Blogger Blog With Google Ads Increase CPC | CTR And Earning
Best Ways Make Money With Blogging Through Google And 5 Profitable Work For Home Tips And Tricks
How To Easily Make Money With Affiliate Marketing Blogger
Tricks To Add Simply/Easily/ PayPal Donate Button To Blogger
How Easliy/Simple To Manage Page Layout In Blogger Blogspot
Quality Blog Or Website Article Writing Skills:
Be a Decent Author:
There's no manner that you just are going to be ready to create a large mark within the world of blogging if you are a lousy author. So, before you sink your teeth into this endeavor, hone your writing skills 1st. As a blogger, you want to acumen to induce your message across whereas entertaining your readers all at an equivalent time.
Be Within The Recognize:
As a blogger, your followers can expect you to understand the newest info in your chosen niche. don't let down them. begin your day reading concerning the newest problems. investigate relevant RSS feeds and mingle with others who are thought of authorities in your field. They for sure have plenty to supply.
Best Blogger Tips And Tricks For My Blog SEO Instantly
Simple | Easy Tutorial For Transfer Blogspot To Website
Consider Your Readers:
It's totally necessary that you just take these individuals and their desires into thought when you faucet on your keyboard. try to relinquish them precisely what they are probing for. If true concerns it, be willing to travel that additional mile simply to confirm that you're going to be ready to satisfy them. These are the most effective things that you just will do to form positive that your diary can leave a long-lasting mark on the minds of those individuals.
Try For Excellence:
Don't accept mediocre diary posts. Also, certify that what you will provide to your guests is ideal -- they merit nothing less. ceaselessly improve your skills (writing, research, grammar, analytical, and problem-solving skills) and try to induce higher and higher on your craft therefore you'll higher serve your audience.
Related Articles:
Best | Top Blog Marketing Tips Given To Successful Blogger And Free Tips Marketing Your Blog
Best | Latest Blogging Suggestion And Advice For Benefits In Business SEO Professionals
How Optimize Blogger | Website To Increase Or Make Money With Blogging Tricks
Best | Easy Tricks To Monetize Your Blogger Blog With Google Ads Increase CPC | CTR And Earning
Best Ways Make Money With Blogging Through Google And 5 Profitable Work For Home Tips And Tricks
How To Easily Make Money With Affiliate Marketing Blogger
Tricks To Add Simply/Easily/ PayPal Donate Button To Blogger
How Easliy/Simple To Manage Page Layout In Blogger Blogspot
Minggu, 28 Juli 2013
Cara Membuat Efek Pelangi pada Foto dengan Adobe Photoshop
Okeh sahabat mazinu! Kali ini mazinu akan berbagi tutorial kepada kalian mengenai cara membuat efek pelangi pada foto atau gambar, emmhh kalian tahu pelangi kan? pelangi itu yang ada dilangit itu loh,, yang biasanya pelangi muncul setelah hujan di siang hari,, hehehe,, pastinya kalian tahu banget tentang pelangi bukan yang biasanya saat kita TK sering banget nyanyiin lagu pelagi-pelangi alangkah indamu merah kuning hijau dilangit yang biru,, hmmm gak usah kelamaan bahas pelangi, langsung saja mazinu beri tahu caranya membuat efek pelangi di Adobe Photoshop cs3,, intinya tidak harus menggunakan cs3, ps yang lainnyapun juga bisa seperti cs1 cs2 cs4 cs5 atau yang masih biasa-biasa saja bisa. Asal kita punya skil dan kemampuan pasti bisa!
Cara Membuat Efek Pelangi pada Foto dengan Adobe Photoshop


Cara Membuat Efek Pelangi pada Foto dengan Adobe Photoshop
- Langkah pertama buka adobe photoshop kalian!
- Buka foto atau gambar kalian menggunakan Photoshop dengan cara menekan tombol Ctrl+O. Setelah itu pilih file foto atau gambar kalian kemudian tekan tombol Open. misal mzinu kasih contoh gambar seperti ini!

- Buat layer baru dengan cara mengklik icon Create New Layer yang terletak di bagian bawah layer palette. untuk mengawali langkah Membuat Efek Pelangi pada Foto!
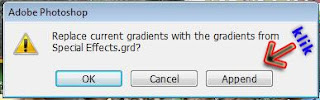
- Tambahkan Gradient Pelangi pd gambar. Klik icon Gradien Tool ( Tekan G) pd icon Toolbox. Kemudian pd options bar, klik pd gradient picker untk memilih gradient pelangi. Akan muncul kotak dialog Gradient Picker. Secara default gradient pelangi tidak ada pd gradient picker. Jadi kita harus menambahkannya. Pd kotak dialog gradient editor, klik tkalian panah kecil pd kotak preset untk menambahkan gradien pelangi. Pilih menu Special Effects.

- Akan muncul pesan untk menimpa (replace) gradient yg ada atau hanya menambahkan gradient baru. Kemudian langkah Membuat Efek Pelangi pada Foto selanjutnya yaitu Klik Append untk menambahkan gradient pelangi pd gradient picker.

- Kemudian langkah Membuat Efek Pelangi pada Foto yaitu klik thumbnail gradient pelangi untuk menggunakannya! Di Option Bar pilih Radial Gradient. Lihat gambar dibawah ini :
- Pada foto kalian Drag mouse secara horizontal. Dri kanan ke kiri atau dri kiri ke kanan sesuai dengan efek pelangi yg kalian inginkan. Maka hasilnya foto akan seperti ini :

- Kemudian Hapus sebagian warna pelanginya! yang hasilnya nanti jadi seperuh seperti ini:

- Kemudian setelah posisi pelanginya sudah sesuai dengan selera kalian, kemudian atur Fill menjadi 50% atau terserah kalian.
- Setelah Fill pelanginya kalian kurangi maka hasilnya pelangi akan telihat lebih nyata! Seperti punya mazinu ini! Pelanginya kelihatan nyata, tapi terlihat boongnya kalau pada gambar ini! Heehehe.

Yah itu barusan Tutorial Adobe Photoshop yang sudah mazinu posting, semoga dengan Tutorial Cara Membuat Efek Pelangi pada Foto dengan Adobe Photoshop ini bisa membantu kalian dan mempercantik foto kalian tentunya. Semoga bermanfaat!
Cara Merubah Kata yang Banyak dengan Satu Langkah di Microsoft Office Word
Hay sahabat mazinu? sekarang saya akan menuliskan tutorial Microsoft Office word yaitu cara Merubah kata atau kalimat yang cukup banyak dengan cepat dalam satu kali langkah. Bagaimana maksudnya? Maksudnya apabila kalian sudah menuliskan sebuah artikel atau diskripsi yang cukup banyak kalian bisa mengubahnya pada satu atau dua kata yang salah dengan cepat tanpa harus mencari atau membaca hasil ketikan kita. Yuk langsung saja +mazinu mazure berikan tutorialnya!
Cara Merubah Kata yang Banyak dengan Satu Langkah di Microsoft Office Word

Yah begitulah Cara Merubah Kata yang Banyak dengan Satu Langkah di Microsoft Office Word. Semoga bermanfaat bagi kalian!
Cara Merubah Kata yang Banyak dengan Satu Langkah di Microsoft Office Word
- Pertama buka lembar kerja Microsoft Office Word 2007 kalian.
- Kemudian di Menu Home pilihlan Replace atau bisa tekan CTRL+H
- Maka akan muncul tampilan seperti ini :

- Keterangan gambar : Pada "Find what" tuliskan kata atau kalimat yang akan kalian rubah.
Pada "Replace with" tuliskan kata atau kalimat sebagai penggati kata/kalimat yang akan dirubah! - Kemudian klik Replace All
Yah begitulah Cara Merubah Kata yang Banyak dengan Satu Langkah di Microsoft Office Word. Semoga bermanfaat bagi kalian!
Best Social Sharing Tool Box With Share Post Count Below Every Blog Post
In this tutorial i will show you how to Add Cool Shareaholic Sharing Icon below every article in blogger and which also tell how many time post is share on Social Media or Social Sites.
Now i am going to tell how to Add this on your blog posts. If you have already adding Social Sharing Widget/Gadget on blogger then remove it and replace with this widget because it is very simple show able and also occupies less space comparatively to other sharing widgets. It is a tool tips with Hover Effect means when some one place mouse on these icons its rises and also shows the sharing number of posts on social websites.
WordPress Best | Easy Plugins Installation List For SEO And Make Professional Wesbite After Blogger
Add | Changes Labels Or Tags With CSS Button Beautiful Color With Hover Effect
Add 6 Best | Beautiful | Cool Looking Social Bookmarking Sharing Buttons Widget | Gadget On Blogger Blogspot
When you find this above code then copy below coding and paste it just above/before ]]></b:skin> tag.
Now find another code in your template for adding Social Icons on below post or Footer of your blogger blogspot.
When you find this code line then copy below given code and paste below this above code.
Replace Red Highlighted Color my twitter page with your Twitter page by replacing name.
Now Save your template.
Click on view blog.
And you have done.
If you feel any problem about this widget or other gadgets for adding in your blog then submit your comment and get a beautiful and helpful answer.
 |
| Best Social Sharing Tool Box With Share Post Count Below Every Blog Post |
WordPress Best | Easy Plugins Installation List For SEO And Make Professional Wesbite After Blogger
Add | Changes Labels Or Tags With CSS Button Beautiful Color With Hover Effect
Add 6 Best | Beautiful | Cool Looking Social Bookmarking Sharing Buttons Widget | Gadget On Blogger Blogspot
How To Add Shareaholic Sharing Icon on Blogger:
Follow my below tutorial and do same as my posts tell.
Go to Blogger.com.
Go to Template.
Click On Edit HTML.
Press Ctrl+F in HTML Body Box.
When search box is appear in right to corner then paste below code/tag in it and press enter.
]]></b:skin>
When you find this above code then copy below coding and paste it just above/before ]]></b:skin> tag.
div.shr-bookmarks{margin:20px 0 8px;clear:both !important;display:block !important}div.shr-bookmarks ul.shr-socials{width:100% !important;margin:0 !important;padding:0 !important;float:left !important}div.shr-bookmarks ul.shr-socials{background:transparent none !important;border:0 none !important;outline:0 none !important}div.shr-bookmarks ul.shr-socials li{display:inline !important;float:left !important;list-style-type:none !important;padding:0 !important;height:29px !important;width:60px !important;cursor:pointer !important;margin:3px 0 0 !important;background-color:transparent !important;border:0 none !important;outline:0 none !important;clear:none !important}div.shr-bookmarks ul.shr-socials li:before,div.shr-bookmarks ul.shr-socials li:after,div.shr-bookmarks ul.shr-socials li a:before,div.shr-bookmarks ul.shr-socials li a:after{content:'' !important;}div.shr-bookmarks ul.shr-socials a,div.shr-bookmarks ul.shr-socials a:hover{display:block !important;width:60px !important;height:29px !important;text-indent:-9999px !important;background-color:transparent !important;text-decoration:none !important;border:0 none !important}div.shr-bookmarks ul.shr-socials a:hover,div.shr-bookmarks ul.shr-socials li:hover{background-color:transparent !important;border:0 none !important;outline:0 none !important}.shareaholic-show-on-load{display: block !important;}div.shr-bookmarks div.shr-getshr{line-height:20px !important;padding-left:8px !important;float:left !important;}div.shr-bookmarks div.shr-getshr a{width:auto !important;font-size:10px !important; text-indent:0px !important;text-decoration:none !important;}div.shr-count{font:12px bold,arial !important;position: relative !important;}div.shr-count-outline{position: absolute !important;color: white !important;}div.shr-count-center{position: absolute !important;color: blue !important;}li.shr-2{background-position:-120px bottom !important}li.shr-2:hover{background-position:-120px top !important}li.shr-3{background-position:-180px bottom !important}li.shr-3:hover{background-position:-180px top !important}li.shr-5{background-position:-300px bottom !important}li.shr-5:hover{background-position:-300px top !important}li.shr-7{background-position:-420px bottom !important}li.shr-7:hover{background-position:-420px top !important}li.shr-10{background-position:-600px bottom !important}li.shr-10:hover{background-position:-600px top !important}li.shr-38{background-position:-2280px bottom !important}li.shr-38:hover{background-position:-2280px top !important}li.shr-40{background-position:-2400px bottom !important}li.shr-40:hover{background-position:-2400px top !important}li.shr-43{background-position:-2580px bottom !important}li.shr-43:hover{background-position:-2580px top !important}li.shr-52{background-position:-3120px bottom !important}li.shr-52:hover{background-position:-3120px top !important}li.shr-74{background-position:-4440px bottom !important}li.shr-74:hover{background-position:-4440px top !important}li.shr-88{background-position:-5280px bottom !important}li.shr-88:hover{background-position:-5280px top !important}li.shr-106{background-position:-6360px bottom !important}li.shr-106:hover{background-position:-6360px top !important}li.shr-201{background-position:-12060px bottom !important}li.shr-201:hover{background-position:-12060px top !important}li.shr-219{background-position:-13140px bottom !important}li.shr-219:hover{background-position:-13140px top !important}
Shareaholic
Shareaholic
Now find another code in your template for adding Social Icons on below post or Footer of your blogger blogspot.
<div class='post-footer'>
When you find this code line then copy below given code and paste below this above code.
<b:if cond='data:blog.pageType == "item"'> <div class='shr_class shareaholic-show-on-load'> </div> <script type='text/javascript'> var SHRSB_Settings = {"shr_class":{"src":"http://www.shareaholic.com/media/css/styles/sb","link":"","service":"5,7,2,38,3,219,43,52,201,88,74,10,106,45,40,210,78,39","apikey":"6ffe2cbf142c45bd4cd03b01ec46b8658","localize":true,"shortener":"google","shortener_key":"","designer_toolTips":true,"twitter_template":"Some fancy post title - http://goo.gl/dbqlx via @trickofblogging"}}; </script> <script type='text/javascript'> (function() { var sb = document.createElement("script"); sb.type = "text/javascript";sb.async = true; sb.src = ("https:" == document.location.protocol ? "https://dtym7iokkjlif.cloudfront.net" : "http://cdn.shareaholic.com") + "/media/js/jquery.shareaholic-publishers-sb.min.js"; var s = document.getElementsByTagName("script")[0]; s.parentNode.insertBefore(sb, s); })(); </script><a href='http://trickofblogging.blogspot.com/' target='_blank'>Social Bookmarking Gadget</a></b:if>
Replace Red Highlighted Color my twitter page with your Twitter page by replacing name.
Now Save your template.
Click on view blog.
And you have done.
If you feel any problem about this widget or other gadgets for adding in your blog then submit your comment and get a beautiful and helpful answer.
Related Articles:
Sabtu, 27 Juli 2013
Kata-kata Mutiara tentang Renungan dan Usaha
Hay sahabta mazinu? ini mazinu akan memberikan Kata-kata Mutiara kepada kalian tentang Renungan dan Usaha. Silahkan disimak Kata-kata Mutiara tentang Renungan dan Usaha dibawah ini!

Okeh saya rasa cukup Kata-kata Mutiara tentang Renungan dan Usaha ini yang bisa mazinu berikan kepada kalian. Semoga bermanfaat!
- Merenung dlam satu menit, dapat menyelamatkan hidup kita dlam satu hari.
- Visi tnpa eksekusi merupakn sebuah lamunan, tapi eksekusi tnpa misi merupakn sebuah mimpi buruk.
- Jenius adalah orang yg bisa membuat hal rumit menjadi terlihat sederhana.
- Jangan katakn: Wahai Tuhan, aku memiliki masalah besar, tapi kataknlah: Hei masalah, aku memiliki Tuhan yg maha besar.
- Dlam melakukan sesuatu kita tidak harus menjadi seorang ahli, karena keahlian itu akn datang ketika kita melakukannya.
- Lebih baik dibenci karena menjadi diri sendiri, daripada harus disukai tapi menjadi orang lain.
- Salah satu ciri dari orang yg pandai adalah orang yg mampu memanfaatkan mimpinya menjadi hal yg lebih berguna untuk orang lain.
- Setiap cerita pasti memiliki akhir, tapi dlam kehidupan akhir merupakn sebuah awal yg baru.
- Setiap orang mencoba untuk mencapai hal besar, tnpa menyadari bahwa kehidupan merupakn kumpulan dari titik-titik kecil.
- Berusalah untuk tidak menjadi seorang manusia yg berhasil tapi menjadi manusia yg berguna.
- Belajar memang hal yg melelahkan, tapi akn lebih lelah jika kelak nanti saat ini tidak belajar.
Okeh saya rasa cukup Kata-kata Mutiara tentang Renungan dan Usaha ini yang bisa mazinu berikan kepada kalian. Semoga bermanfaat!
How to Remove Attribution Gadget on Blogspot
Attribution gadget is a blogger identity button that usually added on the bottom of the page with text Powered by Blogger. Sometimes when you download free blogspot template they have it. You can keep it if you want, but if you want to remove it follow this easy blogspot tutorial for beginner below:1. Log in to your blogger dashboard, and choose TEMPLATE.2. Now on your template box, search ( Ctrl
Tarif JNE Jasa Pembuatan Toko Online WP2

Update informasi Jasa pembuatan toko online wordpress dengan fitur perhitungan otomatis biaya pengiriman JNE keseluruh kecamatan di Indonesia. Sebagaimana yang kita ketahui bahwa pada awal tahun 2013 yang lalu bahwa tarif untuk jasa kirim JNE terdapat kenaikan, ini berdampak kepada toko online yang masih menggunakan data tarif jne lama. karena kenaikannya signifikan maka tentunya tarif lama harus segera diperbaharui dengan tarif JNE yang baru.
Untuk paket toko online wordpress Kangroes khususnya WP2 yang menggunakan fitur otomatis tarif pengiriman JNE, fitur ini menggunakan script khusus yang dibenamkan dalam database toko online dan tidak memakai script widget cek tarif/resi JNE dari pihak ke-3. Sampai saat ini sudah sekitar 11 kota yang tersedia diantaranya:
- Bandung
- Batam
- Bekasi
- Jakarta
- Jogjakarta
- Malang
- Padang
- Pekanbaru
- Purwokerto
- Semarang
- Surabaya
Note: data pengiriman di breakdown per-kecamatan di seluruh Indonesia.
Jadi untuk Anda yang berdomisili 11 kota di-atas bisa segera menggunakan jasa kami dalam desain atau pembuatan toko online dengan cms wordpress.
- Demo dalam pengecekan ongkos kirim di-dalam toko online WP2:
http://www.tokowpkangroes.com/cek-ongkos-kirim - Demo untuk perhitungan otomatis melalui pembelian kantong belanja bisa Anda coba sendiri di demo toko online WP2 dengan tahapan:
Memilih barang via fitur shopping chart > input data pengiriman barang > Invoice > kirim form order ke admin web.
Selain paket toko online WP2, Anda juga bisa memilih mempertimbangkan paket toko online wordpress WP1 yang fitur-fiturnya sudah diperbaharui.
Demikian informasi jasa pembuatan toko online kali ini, jangan ragu untuk segera menghubungi kami melalui:
Telp/SMS: 085715950615, 088211457172 - pin BB: 3145DBEC, Email: buatblog89@yahoo.co.id
Telp/SMS: 085715950615, 088211457172 - pin BB: 3145DBEC, Email: buatblog89@yahoo.co.id
Jumat, 26 Juli 2013
Cara Mencari Kata dengan Cepat di Microsoft Office Word
Okeh pada kesempatan hari ini mazinu akan postingkan kepada kalian khususnya sahabat mazinu yang saya cintai. Saya akan posting mengenai Cara Mencari Kata atau kalimat dengan Cepat di Microsoft Office Word 2007, yang mungkin bisanya kita sudah ngetik anyak tapi kita bingung ingin cari kata, kalimat atau tulisan yang ingin kita cari. Nahh ini solusinya mazinu akan memberikan tipsnya! Silahkan disimak!
Cara Mencari Kata dengan Cepat di Microsoft Office Word

Semoga Cara Mencari Kata dengan Cepat di Microsoft Office Word ini bermanfaat bagi kalian yang sudah ngetik buanya tapi kesusahan mencari 1 kata yang entah tak tahu kemana! Sukses!
Cara Mencari Kata dengan Cepat di Microsoft Office Word
- Langkah pertama seperti biasanya buka Ms. Word 2007 kalian.
- Kemudian pada Menu HOME silahkan kalian pilih Find yang terletak di samping paling kanan!
- Maka akan muncul seperti ini :

- Jika sudah muncul seperti gambar di atas,, ketikkan kata/kalima yang akan kamu cari,, maka dalam sekejap langsung ketemu deh,, tanpa baca dari awal hingga akhir!
Semoga Cara Mencari Kata dengan Cepat di Microsoft Office Word ini bermanfaat bagi kalian yang sudah ngetik buanya tapi kesusahan mencari 1 kata yang entah tak tahu kemana! Sukses!
Kata-kata Mutiara tentang Sahabat
Hay Sahabat mazinu? nih mazinu akan postingkan Kata-kata Mutiara kepada kalian tentang Sahabat,, nih langsung saja mazinu berikan!
Kata-kata Mutiara tentang Sahabat
Okey,, itu tadi Kata-kata Mutiara tentang Sahabat yang sudah +mazinu mazure posting untuk kalian sahabat-sahabatku,, semoga bermanfaat!
Kata-kata Mutiara tentang Sahabat
- Sahabat merupakan seseorg yg selalu ada di sampingmu, sabar mendengarkan keluh kesahmu, dan bersedia untk selalu menemani menjalani hidup
- Pikirkan apapun yg saat ini kamu ucapkan, karena setiap ucapan yg akan keluar dari mulutmu, itu tidak akan bisa ditarik kembali.
- Org yg mengetahui dirinya berdusta, maka ia tidak akan percaya terhadap org yg jujur.
- Sahabat yg sejati dan setia, nilainya lebih dari semua emas yg ada di dunia ini.
- Bahagia bukan berarti sempurna segalanya, tapi bahagia adalah ketika kamu memutuskan untk melihat semua secara sempurna.
- Mereka yg berani bertindak seringkali didatangi kesuksesan, tapi mereka yg penakut dan tidak berani mengambil konsekuensi jarang dihinggapi kesuksesan.
- Hidup itu seperti sebuah drama, kamu hanya tinggal memilih menjadi pemain atau menjadi penonton.
- Tidak ada rahasia untk mencapai kesuksesan. Sukses itu terjadi karena adanya persiapan, kerja keras dan mau belajar dari kegagalan.
- Kebanggan terbesar adalah bukan karena kita tidak pernah gagal, tapi disaat kita bangkit setelah kita terjatuh.
- Kita diberikan satu lidah, namun kita juga diberikan dua telinga agr kita bisa mendengar dua kali lebih banyak dibandingkan berbicara.
- Jangan mengingat kebaikan yg pernah kita lakukan, tapi ingatlah kebaikan yg org lain pernah lakukan kpda kita.
- Banyak org mengatakan bahwa kesempatan hanya datang satu kali. Itu tidak benar, kesempatan akan selau datang asal kita siap untk menanggapinya.
- Sahabat yg baik pasti tidak akan meminta sahabatnya menjadi org lain, sahabat yg baik akan menerima sahabatnya apa adanya.
- Manusia tidak dirancang untk gagal, tapi manusia sendirilah yg merancang suatu kegagalan.
Okey,, itu tadi Kata-kata Mutiara tentang Sahabat yang sudah +mazinu mazure posting untuk kalian sahabat-sahabatku,, semoga bermanfaat!
Publish Blogger | Website Posts On Facebook | Twitter | LinkedIn | Tumblr Other Social Sites Automatically
In this tutorial i will show you how to Automatically Publish our Blog posts or Website posts on different Social Sites using simple best tricks. If you are not regularly updated your blog post on many of social sites or not share your blog post link on social sites due to less time in your busy life then follow this tutorial and save your time a also share your post on all social site just on click after publishing your post on blogspot or website. And if you can't share your blog post links on social sites then i think you loss a massive traffic from these social sites because social sites are also a big source of too much traffic.
Social Media or Social Sites plays an important role to improve blogger or website SEO. If you have a lot of Subscriber on your social sites account then use this automatically publish posts gadget and get massive traffic from these social sites and improve your ranking in Google Search Engine because Google also like those sites which have more backlinks on other popular or social sites and they also index your blog in search engine quickly and your blog get a lot of organic traffic through these tricks also. For doing this i am going to give you this trick how to use it and publish your posts on different social sites account.
How Use Social Website To Increase Your Website Traffic
Best Blogging Suggestion | Advice For Benefits In Business SEO Professionals
dlvr.it is the best service to publish automatically posts on different social sites and it also free of costs. I am also use this service and feel good. It is also very easy to setup.
 |
| Publish Blogger | Website Posts On Facebook | Twitter | LinkedIn | Tumblr Other Social Sites Automatically 1 |
How To Publish Post Automatically On Different Sites:
Follow below tutorial and done easily without having problem.
Go to divr.it.
After reaching on this website same above first page is shown.
Give your any Email Address and the Strong Password also and click on Signup Button.
Then this type of page is appear on your screen.
 |
| Publish Blogger | Website Posts On Facebook | Twitter | LinkedIn | Tumblr Other Social Sites Automatically 2 |
1) Automatically Publish Post On Twitter:
Here you give your blog link or blog address and click on Next button.
When you press Next button Social Icon Page is highlighted.
Click on Twitter Icon.
And give your account Authorization Access.
 |
| Publish Blogger | Website Posts On Facebook | Twitter | LinkedIn | Tumblr Other Social Sites Automatically 3 |
Give your Twitter account Email Address and Password.
Then Click on Authorize App blue button.
When you Press button your blog posts are automatically publish on twitter when you publish your post in blogger same as Google Plus sharing.
How I Can Use Crawlers And Indexing Tool In Blogger
How To Make Backlinks To Other Website To Increas Page Rank
2) Automatically Publish Post On Facebook:
Back To Front Page and Click on Facebook Icon.
Give your Facebook Account Email Address or Fan Page or your blog.
 |
| Publish Blogger | Website Posts On Facebook | Twitter | LinkedIn | Tumblr Other Social Sites Automatically 4 |
Also give authorization to Facebook.
And Done.
Now you can repeat this process for all social sites and done easily.
You can also publish your post on LinkedIn or Tumblr.
3) Automatically Publish Post On LinkedIn:
Come Back on front page and click on LinkedIn Icon.
Also give the LinkedIn Account Email or Password.
When you give Email Address then click on blue button Allow Access shown in picture below.
 |
| Publish Blogger | Website Posts On Facebook | Twitter | LinkedIn | Tumblr Other Social Sites Automatically 5 |
When you press Allow Access button your blog posts also automatically publish on LinkedIn Profile.
4) Automatically Publish Post On Tumblr:
Now do same above tutorial and Click on Tumblr Icon.
Give your Tumblr Account Email or Password and press on login and give access.
Now your work is done.
Do same as last icon i can not give you detail more because this post is already too much long and i am also tired. If you face any problem then don't forget to comment me and use contact us page for better answer.
Related Articles:
Kamis, 25 Juli 2013
Kata-kata Mutiara tentang Kehidupan dan Kegagalan Manusia
Sahabat mazinu yang ingin mencari Kata-kata Mutiara, disini +mazinu mazure memberikan Kata-kata Mutiara tentang Kehidupan dan Kegagalan Manusia yang semoga bermnafaat untuk kalian!
Kata-kata Mutiara tentang Kehidupan dan Kegagalan Manusia
Yah, itu tadi Kata-kata Mutiara tentang Kehidupan dan Kegagalan Manusia yang bisa saya posting, semoga dengan kata-kata mutiara diatas bisa bermanfaat untuk kalian!
Kata-kata Mutiara tentang Kehidupan dan Kegagalan Manusia
- Hidup memang tak selalu seperti yg anda mau, hal buruk dan baik selalu terjadi, namun semua itu telah diatur oleh Tuhan dgan akhir yg indah.
- Setiap org memiliki masalah, lebih baik cari solusi untuk masalahmu sendiri, jangan membandingkan dgan masalah org lain.
- Menjadi manusi yg terbaik adalah org yg memberikan manfaat bagi org lain.
- Kegagalan merupakan suatu pengalaman, jangan pernah takut untuk gagal, karena kita bisa belajar darinya.
- Pakaian merupakan topeng manusia, perilaku merupakan wujud sebenarnya.
- Menolong dgan cara menutupi sebuah kebohongan sama saja dgan melakukan kebohongan itu sendiri.
- Jika kita belum matang untuk dikritik, berarti kita terlalu muda untuk dipuji.
- Menjadi lilin berarti memberikan cahaya bagi org lain dan membiarkan diri kita sendiri ternakar.
- Jangan membenci mereka yg mengatakan hal buruk untuk menjatuhkanmu, karena merekalah yg membuatmu setiap hari semakin kuat.
- Kekuatan tidk bisa menjaga perdamaian, perdamaian hanya bisa diraih dgan saling pengertian.
- Kesedihan hanyalah lembaran buram yg ada dalam sebuah buku kehidupan, yg harus dilakukan adalah membuangnya dan menggantinya dgan lembaran baru.
- Salah satu hal yg terbaik adalah melihat senyuman di wajah org tuamu, dan menyadari bahwa kamulah alasan mereka tersenyum.
- Jangan berharap pada jalan pintas untuk mendapatkan kesuksesan yg bertahan lama.
- Menertawakan masalah org lain itu merupakan hal yg sangat mudah, tapi menertawakan masalahmu sendiri? Itu hanya org hebat yg bisa.
- Jangan menghina barang yg bentuknya kecil, jarum yg kecil saja bisa menumpahkan darah.
Yah, itu tadi Kata-kata Mutiara tentang Kehidupan dan Kegagalan Manusia yang bisa saya posting, semoga dengan kata-kata mutiara diatas bisa bermanfaat untuk kalian!
2 Cara Membuat Tombol Back To Top Terbaik di Blog
Hay sahabat +mazinu mazure ! Kali ini mazinu akan berbagi tentang cara membuat Tombol Back To Top atau lebih dikenal dengan Tombol Kembali Ke atas, yaa jadi fungsinya memasang back to top button itu agar pengunjung bisa langsung menuju ke atas dalam sekali klik. Nahhh langsung saja mazinu kasih tips dan caranya membuat tombol back to top.

Cara Membuat Tombol Back To Top Terbaik
Tombol Back To Top yang Pertama
*) kode yang berwarna biru ganti dengan kata-kata yang ingin ditampilkan
*) kode yang berwarna ungu ganti dengan url gambar yang ingin ditampilkan
Tombol Back To Top yang kedua

Untuk ditempatkan di pojok kanan bawah silahkan taruh script dibawah ini tepat dibawah code </body> di Template - Edit HTML kalian,,
<script src='http://bloggerpeer.googlecode.com/files/backtotop.js' type='text/javascript'/>
<!-- Back to top designed by Mazinu Mazure - mazinubersahabat.blogspot.com -->
<a href='#' style='display:scroll;position:fixed;bottom:5px;right:5px;' title='Back to Top'><img onclick='MGJS.goTop();return false;' src='http://png-1.findicons.com/files/icons/2166/oxygen/48/arrow_up.png'/></a>
Okeh, Itu tadi cara membuat tombol Back To Top yang sudah mazinu berikan untuk kalian, semoga dengan kalian memasang tombol back to top di blog kalian menjadi keren dan tampil terbaik.
Tombol Back To Top yang Pertama
- Login terlebih dahulu ke akun blog kalian
- Masuk ke bagian layout / tata letak
- Tambah gadget
- Pilh add HTML / Java script
- Lalu simpan kode dibawah ini :
<a href='#' style='display:scroll;position:fixed;bottom:15px;right:15px;' title='Back to Top'><img src='https://blogger.googleusercontent.com/img/b/R29vZ2xl/AVvXsEhI_-xVK8qcjjMVasz_oVudC_aYm3yQDTCIyAhltG1433dn0u9p0V8ovETffe8nxnMRucqzq0ty2RtZI6PKmr6mSply2sqppsdPM44UVUYHdzlI633MIpUGfLGO5qmSkhFkgF32-pdaeASI/s1600/navigate-up-icon.png'/></a>
*) kode yang berwarna biru ganti dengan kata-kata yang ingin ditampilkan
*) kode yang berwarna ungu ganti dengan url gambar yang ingin ditampilkan
- Klik "Save", dan selesai.
Tombol Back To Top yang kedua
- Pertama masuk ke Blogger lalu pilih Layout terus Add a Gadget dan tambahkan HTML/JavaScript. Terus copy kode di bawah ini:
<script type="text/javascript" src="http://ajax.googleapis.com/ajax/libs/jquery/1.3.2/jquery.min.js"></script>
<script type="text/javascript" >
var scrolltotop={
//startline: Integer. Number of pixels from top of doc scrollbar is scrolled before showing control
//scrollto: Keyword (Integer, or "Scroll_to_Element_ID"). How far to scroll document up when control is clicked on (0=top).
setting: {startline:100, scrollto: 0, scrollduration:1000, fadeduration:[500, 100]},
controlHTML: '<img src="https://blogger.googleusercontent.com/img/b/R29vZ2xl/AVvXsEhWfyVmocUM17BG6mbiKDFEAoQ8cB29WrXoOrCQdVdkTvMxfJvC6OD8KTrXa8Hj3liIk1ERtL_21-atcbAOn7W9yrp26X3rQ4jD3QJ1pcs9BPvKup87l33QYkqqUV_lF7zu7XXKGIgxLKTD/s1600/back+to+top10.gif" />', //HTML for control, which is auto wrapped in DIV w/ ID="topcontrol"
controlattrs: {offsetx:5, offsety:5}, //offset of control relative to right/ bottom of window corner
anchorkeyword: '#top', //Enter href value of HTML anchors on the page that should also act as "Scroll Up" links
state: {isvisible:false, shouldvisible:false},
scrollup:function(){
if (!this.cssfixedsupport) //if control is positioned using JavaScript
this.$control.css({opacity:0}) //hide control immediately after clicking it
var dest=isNaN(this.setting.scrollto)? this.setting.scrollto : parseInt(this.setting.scrollto)
if (typeof dest=="string" && jQuery('#'+dest).length==1) //check element set by string exists
dest=jQuery('#'+dest).offset().top
else
dest=0
this.$body.animate({scrollTop: dest}, this.setting.scrollduration);
},
keepfixed:function(){
var $window=jQuery(window)
var controlx=$window.scrollLeft() + $window.width() - this.$control.width() - this.controlattrs.offsetx
var controly=$window.scrollTop() + $window.height() - this.$control.height() - this.controlattrs.offsety
this.$control.css({left:controlx+'px', top:controly+'px'})
},
togglecontrol:function(){
var scrolltop=jQuery(window).scrollTop()
if (!this.cssfixedsupport)
this.keepfixed()
this.state.shouldvisible=(scrolltop>=this.setting.startline)? true : false
if (this.state.shouldvisible && !this.state.isvisible){
this.$control.stop().animate({opacity:1}, this.setting.fadeduration[0])
this.state.isvisible=true
}
else if (this.state.shouldvisible==false && this.state.isvisible){
this.$control.stop().animate({opacity:0}, this.setting.fadeduration[1])
this.state.isvisible=false
}
},
init:function(){
jQuery(document).ready(function($){
var mainobj=scrolltotop
var iebrws=document.all
mainobj.cssfixedsupport=!iebrws || iebrws && document.compatMode=="CSS1Compat" && window.XMLHttpRequest //not IE or IE7+ browsers in standards mode
mainobj.$body=(window.opera)? (document.compatMode=="CSS1Compat"? $('html') : $('body')) : $('html,body')
mainobj.$control=$('<div id="topcontrol">'+mainobj.controlHTML+'</div>')
.css({position:mainobj.cssfixedsupport? 'fixed' : 'absolute', bottom:mainobj.controlattrs.offsety, right:mainobj.controlattrs.offsetx, opacity:0, cursor:'pointer'})
.attr({title:'Scroll Back to Top'})
.click(function(){mainobj.scrollup(); return false})
.appendTo('body')
if (document.all && !window.XMLHttpRequest && mainobj.$control.text()!='') //loose check for IE6 and below, plus whether control contains any text
mainobj.$control.css({width:mainobj.$control.width()}) //IE6- seems to require an explicit width on a DIV containing text
mainobj.togglecontrol()
$('a[href="' + mainobj.anchorkeyword +'"]').click(function(){
mainobj.scrollup()
return false
})
$(window).bind('scroll resize', function(e){
mainobj.togglecontrol()
})
})
}
}
scrolltotop.init()
</script>
- Ganti Kode warna Pink dengan URL Gambar kalian!
- Kalau Tidak Mau ganti Tidak apa-apa, itu juga sudah bagus kok,, yang nantinya hasilnya seperti ini :
- Keren bukan? Jika sudah. Simpan!
Untuk ditempatkan di pojok kanan bawah silahkan taruh script dibawah ini tepat dibawah code </body> di Template - Edit HTML kalian,,
<script src='http://bloggerpeer.googlecode.com/files/backtotop.js' type='text/javascript'/>
<!-- Back to top designed by Mazinu Mazure - mazinubersahabat.blogspot.com -->
<a href='#' style='display:scroll;position:fixed;bottom:5px;right:5px;' title='Back to Top'><img onclick='MGJS.goTop();return false;' src='http://png-1.findicons.com/files/icons/2166/oxygen/48/arrow_up.png'/></a>
Okeh, Itu tadi cara membuat tombol Back To Top yang sudah mazinu berikan untuk kalian, semoga dengan kalian memasang tombol back to top di blog kalian menjadi keren dan tampil terbaik.
CARA MEMBUAT MENU VERTIKAL DI BLOGGER
Cara Membuat Menu Vertikal Di Blogspot
Cara Membuat Menu Vertikal Di Blogspot | Iseng gak ada ide buat bikin posting hari ini, jadi saya langsung menuju blognya Bloggertrix dan sempat menemukan satu artikel tentang cara membuat menu vertikal keren untuk blogger , dan setelah saya teliti ternyata menu vertikal ini cukup elegan dan bagus. dan cocok untuk di pasang yang template blognya ada 2 sampe 3 kolom. kalau untuk scriptnya saya rasa tidak akan membuat blog jadi LOLA (Loading Lama) karna script css-nya tidak banyak, Untuk demo saya hanya bisa berikan gambarannya di bawah ini : Apa yang anda pikirkan setelah melihat demo nya, penasaran untuk segera memasangnya silahkan ikuti langkah di bawah ini.

1. Login Blogger
2. Pilih Tabs "Rancangan"
3. Pilih "Edit HMTL" -> Cek "Expand Widget Template"
4. Cari Kode ]]></b:skin> Kemudian Letakkan kode di bawah ini TEPAT di Atas kode ]]></b:skin>
/* Start Menu Vertikal*/
*{
list-style:none;
margin:0px;
padding:0px;
}
#menu4 {
width: 200px;
border-style: solid solid none solid;
border-color: #D76100;
border-size: 0px;
border-width: 0px;
}
#menu4 li a {
height: 32px;
voice-family: "\"}\"";
voice-family: inherit;
height: 24px;
text-decoration: none;
}
#menu4 li a:link, #menu4 li a:visited {
color: #9E3C02;
display: block;
background: url(https://blogger.googleusercontent.com/img/b/R29vZ2xl/AVvXsEiYJXT7nsoVFGJT-dPvfJ-75HeVJxGdbcyQupf42fc7aBVctNPnvz_obJDOuZFZa-ZriDmbaKLOAmjS-UbGzqzj95v9IH_pjWjHj59Wp0SOUKLyDpGLDcRahHJpj4xoGYOjoauNR6uoLY4/s1600/menu4.gif);
padding: 8px 0px 0px 30px;
}
#menu4 li a:hover {
color: #fff;
background: url(https://blogger.googleusercontent.com/img/b/R29vZ2xl/AVvXsEiYJXT7nsoVFGJT-dPvfJ-75HeVJxGdbcyQupf42fc7aBVctNPnvz_obJDOuZFZa-ZriDmbaKLOAmjS-UbGzqzj95v9IH_pjWjHj59Wp0SOUKLyDpGLDcRahHJpj4xoGYOjoauNR6uoLY4/s1600/menu4.gif) 0 -32px;
padding: 8px 0 0 30px;
}
#menu4 li a:active {
color: #fff;
background: url(https://blogger.googleusercontent.com/img/b/R29vZ2xl/AVvXsEiYJXT7nsoVFGJT-dPvfJ-75HeVJxGdbcyQupf42fc7aBVctNPnvz_obJDOuZFZa-ZriDmbaKLOAmjS-UbGzqzj95v9IH_pjWjHj59Wp0SOUKLyDpGLDcRahHJpj4xoGYOjoauNR6uoLY4/s1600/menu4.gif) 0 -64px;
padding: 8px 0 0 30px;
}
/* End Menu Vertikal*/
5. Klik "Simpan Template"
* Sekarang tinggal Membuat Widget JavaScriptnya
6. Pilih Tabs "Tata Letak" -> Klik "Tambah Gadget"
7. Cari dan Pilih "HTML/JavaScript"
8. Kemudian Masukkan kode di bawah ini pada widget JavaScript
<div id="menu4">
<ul>
<li><a href="#1" title="Home">Home</a></li>
<li><a href="#2" title="About">About</a></li>
<li><a href="#3" title="Services">Services</a></li>
<li><a href="#4" title="Portfolio">Portfolio</a></li>
<li><a href="#5" title="Store">Download</a></li>
</ul>
</div>
Perhatian (Yang Boleh Di Ganti) :
- Ganti Kode #1 sampai #5 dengan URL / Link yang ingin di tuju
- Ganti Kode Warna hijau dengan Judul Link
- Ganti Kode Warna Merah dengan Judul Link
9. Klik "Simpan"
Nah Gampang kan, nah bagi anda yang minat buat bikin menu vertikal ini, tunggu apalagi silahkan terapkan di blog anda. semoga bermanfaat
Sumber : http://zamaprilio.blogspot.com/2013/02/cara-membuat-menu-vertikal-di-blogspot.html
Rabu, 24 Juli 2013
How to Replace Older - Newer Text Link to Image on Blogspot
By default every blogspot template has Older - Newer link in text type. The link will appear on the bottom of the post, leading readers to visit older or newer post. Sometimes readers miss it cos the link is not so eye catching to get people attention to click. But, you can change that by replace the link with image button.
This blogspot tutorial for beginner will show you how to replace older -
This blogspot tutorial for beginner will show you how to replace older -
Cara Memberikan Bingkai Gambar Pada Lembar Kerja Microsoft Office Word
Hay sahabat mazinu semua,, senang sekali hari ini masih bisa berbagi tutorial Microsoft Office word 2007 untuk sahabat +mazinu mazure ,, pada hari ini mazinu akan memberikan tentang bagaimana cara memberikan bingkai di kertas kita yaitu dengan bingkai gambar keren!
Cara Memberikan Bingkai Gambar Pada Lembar Kerja


Okeh itu tadi turial tentang Cara Memberikan Bingkai Gambar Pada Lembar Kerja Microsoft Office Word yang sudah mazinu berikan untuk kalian, Semoga bermanfaat!
Cara Memberikan Bingkai Gambar Pada Lembar Kerja
- Seperti biasa langkah pertama buka Microsoft Office Word 2007 Kalian.
- Jika sudah terbua, silahkan kalian klik menu Page Layout - kemudian pilih Page Borders.
- Untuk Lebih jelasnya lihat gambar dibawah ini!

- Setelah kalian klik Page Borders maka akan muncul seperti ini

- Kemudian Pilihlah gambar yang kalian sukai untuk nantinya dijadikan bingkai,, dan disini mazinu mengambil gambar Apel, maka jadinya nanti seperti ini :

- Selesai!
Okeh itu tadi turial tentang Cara Memberikan Bingkai Gambar Pada Lembar Kerja Microsoft Office Word yang sudah mazinu berikan untuk kalian, Semoga bermanfaat!
Cara Memperlebar dan Memperkecil Sisi Lembar Kerja di Microsoft Office Word
Pada umumnya jika jarak antara samping lembar kerja dan hasil ketikan kita di lembar kerja terlihat terlalu lebar dan jauh menurut +mazinu mazure sangatlah kurang rapih, Nah agar kertas kita terlihat bagus, maka pada lembar kerja microsoft office word 2007 harus diatur agar rapih dan bagus terutama pada sisi-sisinya!
Cara Memperlebar dan Memperkecil Sisi Lembar Kerja
Untuk memperkecil atau memperlebar sisi pada lembar kerja microsoft office word 2007 itu menurut mazinu sangatlah gampang, sebelum mazinu memberikan caranya, ini ada hasil sebelum diperkecil yang masih default ukuran Ms. Word pada umumnya!

Naah Untuk selanjutnya langsung saja mazinu berikan caranya :

Yah, itu tadi tutorial tentang Cara Memperlebar dan Memperkecil Sisi Lembar Kerja di Microsoft Office Word yang sudah mazinu berikan, semoga bermanfaat!
Cara Memperlebar dan Memperkecil Sisi Lembar Kerja
Untuk memperkecil atau memperlebar sisi pada lembar kerja microsoft office word 2007 itu menurut mazinu sangatlah gampang, sebelum mazinu memberikan caranya, ini ada hasil sebelum diperkecil yang masih default ukuran Ms. Word pada umumnya!

Naah Untuk selanjutnya langsung saja mazinu berikan caranya :
- Pertama, Buka Ms. Word 2007 kalian dulu
- Pilih Page Layout kemudian Klik Kotak kecil pada sisi pojok kiri bawah (Page Setup)
- Kemudian nanti akan muncul gambar seperti dibawah ini :

- Gambar diatas menunjukkan ukuran defaul pada umumnya,, Untuk memperkecil atau memperlebar silahkan atur sesuai keinginan kalian,, saran mzinu isikan minimal 1 cm untuk hasil yang rapi dan bagus.
- Keterangan gambar :
Top : Atas
Bottom : Bawah
Right : Kiri
Left : Kanan - Kemudian Klik OK
- Selesai
Yah, itu tadi tutorial tentang Cara Memperlebar dan Memperkecil Sisi Lembar Kerja di Microsoft Office Word yang sudah mazinu berikan, semoga bermanfaat!
Best | Top Blog Marketing Tips Given To Successful Blogger And Free Tips Marketing Your Blog
In this tutorial i will discuss best points which give you better idea of Marketing Your Blog and also Best Tips To Marketing Successful Blogger. Blogger Blogspot is also same thing and when you want to by best Name for your Niche or Blog then first you decide about name to get better results. In my opinion any type of blog but must unique.
Which Website Name Give Best CPC | CTR To Make More Money
Which Website Name Give Best CPC | CTR To Make More Money
First i tell you in my below article words Journal means (Blogger or Blog) for better results means i want to fully optimize my post that's why i not use Blog commonly.
Everyone United Nations agency encompasses a journal desires it to achieve success and even have plenty of internet traffic. you wish your readers to be excited concerning your content so they keep coming to go to. There area unit 3 promoting tips that you just will to try to to to assist you be a booming blogger. To be a booming blogger, you would like to own a RSS Feeds, update on a regular basis and inquire into different relevant blogs.
Marketing Tips And Techniques Using RSS Feed:
When you begin a replacement journal, nobody is aware of concerning it unless you truly provide them the link. you truly ought to do some promoting to let folks grasp that you just exists. There area unit some simple ways in which to induce the word out concerning your new journal. the primary issue you ought to do is about up a RSS feed. you wish to permit RSS feeds to be taken from your journal. RSS feeds area unit a good means for promoting and obtaining your journal out there. you ought to embody a contrivance on your sidebar therefore folks will register for your RSS feed.
Best Ways Make Money With Blogging Through Google 5 Profitable Work
Easy | Best | Simple Tricks To Make Money From Youtube | Chitika
Marketing Tips And Techniques Using Update Journal Often:
The second tip is to update your journal often and on a regular basis. If you've got committed to change your journal daily, then update it daily. The minimum is to form a replacement journal post once every week. If you develop a regular pattern, then your readers can begin to return back to your Website probing for new content. I will tell you from personal expertise that you just have to be compelled to be consistent. If not, you'll be able to begin to lose your audience.
Marketing Tips And Techniques Using Journal Commenting:
 |
How To Make Backlinks To Other Website To Increas Page Rank
Now below is my second part of my article which tell you how to Marketing Your Blog for better optimization or make money.
With many blogs being made each day, it's a mystery to several web loggers a way to build their blog stand out. it's very easy. folks wish to browse effective content, and with smart content arrives ad revenue. Well, perhaps it's not that abundant straightforward. you've got finally loosed the secrets of flourishing web log promoting. Do note that these aren't assured to change of magnitude your click-through ratios and that they won't bestow smart fate to you or your adverts. However, the following pointers ought to gain for your web log and create it additional simply accessible, easy and additional content-modified.
Best | Easy Tricks To Monetize Your Blogger Blog With Google Ads
A web log directory categorizes and organizes blogs in such the way that anyone will verify blogs associated to any topic simply. you'll be able to notice a web log directory with connected keywords or dig broad within the directory to zero in to the category that you just area unit checking out. it's very similar to the web site directories rather like Yahoo! And Dmoz.
Acquiring an inventory in an exceedingly best web log directory ascertains you of a good quantity of subject matter in terms of the exposure that your web log gets. once anybody explores for your connected searches or keyword a category during which you're registered, they're going to notice your web log. you'll further notice a permanent link back to you web log.
Articles promoting area unit what all serious blogger ought to comprise in its promoting strategy. All the tampered web marketers take reward of this vehicle, why? simply since it works and acts upon within the long-term. Beginners usually area unit unconscious of the ability article promoting admits and that is probably why they fall inadequate of properly exploitation it. create a habit of posting a minimum of 2 of your higher written articles every week or each 10-12 days to article directories. you are doing not need to suggests what you've got written already and announce on the web log. If you'd ideally wish to keep your well composed stuff to your web log, no problem, simply retell the data, alter a trifle, and supply it a singular bit.
Optimize Blogger Website To Increase Or Make Money With Blogging Tricks
If you're a little business owner with a web site, the good thanks to change of magnitude your organic traffic is to jot down compelling and fascinating content that's focused towards your target market.
If your content is best, as compare to alternative web sites can after all begin linking to your website. The search engines promptly develop on this and simply offer your web site additional "authority." Higher authority suggests that additional directed free traffic approaching your manner.
This theme involves submitting your computing machine to superior internet directories that review manually every web site. In most of the cases, you'll bear a fee for the reviewing method. many folks can tell you that the Search Engines don't type paid links and devalue them.
Bloggorati.com could be a distinctive web site providing wondrous platform for web log directory submission [Bloggorati.com]. It guarantees to supply large traffic to individual or business blogs. To fancy the many edges of quality web log directory submission and drive organic traffic to a web site, webmasters will visit promoting Your web log [Bloggoratic]
Related Articles:
Ready to Make Money With Adsense Keywords and Blogger
SEO Tips How Keyword Take Your Website On Rank
How Can I Make Earning With My Blogger Blogspot
Best Blogging Suggestion And Advice For Benefits In Business SEO Professionals
Use Language And Formatting | Search Preferences | Setting In Blogger Blogspot
Simplifying The Practice of Blogging With Software
Customise Blogger Default Template To Make Professional Template
Get Google Page Rank With In 1 Month By Simple And Easy Tricks
Langganan:
Postingan (Atom)