Cari Blog Ini

Tampilkan postingan dengan label Tips and Troubleshooting. Tampilkan semua postingan

Rabu, 15 Mei 2013

How To Set | Select | Choose | Change Desire Blog Post Date And Time In Blogger

I am gona show you how to Change or Set Blog Post Date and Time in blogger blogspot. To customize the blog post simply using small tutorial and make blog post beautiful by selecting daily or weekly its up to you. Now if you want to show your blog post with arrangement to make perfect then you use this feature. Publish On feature on right hand side of your post page is for that if you have miss some days or forget to write post then make changes and return back your post on that date which you want.

Setup A Different Date Of Your Blog Post:

In Blogger.com we set date easily. Blogger allow a Blog Administrator or Webmaster to set any publication date for a post which they choose. For setting up there are many reason for set a particular publishing date for a blog post. To keep continuity with  sequence for blog articles we use this feature. You also use this feature if you forget to write a post/articles with sequence or you can decide afterwards to add an extra article to the sequence. When we start blogging on our blog we always forget to make About Author Page in blog and after we decide to set up them. It also take you several years back if you want.

Social Bookmarking Button Add To Blogger
5 Ways How to Make your Blogger Blog Like WordPress Website
How Use Social Website To Increase Your Website Traffic 

Tips And Troubleshooting:


  • I suggest you to setup the About Page Date first because it appears first at the beginning of your RSS feeds.
  • Remember when you are posting with changing date that the post will still appear in your recent posts Rss Feeds even you setup this post date in past.
   

How To Setting Up User Defined Publish Date In Blogger Blogspot:

  1. Create a new post of your blog as usual.
  2. Click on the Published On.
  3. Set your desire Date or Time like below picture/image.
  4. Click on Done Link.
  5. Click Update Orange Button.
  6. And preview your blog post it is list in those post where you want.
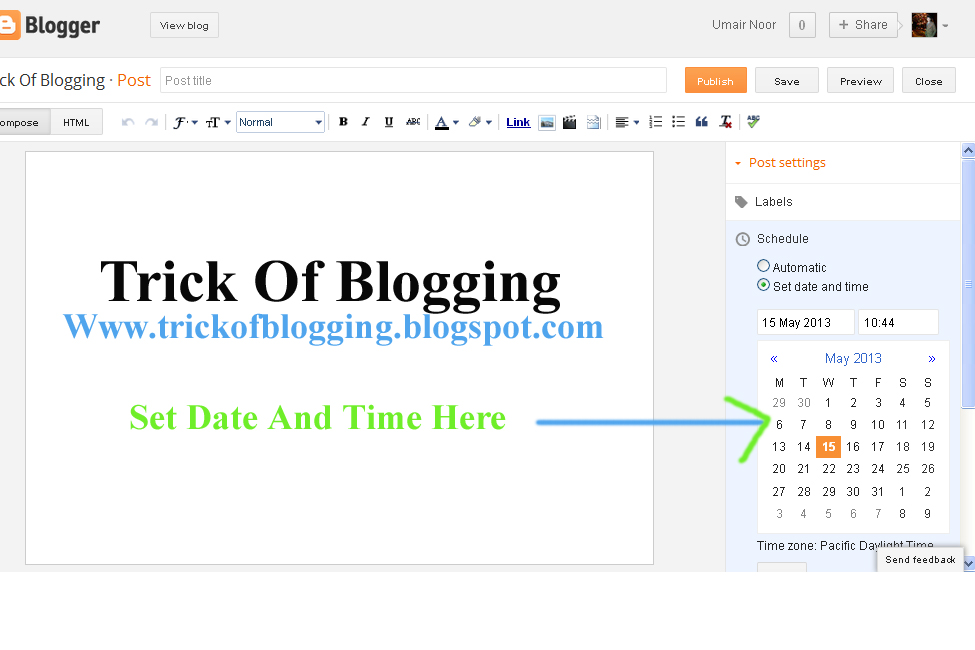
How To Set | Select | Choose | Change Desire Blog Post Date And Time In Blogger
In this post you will learn how to select or changes the desire post date or time. I have also a big and detailed tutorial about how to make money from blog or website, Blogger SEO Tips and Tricks, Alexa Ranking, Google Page Rank, Get Backlinks, Make Internal links, Get lot of visitors on your blog by Search Engine Optimization, Submitting sitemap of blog or website to Google Search Engine or Major Search Engine.


Related Articles:


Rabu, 13 Maret 2013

How I Can Import And Export My Blog To Other Blogspot

In this tutorial i will show you how you can easily import and export you blogger blogspot to other blog. This mean if you have a good content blog and some error is occur in your Blog or Gmail account then how you can make new blog and import your blog to other Gmail. I am going to tell you about in detail which clear your all concepts.

If you have a blog with large and original and good content if you think you can't make blog like this then you export your blog in your computer. If you have face an error with your Gmail account and in your blog then you easily make your blog again like this and no hardworking is required. This thing take only one minute or less to make blog your previous corrupted blog. This tool is very useful in today because we have no an enough time to make free blog and take too much time on our blog. Then this tools is work really so good. If you want to do so then go with me and make your blog in second. I have really glad when a boy comment me he say brother how i can make my blog again which have about 126 posts i am not write again 126 posts. I am so worried because my blog take me error. Then i think and i sit front of my computer screen and start write this post.

How Import And Export Blog To Other Blog:
If you export your blog which you have already make with large amount of post then download your blog and save to your computer and when you make your new blog then import (upload) your blog to the new blog. When you upload your blog then no changes are required your blog show all the dates in which you write your posts and all the tags and description same as your previous blog.

Now Going To Export Your Blog:

Go to Blogger.com.
Go to Setting.
Go to Other.
Go to Blog Tools.
Click Export Blog and download your blog all posts.

When you download your blog then if you want to delete this blog then click delete and if you want not to remove and make new blog on your new Gmail account then ready to make. In the below link you have learn how make perfect and good blog in easy ways.

Make Your Own Free Blog At Blogger.Com
How to Verify My Blogger Blogspot in Webmaster Tools

When you make your blog on new Blogger account then repeat all the above steps and import your blog to click import link. When you importing your blog then you give also the path where you save your xml blog posts data. When you upload your xml file then go to post and check your posts work same as your previous blog. 

Sabtu, 23 Februari 2013

How Can I Make Earning With My Blogger Blogspot

In this tutorial i will tell you how you can make earning with your blog easily. If you have a blog with good content and good look then you make earning easily. Now start our tutorial with some tips.

I am going to tell you about the make earning trick and advertiser which pay more and more. If you have already known about this then you can easily understand my article but if some one not know about these trick then don't worry i will learn you about these trick. We have a lot of method to make earning one of the main and big advertiser is Google itself. We can make a lot of earning with Google Adsense.


What is Google Adsense?
Your Answer is here Google Adsense is the advertiser which pay to publisher to show the ads of Google on your website or a blog also. It is not so easy but if you can achieve this then earning is make automatic like if some one click on your ads which is place on your website or blog then you get earn. In this tutorial i am going to tell you about these trick in detail how to connect with Google Adsense.

How To Get Google Adsense Account:
If you have a blog then paste original content which is written on your hand not copyright content. If you copy the content then it is not indexed by Google Search Engine then you can get organic traffic. Organic traffic is the best way to get Google Adsense Account. For earning and get Google Adsense Account you have put these tips.
                                           
1. Make your blog on Blogger.com.
2. Paste original content on your blog. Copyright content is not approved.
3. Your Blog age is about Six Month old. 
4. After having your blog six month you can eligible for get Google Adsense Account.
5. To get Account go to Blogger.com > Earning >   Click Get Started.
6. Fill Form Select your country then your Payee Name which person is get payment.
7. Perfect Address where Pin Code is send by Google.
8. Click Submit.
9. The message is display on your screen is your application is under review and with in a week. Google tell you about your account is approved or not.
10. Go Back and take rest till you have not receive a mail from Google.

Tips And Troubleshooting:
To Get Google Adsense Account i have some tips for you. When you make a blog then verify your blog in webmaster tools and submit sitemap of your blog for indexing with Google. Make Google Analytic account and add your Google analytic Id in your Blogger.com and Analytic Code in your HTML body. For these tips and trick if have some related article which help you for this.

Related Post:

Google Analytics to a Blogger Blog :
The Most Essential Tools for a Blogger Analytics:
How to Verify My Blogger Blogspot in Webmaster Tools :
Make Money Form Links of Amazon Product to Blogger Posts:
If You want to Increase Google Ranking Then Sitemap of Your Blogger Is Submitt to Major Search Engines :


Selasa, 19 Februari 2013

How To Embeded Live Streaming On My Blog Or Website

In this tutorial i tell you about the live streaming. Live Streaming is the biggest way to make money but it has never been easy. If you are the master in web developing then you become do this. But i will tell the overview of live streaming to embed on blog or website. I am also not a web developer but i do this easily when i check out this. 

Now let's start creating and broadcasting live streaming video on your site is fairly easy to do with embed code from a couple of sites. Livestream or Ustream, two live streaming video sites, allows you to create your own channel and broadcast your live streaming video with a few simple clicks.When you are going to do this you make the account first on these two website.


1. Go on website which is give above.
2. Sign Up for new account.
3. When you make account they asked some question
    about you and your channel. Like name of Your
    Channel.

4. When you Create an account then go to Go To Show
    Page On right side.
5. To Get the embed code.
6. When you grab the live video embed code.
7. Go to your Blogger and sign in.
8. Go to Layout > Add A Gadget.
9. Paste Your code in this box and click save.
10. Now view blog your live streaming is now working.

Tips and Troubleshooting:
If your live streaming video is not show on your blog then its mean you can paid for it and when you paid and buy your live stream then you also make money with your live streaming if some body when watch your video then you earn some money.

Senin, 18 Februari 2013

How To Increase The Website Ranking From Social Bookmarking Sites

In this tutorial you will learn about how to get more traffic through social bookmarking websites. If you are worried about to increase traffic then feel free and start your work with your website. There are many ways to increase website traffic like to make video and upload on YouTube, to increase traffic by your back-links with other sites. But social bookmarking is the simple and most reliable.

It is a know fact that social bookmarking sites allow people to share web pages with their network. Website owners mostly measure their success by the traffic that their site is able to lure. This is because the larger the number of people visits a site, the higher the ranking their web pages can get from search engines. Given its current popularity, many online marketers are typing their best to find ways to further enhance web promotion through social bookmarking sites. 


The whole idea of social bookmarking is sharing with others something interesting found online. If you find your own site's content to be worthy of attention by others, there is nothing immoral or immodest to include your web pages in your bookmarks. But make doubly sure that the content is absolutely unique. If your pages bear a category, then the social bookmarking site might refuse your pages becoming part of your bookmarks.

There is no denying that social bookmarking sites have extraordinary marketing value. Assuming a user includes a link to any of your pages in his list, there is the possibility that his entire network will follow your link. Here is a well-researched list of steps that one can possibly take to augment traffic from social bookmarking sites. It is found that quite often excellent content do not draw the type of traffic from social bookmarking sites it deserves, for the simple reason it did not have catchy caption. Most people look at the headline first and pre-judge the contents. The golden rule is to provide alluring captions if you want to draw maximum traffic from social bookmarking sites.


After providing the type of attention grabbing headline:
It is crucial to provide a meaningful description. Make sure to avoid using superlatives as your text will sound hollow and visitors may suspect your story to be a pack of lies. Please bear in mind that many social bookmarking sites limit description, so you should present something succinct and yet appealing to describe your article.


Equally important is the opening paragraph of your content:
If the first paragraph does not impress the reader, he or she might as well leave your site half way. It is often said and there is not harm reiterating that Content is king. To sustain the reader's interest and attention, the content has to be relevant, well-presented and gripping as otherwise, bookmarking is foolish further, there is also a real threat of your web pages getting banned from social bookmarking sites, if you persistently post trash.


    Tips and Troubleshooting:
    There is one more important point to remember. No matter how well written your content is, no one will be keen to read your pages if they do not find your text relevant to their needs. Some home work is essential to know exactly what issues and needs that your brand can address. Investigate the places on the internet your target audience hangs out. This knowledge is of paramount importance to build relationships.


    Related Post:

    Going To Track Visitors:
    New Tools for a Blogger To Make Like Website :
    Make Money With Google And Amazon Links:
    Live Traffic Counter Put In Your Blogger Blogspot:

    Jumat, 15 Februari 2013

    Method of Getting Free Backlinks From Your Blogger Or Website In Simple 5 Trick or Tips

    In this tutorial i will learn you about how to get a lot of back links of your blog or website. Back links is the most important thing to increase the Google Organic Traffic. If you have a tons of back links then you forget about your blog or website but visitor visit your site daily without hardworking. Back links are main part of SEO, so you can say that back links are main or important part of search engine optimization. It does not mean just back links are only for this that is not important to search engine optimizations their quality have also importance.
                              
                                                
    If you want to get good rank in Google, then you need high quality back links. Like words and phrase are so important when we search on Google then copied or poor content not be easily appeared on search engine. When we use high keywords and its mean like i use cancer disease or [www.breast-cancer.disease.com] or mobile technology or marketing related word then it is the best keywords. You would also check in the Google Tool to find the high keywords

                                              
    When you have got high quality back links with high quality words or content then on your targeted keyword then you will get high rank in Google. There are a lot of ways to Get free back links so you can easily get free back links, but high rank back links are some difficult. I have also 258 back links of my blog that's my daily page-views average is nearly 200 visitor on my blog. I have some idea to get free back links so, I am going to share it with you. I have also got free high rank keywords by this.

    How you can get or create Free Back links:
    In this tutorial or all my experience, i have 5 easy ways to get free back links. These ways are fully free and you would never cost to get high rank back links. Some time I listed that the back links which you can buy not so important it same as you can create free. Now i am going to share your 5 ways to get free back links.

    1. The First Step Is  Web Directories:
    Submit your site in high rank web directories to get free back links. Web directories are most common and useful method for high rank back links. Some directory are costly not free to add back links on there site, they will get some cost to submit your site in their directory not follow themes try to submit your site in just free directories. Get high rank free web directory list here.

    Tips And Troubleshooting:
    While you are submitting your site in these directories then you want to add your targeted keywords in Title Field and then submit your blog or website to these directories.


    2. Submit Article:
    Submit article on article directories sites with your hyperlinks. Its very powerful way to get free back links, but these back links will be very useful for your rank. Some article directories are costly, but some are fully free, follow the free article directories to submit your article.

    Tips and Troubleshooting:
    While you are going to submit your article with your targeted keyword, add a link with your targeted keyword. And make the blog powerful and without cost.


    3. Dofollow Comments Blog
    Use dofollow comments blog for high rank free back links. Dofollow comments blogs are fully free, but some blog will instant approve your comments and some will moderate your comments. So, use instant approve comments blog list to get back links fast as fast.

    Tips and Troubleshooting:
    While you are going to use your targeted keywords in the name field during comments.


    4. Forum Back-links:
    Form are also a way to get high rank back links in free. When you have registered in forum, go to edit profile and add a signature with your targeted keyword with your website link.

    Tip and Troubleshooting:
    While your are adding a hyperlink with your targeted keyword in forum signature. This is the best way to make more and more back links of your blog.


    5. Social Bookmarking Site:
    Fifth and the Final step of my experience is social bookmarking site. Social Bookmarking sites are most famous and easy way to get good traffic and free back links for website. Bookmark your site in bookmarking sites with your targeted keyword as your website title. You can social bookmarking tool to bookmark your site quickly.


    Related Post:

    Kamis, 31 Januari 2013

    You Should Make Internal Links And Backlinks and Increase in Blogger Blogspot

    Now i discuss how to add internal and external links and back-links to your blogger. And you can easily manage all these steps if you have a blog then make perfect by using SEO techniques and tools and make the blogger blog perfect like you. There are lots of times when you may want to direct a reader to a different parts of your Blogger post depending on what their needs and interests are. On you might want to alert the visitor to something significant in related post. But When you make the internal links then SEO tips are slightly failed your blogger blog because search engine is crawl your pages and links and then they decide that is a copy material on your blog that's why to make the perfect blogger you stuck your eyes on your webmaster tools for better SEO and make blog perfect. In this post i will show you how to make use of internal links both within posts and in Blogger Generally.
                                            
    Why bother with internal linking you may be wondering? Well the answer is to improve SEO. Blogs with a good internal linking structure will fare better than blogs that don't links posts. Plus you will be creating an aid to navigation for your reader. On longer posts jumps links to different sections within your post or to other posts mean readers can quickly find the information they are looking for.

    1. How to Create Internal Links To Sections Within The same Blogger Blog Posts:
    2. How to Create Internal Links To Sections Within The Different Blogger Blog Posts:

    1. How to Create Internal Links To Sections Within The Same Blogger Blog Posts;

     When You make each links to blogger blog post the when reader interest in this link then he hit this link and go to other post. This type of internal linking is common practice in website building and can be equally applied to blogs to assist with navigation.

    Your Question is how did I create these links?
    Answer is that i used simple HTML that anyone can learn in a few minutes. Here are the Steps i used to create these links.

    1. Login in to Your Blogger Blogspot.
    2. Go to Posting > New Post or Edit Post and either create a new article or edit an existing one.
    3. With the article find a place where you want to add some jumps links. This will be early on in the article as it will help the reader figure out what information is significant to them and how to get there quickly.
    4. Switch to the Edit HTML mode rather than compose mode so you can see the code you are inserting into your post.
    5. Create a couple of headings that will be your links to material further down in your Blogger articles. Note you can also just jump to a word but for the purposes of this demonstration and clarity I am going to use heading. When creating this post i used the following heading.

    Like This Link You Make Your Own Internal Links With Suited Blogger Blog Post To Check it how it work.
    How to Create Internal Links To Sections Within the Same Blogger Blog Posts.
    How to Create Internal Links To Sections Within the Different Blogger Blog Posts.

    Add Links to Your heading like so:

    <a href="#withinposts"> How to Create Internal Links To Sections Within The Same Blogger Blog Posts</a>

    <a href="#withinposts"> How to Create Internal Links To Section Within The Different Blogger Blog Posts</a>

    The href attribute and closing </a> element is the same structure you use for other links in your blog.

    Each Identifier is preceded by a hash mark like #. The # tells the visitor's browser to look for a section within your post.

    Each links identifier needs its own unique identifier and needs to be enclosed in inverted commas Use a name that reflects the link you are creating if possible as it will make it easier to identify on a page with a lot of internal jump links. Now go to the first point in your post where you want to jump the reader to. This will be the start of some new idea, section or logical split in the information.

    At this point create your anchor text by first adding your heading and then enclosing your heading with this anchor structure.

    <a name="identifier'> Your Heading </a>

    Note the use of the name attribute at the beginning and the </a> element at the end.
    Each link identifier needs to be enclosed in inverted commas. Using this anchoring structure our first anchor becomes:

    <a name="withinposts"> How to Create Internal Links To Sections Within The Same Blogger Blog Post </a>

    Substitute your own links identifier and headings.
    Now move on the next point you want to link to and create second anchor. In this example we use the same structure but change the identifier.
            
    <a name="withingblogger" How to Create Internal Links To Sections Within The Different Blogger Post </a>

    Again substitute your own link identifier and heading to suit your article. And then Save and Publish as normal and you will see your links are live and will jumps the reader to different part of the post.


    Tips And Troubleshooting:


    If you want the easily make internal link then follow the steps it is most easy way.
    1. Login Your Blogger Blog.
    2. Create New Post.
    3. Write Article.
    4. Then where you want to make link then go to Link or your Blog where you change your heading size and where you make your character bold or regular here Link is available in blue color and the click it.
    5. After Click you give the path like your website URL and Heading Of URL and ok that's all done enjoy it easily.

    If you can use this and nothing to understand comments me i will solve your problem by replying and to give the best of best answer everything you ask me. And i will learn you how to make back link or link to other blogger in next post.

    Also Check this out.
    How I Can Make Internal Links In The Blog Post To Increase Rank


    Most Recommended Article:


    Webmaster Tools And Google Analytics to a Blogger Blog
    Increase Google Ranking and Your Blogger Is Submitt to Major Search Engines
    How To Added Meta Tag In Your Blogger For Better Optimization
    How Manage Blogger Title Tags to Improve SEO
    How I Can Boost Traffic With Targeted Country On Blogger
    Easy Tricks To Get Lot Of Visitors On My Blogger

    Senin, 28 Januari 2013

    Affilate Banner Put Below in your Blogger Post

    In today's Blogger tutorial you will learn just how easy it is to place an affiliate banner at the end of each post of a Blogger Blog (Blogspot blog). This is a relatively easy task but does require adding a short snippet of code to your Blogger Template. For those new to Blogger or without much technical knowledge don't worry as I have broken down the steps so that any one can follow them even virtual beginners.


    How to Add an Affiliate Banners Below a Blogger Post:
    The Instruction below will place an [affiliate banner] below each post in your blog. The banner will appear on all pages including the home page. If you want faster loading times and the banner to appear only on individual post pages see tips and troubleshooting below for instruction on how to restrict the banner display to post pages only.

    1. Login to Blogger if not already logged in.
    2. Navigate to Design > Edit HTML.
    3. Backup your Blogger template as a precaution by downloading to your computer.
    4. Check the Expand Widgets Template Box.
    5. Find the following lines in your Blogger template with CTRL + F to bring up the search box.

    <div class='post-footer-line
    post-footer-line-3'/>
    </div>


    6. Paste your affiliate banner code between these two lines.

               
    <div class='post-footer-line
    post-footer-line-3'/>
    Place the Affiliate Banner Code Here
    </div>

    Once you have finished your code should like something like the following which places a horizontal like banner (468x60) in the post footer but any size banner can be inserted below each post provide your template is wide enough to accommodate it:

    <div class='post-footer-line
    post-footer-line-3'/>
    <a
    href='https://chitika.com/publishers.php?refid=
    XXXXXX' style='text-decorate: none;'
    title='Get Chitika | Premium'><ima alt='Get
    Chitika | Premium' brorder='o'
    src='http://scripts.chitika.net/eminimalls/logos/
    468x60.png'title=Get Chitika | Premium'/><</a>
    </div>
             
    7. Save Template:

    8. Click on View Blog to see your New Affiliate Banner in Action.

    9. Get Chitika Premium:


    10. Tips and Troubleshooting:


    If your template does not have these lines kit may only have tow post footer lines in which case you can do one of two things.

               Add these lines to your Template:
             
    <div class='post-footer-line
    post-footer-line-3'/>
    Place the affiliate banner code here
    </div>

    Or place the affiliate banner code between the following lines:

    <div class='post-footer-line
    post-footer-line-2'/>
    Place the Affiliate Banner Code Here
    </div>

    If you would like the banner to appear below your post only on the post page and not the home page then you will need to add an if statement to the code as follows:


    <div class='post-footer-line
    post-footer-line-3'/>
    <b:if cod='data:blog.pageType = = "item"'>
    Paste Affiliate Banner Code Here
    </b:if>
    </div>

    If you are having problems adding the affiliate banners code to the template make sure that only single quotes are used. The Blogger Template Code is sensitive to this and usually doesn't accept double quotes.
                 

    Sabtu, 26 Januari 2013

    How To Add Facebook Page On Blog To Attract More Visitors

    In this article i will show you how to add your Blogger Blog for Facebook page to get more visitors. It is very simple to add your Blogger to Facebook so that your updated content can be read right from your Facebook profile. Importing your Blogger Blog into Facebook will only take you a few minutes to set up but will likely produce quite a few extra readers.

    By importing your Blog into Facebook your Blogger posts become available to all your Facebook friends and family. Every time you post new articles to your Blogger Blog they will automatically appear on you Wall in Facebook and in your friends News Feeds. It is also possible to remove any content that you don't wish to be displayed which may be handy for some.
    These are the most advantages of importing Your Blogger Blog into Facebook:
    Increase your Web presence.
    Enjoy added interest in your Blog articles and new readers.
    Not need to replicate your Blog articles or content on Facebook.

    It has also some disadvantages of importing your Blog into Facebook:
    If you blog for profit think carefully about importing your Blogger Blog into Facebook as you are likely to experience a drop off in traffic and a reduction in revenue earnings as fewer people will visit your actual blog. One possible way around this is to set you blog's RSS feed to show summaries only that way ensuring that anyone interested will need to visit your blog to read the whole article.

    Now first Step How to Add your Blogger Blog to Facebook:

    1. Login to Facebook or sign up to Facebook if you are not already a member.
    2. From your Facebook profile page go to setting > Application Setting which you will find in the top right hand corner.
    3. Select Notes from the list of application displayed on the page.
    4. Click on Import a Blog in the right sidebar.
    5. Facebook - Add Notes Screen (Setting, Application Settings, Notes).
    6. Enter the URL address of your Blog.

      Like        Website URL: http://trickofblogging.blogspot.com
                                       
      Your Blog feed:

      Like        http://trickofblogging.blogspot.com/feeds/posts/default?alt=rss

      Please note it is not necessary to add the feed of your blog as Facebook will already detect all your posts.

      Facebook - Import a Blog Screen:
      You will need to tick the box below this to confirm that the content is not illegal or obscene and that you have the right to permit Facebook to reproduce the content of your blog. Any problem click Cancel and reenter your blog URL address.

      Click Start Importing:
      Facebook will now import your feed and you will be taken to a preview screen to make sure the content matches your blog. If it does go ahead and confirm the import by clicking on the Confirm Import Button

      Facebook - Preview Screen for importing a blog showing latest content:
      Go to your wall in Facebook to check that your Blogger posts are now available to all your Facebook friends and family.

      Tips and Troubleshooting:
      1. If your Blogger blog is member only the blog import will fail as Facebook will be unable to detect your blog's feed.
      2. To remove a blog post from your wall in Facebook click on the Remove button on the right-hand sidebar.
      3. If your Images are not displaying then you may need to try importing your blog using Networked Blogs.

      Senin, 21 Januari 2013

      Read More Button In Blogger Post With Jump Break Feature

      In this Blogger tutorial you will learn how to insert jump breaks into your Blogger posts as an aid to quick navigation for your visitors. Jump Breaks in Blogger provide an easy way to show only a snippet of your whole post on the home page of your blog with a read more link below it for the rest of the story. The advantage of adding jump breaks to your Blogger posts is that your most recent posts for what interest them rather than having to scroll through a whole bunch of long articles. This is definitely a big help for those of us like me who often write articles longer than 500 words. If your posts are short and sweet you may find adding this read more features is unnecessary however you can still apply it when you do have a longer post. Below is an example post which illustrates the Jump Break feature in action.

      Example post showing Blogger new jump breaks read more feature.
      How to Insert Jump Break (Read More Links) In Blogger Blogspot Blog:
      It is easy to insert a jump Break into your Blogger post (Blogspot Posts) at any point of your choosing.
      These are two methods of inserting the Jump Breaks in Blogger.
      Which method you choose depends on which post editor you are using. If you are not sure which editor your using check this out by going to setting > Basic and Scrolling to the bottom of the page. Under Global Setting you will see a radio Button next to old editor of updated editor.

      Select Blogger Editor From Setting: Basic

      Step 1:
      Insert Jump Breaks - New Blogger Post Editor Only:
      In order to use this method you need to be using the updated editor in Blogger or have Blogger in Draft enabled. When creating a new post in the Blogger Post Editor position the cursor in the editor at the point you wish the Jump Break to be inserted. Click on the insert Jump Break icon (currently the last option on the menu).
      Click on the Jump Break icon to insert a jump break into a Blogger post. A jagged dividing line will appear to mark the insertion point. A divider line indicates where the jump break will occur.

      Publish Your post as Normal.

      Step 2:
      Insert Jump Breaks - Older Blogger Post Editor Only:
      If you are using the old post editor rather than the new post editor you can still insert jump break into your Blogger posts. When creating a new post in the Blogger post editor make sure you are in the Edit HTML mode rather than compose mode.

      Insert the following code at the point where you want to break the jump Break to occur:
         
                                     <!-- MORE -->


      Publish post as normal.

      Tips and Troubleshooting:
      To Add Jump Breaks to New Posts Automatically:
      To save time it is possible to automatically add Jump Breaks to Post with the following method:

      Go to Setting > Formatting and Scroll to bottom of the page:
      Under Post Template paste <!-- MORE --> into the box and save. The next time you7 create a new post the  <!-- MORE --> will automatically appear. Make sure you are in the Edit HTML mode to See <!-- MORE --> appear.

      Add the code to your Post Template  in Setting  | Formatting to automate Jump Break:
      To Change the Read More Text:
      if you want to change the read more text for something like Read Full Story or Continue Reading You can easily do this by:

      Go to Design > Page Element
      Edit the Blog Posts Widget

      Chang the post page link text Read More Text which appears at the top of the page to your preferred text and save.

      Jump Breaks Page Link text can be changed via Blogger Layout Page Element Edit Blog Posts:
      To manually add jump breaks to Blogger For Users of Customized Templates. If you are using highly a customized template or have customized your blog posts widget you may experience a problem in getting the blogger jumps break feature to work. In this event you can edit your Blogger Template to enable jumps Breaks.

      As a precaution back up your template by downloading full template to your own computer.
      Tick the Expand Widget Template Check Box:
      Using CTRL + F find the following line of code:

                  <data:post.body/>

      Directly below this line insert the following code into your Blogger Template:

      <b:if cond = 'data:post.hasJumpLink'>
      <div class = 'jump-link'>
      <a expr:href='data:post.url +"#more"'><data:post.jumpText/></a>
      </div>
      </b:if>