Cari Blog Ini

Tampilkan postingan dengan label Blog Post. Tampilkan semua postingan

Senin, 10 Juni 2013

Create | Make Blogger Background Image On Photoshop And Change With Desire Photo

In this tutorial i will show you how to create Image In Photoshop and how to Add or Replace your desire image in blogger background just simple steps and trick. Now this tutorial also teach you how to use Photoshop Features. I have write many post about Blogger and Blogging tips and tricks but now i want discuss a small and best tutorial using Photoshop because it also play and important role in field of blogging. Like if you want to add image in blog post and you want to also add any name or text on this photo/image you want to put on blog post then you can easily add this also like i write my blog name on mostly pictures and when someone view or see this picture they also see our blog name which  is very effective and these people also visit your blog to get proper information about this picture or post.


How To Make Blogger Header Image In Photoshop

How To Make Image/Photo/Picture In Photoshop For Blogger Background:


If you want to add your desire customize picture in blogger background then follow the below tutorial to make image and then add this on your blog.
Create | Make Blogger Background Image On Photoshop And Change With Desire Photo
Create | Make Blogger Background Image On Photoshop And Change With Desire Photo 1

Click on Photoshop Install Software on your computer desktop screen.
Run your Photoshop.
Now go to File.
Go to New.
Click on it.
Like above image which totally reduce your effect just follow the picture.
Now according to below picture.
Customize the Page of Image.

Picture 1 For Customization:


Give the Name in Step 1.
Select Width or Height in Step 2. 
Select Resolution in Step 3.
Select Mode Of Color means RGB, Greyscale, CMYK Color, Or Lab Color.
Now Click OK.
You See the White page after this customization.


Picture 2 For Customization For Patten:


Click on Paint Brush. Like pointed in Step 1.
Go with Step 2 to Select the Patten of the color or background.
Now you have done you also customize simply by adding or cutting picture or other picture to pick the best and beautiful template.

If you want just your blog names appear in the background of blogger template then you also do this. For this Go with Picture 3. 


Create | Make Blogger Background Image On Photoshop And Change With Desire Photo 2


Here Is the Small Tutorial which show you how just write text on Blank White Page or Any image which you put on Photoshop.

Just do same as adding blank white page. Where you customize the page with step1 to step 4.
When you add page then put your desire color using Brush Tool and then write 3D Color Effect Text on blank white, color or any picture.

When you make white page on your Photoshop or select any picture then use below tutorial for writing 3D Effect Text on picture.

Click On Text Writing Tool which is represent by bold T.
Write your blog name or any text which you want to appear behind your template.
Now using image or tutorial both to do easily.

Create | Make Blogger Background Image On Photoshop And Change With Desire Photo 3

Go to Above Tab Like File, Edit, Image, Layers, Select, Filter, View, Windows, Help.
Click on Windows Tab.
Go to Show Layers.
After Click you see the Layer Effect page on right bottom sidebar.
Right click on image and create Duplicate Layer.
Remove Background Layer.
Now again Right Click on Duplicate Layer.
Go to Blending Option.
Now you can see the same thing which you are seeing in the above picture.
Tick same as mine.
Select the Shadow.
Click Ok. Now you have done.
Save your image.

Now You can Replace Old Style Templates in Blogger in new one
5 Ways How to Make your Blogger Blog Like WordPress Website

Add Customize Image In Blogger Background Template:


Go to Blogger.com.
Go to Template.
Click on Customise Orange Button.
Go to Background.
Go to Remove Image and click on the image.
Click Upload Image.
Now by using this option add picture from your computer where you save your customize picture.
Click on Apply To Blog Orange Button right top side.
Click to View Blog.
Now you have done correctly.

If you have face any problem about this tutorial then feel free and give me your comment for make more easy or best.

Related Articles:


Add | Put | Embed Three Or Four Column Footer Widget/Gadget In Blogger Blogspot
Add Facebook Like Box Widget/Gadget On Blogger By Facebook Developer Plugin
Add | Make About Us Page Widget | Gadget On Your Blog Footer Or Sidebar
Add | Put 50 Flag Translator Widget | Gadget On Your Blogger Blogspot
Add | Put Three Tab Gadget/Widget In Blog Layout Sidebar On Blogspot 
Add | Put Best Style Subscribe Box Widget/Gadget For Blogger Sidebar
Tricks To Add Simply/Easily/ PayPal Donate Button To Blogger
Add A Simple Drop Down Menu To Blogger Blog 

Rabu, 15 Mei 2013

How To Set | Select | Choose | Change Desire Blog Post Date And Time In Blogger

I am gona show you how to Change or Set Blog Post Date and Time in blogger blogspot. To customize the blog post simply using small tutorial and make blog post beautiful by selecting daily or weekly its up to you. Now if you want to show your blog post with arrangement to make perfect then you use this feature. Publish On feature on right hand side of your post page is for that if you have miss some days or forget to write post then make changes and return back your post on that date which you want.

Setup A Different Date Of Your Blog Post:

In Blogger.com we set date easily. Blogger allow a Blog Administrator or Webmaster to set any publication date for a post which they choose. For setting up there are many reason for set a particular publishing date for a blog post. To keep continuity with  sequence for blog articles we use this feature. You also use this feature if you forget to write a post/articles with sequence or you can decide afterwards to add an extra article to the sequence. When we start blogging on our blog we always forget to make About Author Page in blog and after we decide to set up them. It also take you several years back if you want.

Social Bookmarking Button Add To Blogger
5 Ways How to Make your Blogger Blog Like WordPress Website
How Use Social Website To Increase Your Website Traffic 

Tips And Troubleshooting:


  • I suggest you to setup the About Page Date first because it appears first at the beginning of your RSS feeds.
  • Remember when you are posting with changing date that the post will still appear in your recent posts Rss Feeds even you setup this post date in past.
   

How To Setting Up User Defined Publish Date In Blogger Blogspot:

  1. Create a new post of your blog as usual.
  2. Click on the Published On.
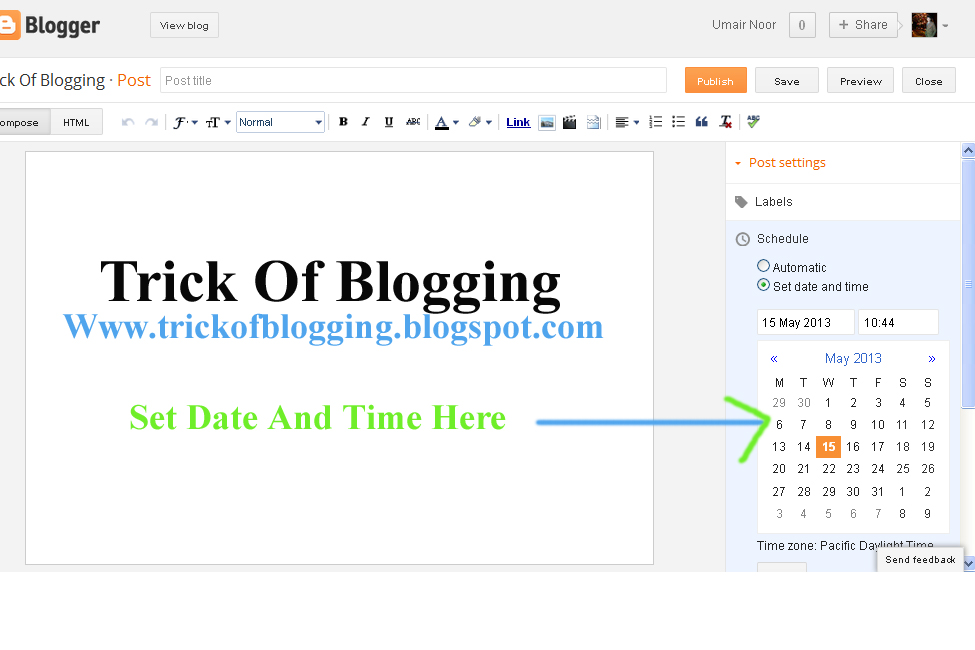
  3. Set your desire Date or Time like below picture/image.
  4. Click on Done Link.
  5. Click Update Orange Button.
  6. And preview your blog post it is list in those post where you want.
How To Set | Select | Choose | Change Desire Blog Post Date And Time In Blogger
In this post you will learn how to select or changes the desire post date or time. I have also a big and detailed tutorial about how to make money from blog or website, Blogger SEO Tips and Tricks, Alexa Ranking, Google Page Rank, Get Backlinks, Make Internal links, Get lot of visitors on your blog by Search Engine Optimization, Submitting sitemap of blog or website to Google Search Engine or Major Search Engine.

Related Articles:


Selasa, 14 Mei 2013

Add | Put | Embed Google Map Between Blog Post Blogger Tricks

How to add or put Google Maps inside the Blog post or Website easily and simple tutorial is discuss below. If you want to put it on your blog sidebar or below Gadget/Widget under all post then you can do also this by easy tricks. Now let's start our tutorial. Why i choose this post to write today because my Blog Member ask me i am so worried how i embed my own home address Google Map on my blog to tell about my blog visitors about me properly then i promise that i will definitely write post on How To Embed Google Maps Inside Blog Or Website. Now go below tutorial and do easy tricks and enjoy.

How Easliy/Simple To Manage Page Layout In Blogger Blogspot
How I Make My Blogger Good Looking Best Tricks
Easy | Best | Simple Tricks To Make Money From Youtube | Chitika

How To Add Google Maps Between Or Inside Blog Post:

Google Maps in between post is embed easily but why we put it inside our blog post i give you example if you are Business Man and a Marketer Shopkeeper and you want to tell about your shop address or your office address to someone to contact with you after seeing this Blog post map easily then it is very important features of Google.


Method To Put Google Map Inside Blogpost:

Add | Put | Embed Google Map Between Blog Post Blogger Tricks

  1. Go to Google.com.
  2. Write Google Map in Google search box you can also see below picture/image to clarify.
  3. Now click on first heading Google Maps.
  4. Now write the correct address in address bar which you want to show in blog post map.
  5. You can also use Satellite Maps by selecting it.
  6. Make changes which you want with your map.
  7. Now copy the code which is available in two form HTML Form or URL Form.
  8. You can also use or paste this link in Email Or IM.
  9. Also you can Short URL by checking the box. See in picture with full detail.
  10. Now When you find the desire Address Map then copy the URL Link short or full its up to your.
  11. You can also paste it with in post by adding link option and when some one click on this link it directly go the map which you have already select.
  12. Now in between blog post you also easily do copy the HTML Code Form.
  13. Add | Put | Embed Google Map Between Blog Post Blogger Tricks 2
    Add | Put | Embed Google Map Between Blog Post Blogger Tricks 2
  14. Paste it on Notepad file and follow the below small tutorial.

Easy Trick To Add Twitter Updates Gadget To Blogspot Blogger
How To Easily Make Money With Affiliate Marketing Blogger

    HTML  Code Form In Blogspot:


    • Go to Blogger.com.
    • Create New Post.
    • When you write your post.
    • Go to Compose Or HTML Button which is located on left top side of post page also show in image.

                   
    Add  Put  Embed Google Map Between Blog Post Blogger Tricks 2
    Add  Put  Embed Google Map Between Blog Post Blogger Tricks 2

    • Click HTML Button same as in pictures.
    • Where you want to paste your Google Map means in the above post section, between post section or below post section then just find this highlighted tag  <br /> and paste your Google Map HTML code above/before this tag and return to Compose Form.
    • Check now your Blog post Google Map is embed in your post.
    • Now Publish your post and enjoy.

    Related Articles:

    Get Google Page Rank With In 1 Month By Simple And Easy Tricks
    Now You can Replace Old Style Templates in Blogger in new one
    Social Bookmarking Button Add To Blogger
    Live Traffic Counter Put In Your Blogger Blogspot
    Read More Button In Blogger Post With Jump Break Feature
    How To Add Facebook Page On Blog To Attract More Visitors

      Kamis, 09 Mei 2013

      Tricks To Add Simply/Easily/ PayPal Donate Button To Blogger

      In this tutorial i will show you how to add or put PayPal Donate Button in blog post, sidebar, footer, above post title and below post. PayPal Button widget is manage in commonly sidebar or in footer.


      PayPal Account Information What Is That:

      Tricks To Add Simply/Easily/ PayPal Donate Button To Blogger
      PayPal account is use to receive or sent money and if you want to make a few cents or some bucks from all the hardworking when you are blogging on your Blogger Blog or Website then you should add a PayPal Donate Button to your blogger (Blogspot Blog) or Website. Adding donation button will encourage all those happy readers to say a big thanks you for helping them out but don't think every one donate some money to your blog or website they are few of who will willingly donate some chumps.

      Easily adding a gadget to the blogger sidebar or in the footer of your blogger template you can get some money. We will using a widget to contain our PayPal Donate Button and we have not required to changing template of our blog. If you want to add the PayPal Donate Button in between blog post then it is also very easy to do.

      The Best Placement of Adsense On Your Blogger Blogspot
      How to Verify My Blogger Blogspot in Webmaster Tools
      How Can I Make Earning With My Blogger Blogspot  

      Add A PayPal Donate Button To Blogger Sidebar Or Blogger Footer:

      Create or Make PayPal Account first if you have not already create.
      Login to your PayPal account.
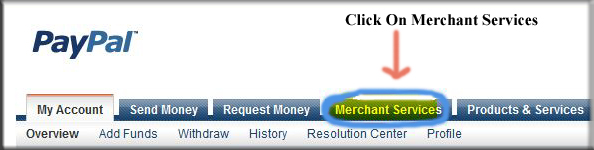
      Click on the Merchant Services Tab like shown in the picture.

      Tricks To Add SimplyEasily PayPal Donate Button To Blogger 1
      Select Donation from the list of keys features displayed in the right sidebar of the PayPal Website Payments Standard Option 3 Payment Solutions. PayPal have changed its interface. You now need to select PayPal Website Payment Standard from Merchant Service drop down and then under the option 1 you will see in ting writing words I must say (There are also Buttons for Donation and Gift certificates). "Click On Donations".

                              
      Tricks To Add SimplyEasily PayPal Donate Button To Blogger 2
      Select Donation link in PayPal from PayPal Website Payments Standard Option 1 to add a donations button to Blogger Blogspot Blog.
      From the PayPal Create a Donation Button Now link (One of Two).

                                       
      Tricks To Add SimplyEasily PayPal Donate Button To Blogger 3

      Manage the default button which you want and customize it.
      Select the Currency which is adjusting by your country or area and depending on your need location.
      Select Donors enter their own contribution amount radio button unless you want to have a set amount.

                                       
      Tricks To Add SimplyEasily PayPal Donate Button To Blogger 4

      Ensure the Secure Merchant ID radio button is selected. This will always prevent spammers getting hold of your email address.
      At Step 2 it is worth saving your button.
      At Step 3 customize your checkout page by allowing donors to write a short comment by selecting the Yes radio button to special instruction to seller.
      Select the No radio button for customer's shipping address. Select the create Button.
      When PayPal make or creates the PayPal Donation Button HTML code then copy it on your notepad file to further use. Now Sign out of your PayPal Account. Now next work in blogger.com.

      How I Can Add Recent Post Moving In Down And Upward Direction
      How to Remove 404 Errors in Blogger Blogspot
      Why I Make More Pages On My Blog To Increase Organic Traffic 
      Easy | Best | Simple Tricks To Make Money From Youtube | Chitika

      Now Working In Blogger When PayPal Donation Button Code Is Get:

      In blogger you can make more and more changes you can easily add or put your PayPal Donation Button where you want but i have best placement of paypal button which i already use on my website.


      PayPal Button Adding Tutorial In Blogger Sidebar Or Footer:


      Go to Blogger.com.
      Go to Layout.
      Click Add A Gadget.
      Select HTML/Javascript widget which is located on 11th no in the list.
      Now copy your PayPal Donate Button Code from notepad file where you can save it and paste the HTML code into the HTML coding box.
      Now Pick the gadget with mouse and place it sidebar of your template where you want left or right its depends on your choice.
      Now give the name of gadget/widget which you want. Like "Donate For My Blog".
      Click the save button.
      Visit your blog and your PayPal Donation Button is appear in your blog sidebar.
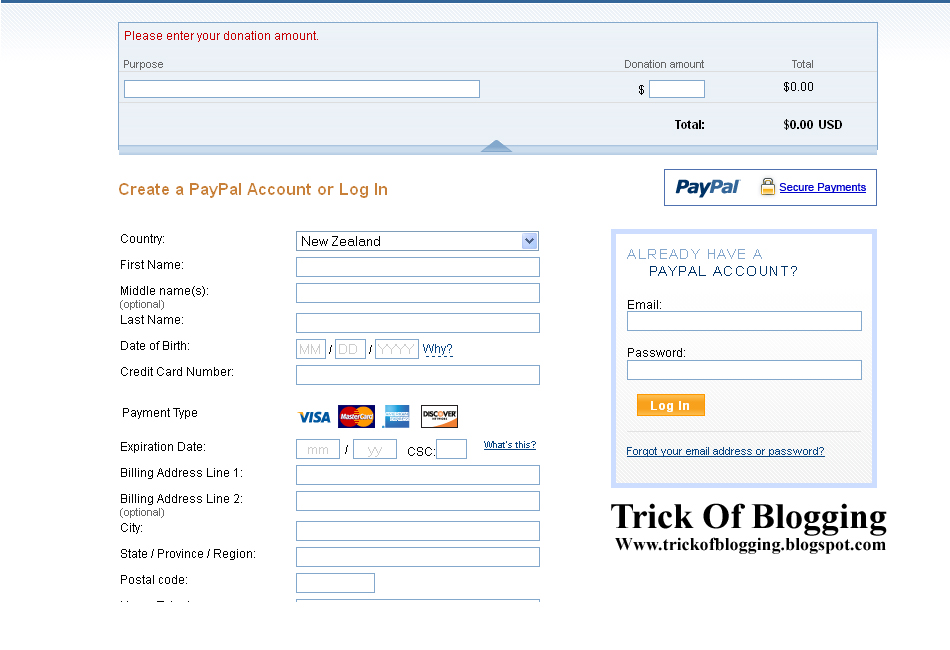
      Now for checking donate button will it work or not click your button you can see this type of page which is given below appear after your blog page then its mean your PayPal Account is working for your blog.

                     
      Tricks To Add SimplyEasily PayPal Donate Button To Blogger 5


      PayPal Button Adding Tutorial In Blogger Post Footer After Every New Post:


      In this small tutorial you can easily add the PayPal Donation Code in the footer of every post but remember your previous post can not work like future post. Before adding the PayPal Button first copy your button code in HTML form.

      Go to Blogger.com.
      Go to Setting.
      Go to Post and Comments.
      Click on Post Template Add links.
      Paste the code into the Post Template Box and save it.
      Click to Writing New Post you can see the code in Compose form if you want to see the PayPal Donation Button Code then you should go to HTML form to see the code.

      How I Can Use Crawlers And Indexing Tool In Blogger
      How I Can Get Approval From Google Adsense My Blog Or Website
      How I Can Make Internal Links In The Blog Post To Increase Rank


      PayPal Button Adding Tutorial In Anywhere In Blog Post:


      If you want to add the PayPal Donation Button in between blog post then copy your button code and go to HTML form and where you want to show your button paste this code after breaking the <br> tags and you can easily add the code in your blog post and enjoy it.


      Related Articles:

      How Easily Delete/Remove/Get Rid Blogger Blog Tricks In Blogspot
      How I Remove Or Change Blogger Post Image Border In Blogspot
      Best Blogger Tips And Tricks For My Blog SEO Instantly
      Easy Trick To Add Twitter Updates Gadget To Blogspot Blogger
      How I Make My Blogger Good Looking Best Tricks
      Easy Tricks To Get Lot Of Visitors On My Blogger
      How I Can Get More Pageviews Using Social Bookmarking.Com
      How I Can Import And Export My Blog To Other Blogspot 

      Rabu, 08 Mei 2013

      How Remove Photos/Images Border In Simple Or Awesome Inc Templates Blogger

      This tutorial is how remove, change, delete border or outline around images or photos in blog post with Simple and Awesome Templates in blogger.com. Best trick to manage blog images border line easily to make changes in Templates. If you are using old interface blog template or custom template then i have already write a post about it if you want to do this then check the link in this you can manage older interface blogger template easily with adding code in blogger HTML coding.


      How I Remove Or Change Blogger Post Image Border In Blogspot .


      I have two main points or steps to removing or changing images borders in the blog post in Simple Templates. First method is how to remove the image border using Template Designer and next is how to remove the photo, pictures, images border line manually by changing the HTML code in the blogger templates.


      Trick No#1 Remove Picture/Photos/Images Border line using Template Designer:

      How Remove Photos/Images Border In Simple Or Awesome Inc Templates Blogger 1
      Go to Blogger.com.
      Go Template.
      Click On the Customize Orange Highlighted Button.
      Go to Advanced and click to Advanced link.
      Go to Images and click here.
      How Remove Photos/Images Border In Simple Or Awesome Inc Templates Blogger 2
      Now you can see three color box.

      • Background Color.
      • Border Color.
      • Caption Text Color.

      Where you can see the white arrow head click here to transparent the background of blog template.
      When you click here you can see white box write with Transparent Tick it.
      Now go to Border Color and also transparent it by checking the box.
      Now next box is Caption Text Color if you give the pictures caption for better SEO for this you can manage the color of the caption text but it is normally black.
      Click Apply to Blog to save your template changes.
      Click to view blog and check out any post your blog post image border is disappear.

      How Easliy/Simple To Manage Page Layout In Blogger Blogspot
      How Easily Delete/Remove/Get Rid Blogger Blog Tricks In Blogspot
      Simple | Easy Tutorial For Transfer Blogspot To Website 

      Trick No#2 Changes Or Remove Images Border Outline By Changing HTML Code Manually:


      In this trick you can just replace one code to make these changes and your all blog post pictures or images border is disappear and which you post in future then this also work in these post.

      Go to Blogger.com.
      Go to Template.
      Click To Edit HTML. if you have not aware new interface of Blogger HTML then click this link and read about more for make easily changes in your template also. How I Can Handle New Interface Of Blogger HTML Editor
      First Get Back up your Blogger Template.
      Find the code which is given below to find this code easily press Ctrl+F in between coding box.
      Paste below code in it and press enter and your code is highlighted.

       <Variable name="image.border.color" description="Border Color" type="color" default="transparent" value="#cccccc"/>


      When you find the above code then replace it with below code perfectly to make better changes otherwise your template give Error after wrong pasting code.

      <Variable name="image.border.color" description="Border Color" type="color" default="transparent" value="transparent"/>

      I will transparent the border of your blog post images. Now save your changes of blog template and view your blog post to see images border no longer. I have some beautiful and helpful article for make blog better in Search Engine. Lot of tricks about making money, getting backlinks, different types of widgets, Facebook Button, Facebook Page, Twitter Updates Widget, Blogger SEO Tutorial and many many more.

      Related Articles:

      Hot And Latest Seo Tips For Blogger 
      How To Make Website Like My Blogger Tricks To Get Best Alexa Rank
      How To Added Meta Tag In Your Blogger For Better Optimization
      Now Ready To Increase Google Page Ranking And Alexa Ranking
      Other Tips To Make Money
      Easy | Best | Simple Tricks To Make Money From Youtube | Chitika
      How I Can Get Approval From Google Adsense My Blog Or Website
      How I Can Use Webmaster Tools Properly For Blogger

        Jumat, 03 Mei 2013

        Add/Put Blog Table In Blog Post Best Blogger Tricks

        Add or Insert beautiful Blog table in between your blog post. Tables are not put easily on blog just adding CSS style, HTML Coding and others. But it is the table code which is put in HTML coding in blog post. Tables for Blogger is not easy for this you can know about HTML to make changes in the table for your own choice. Blog Table is the way to understand your justify data easily.

        This tutorial is tell you how to easily put and create blog tables to blogger and their are complex or simple tables which optimize easily with this tutorial. I tell you how you can easily changes the colors of blog post table for match with your own blog template to make good looking blog.

        Heading Box 1 Heading Box 2 Heading Box 3 .........
        Data Box 1 Data Box 2 Data Box 3
        Data Box 1 Data Box 2 Data Box 3
        Data Box 1 Data Box 2 Data Box 3
        Data Box 1 Data Box 2 Data Box 3  Pic Is Here


        Tables is most important and useful way to display information particularly tabulated information. You can also add links, text, hyperlinks and even images to a table and that thing is makes them very useful for presenting information for your blog post table. If you want to add the picture in the table
        then it just simple step you can just drag picture which you want to add in the table then drop in the required field.

        There is no easy way to put or insert table in Blogger yet. Even if you are using the new Template HTML Editor.

        Simple Tricks/ Way to Put/Insert Table To Blogger Post Easily:

        First we start this tutorial with a table of four columns with one column of pic included already and Five rows including a Heading Box row. Now i will show you step by step how to insert it on blog and how we can add different arrangement with our choice for better results.

        I am going to give you a code already made like above table you can just put the different choice which is you own after it and i also tell how you make some changes like how to change Background color of table, How to Add columns in table, How to Add rows in table, How to change heading color also and many other things. First pic this below code and paste it your notepad file to make some change step by step.

         <style type="text/css">.nobrtable br { display: none }</style>

            </div>

        <div class="nobrtable" style="text-align: justify;">

        <a href="https://blogger.googleusercontent.com/img/b/R29vZ2xl/AVvXsEjSOS-0PHKbF3xDNP-G8XY4Fa6Rem46zWknpBuM8eOXmInOF-fjGWhyphenhyphenjBmZXFLBuueCKD_W4poQvZGR46i5zbUlzoR8UWFtLFl3iVUpttoca5-MZvtPZiTcLa0BWIARSn5rAyWhkKHtOYg/s1600/AddPut+Blog+Table+In+Blog+Post+Best+Blogger+Tricks.jpg" imageanchor="1" style="clear: right; float: right; margin-bottom: 1em; margin-left: 1em;"><img border="0" src="https://blogger.googleusercontent.com/img/b/R29vZ2xl/AVvXsEjSOS-0PHKbF3xDNP-G8XY4Fa6Rem46zWknpBuM8eOXmInOF-fjGWhyphenhyphenjBmZXFLBuueCKD_W4poQvZGR46i5zbUlzoR8UWFtLFl3iVUpttoca5-MZvtPZiTcLa0BWIARSn5rAyWhkKHtOYg/s1600/AddPut+Blog+Table+In+Blog+Post+Best+Blogger+Tricks.jpg" height="190" width="200" /></a><br />

        <table border="2" bordercolor="#00000" cellpadding="5" cellspacing="5" style="background-color: #36d141; height: 250px; margin-left: 5px; margin-right: 5px; text-align: left; width: 500px;">

            <tbody>

        <tr>

            <th>Heading Box 1</th>

            <th>Heading Box 2</th>

            <th>Heading Box 3</th>

            <th></th>

            <th>.........</th>

            <th></th>

            <th></th>

            </tr>

        <tr>

            <td>Data Box 1</td>

            <td>Data Box 2</td>

            <td>Data Box 3</td>

            </tr>

        <tr>

            <td>Data Box 1</td>

            <td>Data Box 2</td>

            <td>Data Box 3</td>

            </tr>

        <tr>

            <td>Data Box 1</td>

            <td>Data Box 2</td>

            <td>Data Box 3</td>

            </tr>

        <tr>

            <td>Data Box 1</td>

            <td>Data Box 2</td>

            <td style="text-align: justify;">Data Box 3&nbsp; </td>

            <td>Pic Is Here</td>

            </tr>

        </tbody></table>

        </div>

        Now Let's Start The Table Tutorial: 

        Go to Blogger.com.
        Click to Create New Post and write your post and where you want to add table then pick above code.
        When you copy the above code then paste it on note pad file to make some changes.
        When you done changes then paste it in HTML coding in your blog post and your Data Table is ready to make beautiful and justify content.

        To Make Changes:

        If you want to make changes with table to suit your own Blogger Templates look like then changes the following given code below.


        • <table border="2" bordercolor="#0033FF" style="background-color:#99FFFF" width="100%" cellpadding="3" cellspacing="3">

        1. For Border Width (Red Color 2) Changes to your own choice.
        2. For Border Color (Pink Color 0033FF) Changes to your own choice.
        3. For Background (Magenta Color 99FFFF) Changes to your own choice.
        4. For Table Width (Green Color 100) Changes to your own choice.  

        How To Add Pictures/Images In The Table:

        If you want to add image or picture in the table like first table on the top of my post then you see the whole above coding which you already copy on your notepad file the Red Highlighted Color changes with your image URL. Remember images URL only get if your pictures is already host on some where on internet like Instagram, Facebook, Google+ or also in your blog post just click the image and copy its URL and replace with the highlighted coding and your table with picture is ready to your posting.

        Now if you want how to add new columns or new rows then i tell you about this in the up coming post till visit my blog.

        Related Articles:

        How To Make Blogger Header Image
        5 Ways How to Make your Blogger Blog Like WordPress Website
        How I Can Add Recent Post Moving In Down And Upward Direction
        How to Add Next Page Or Previous Page Navigation Number For Post In Blogger
        How i Can Put Facebook Like Button in Blogger Post
        How I Can Run And Float Text Line On My Blog For News Or Other Thing
        How I Can Use Webmaster Tools Properly For Blogger
        Add A Simple Drop Down Menu To Blogger Blog
          Rabu, 01 Mei 2013

          How I Remove Or Change Blogger Post Image Border In Blogspot

          Blogger post image border is big problem remove/delete this images border line or box easily with simple tricks. Some times you see border line with post image in blogger its not good looking this tutorial show you how you can easily change it or remove. If you have good looking blog and you get daily hundred of visitors on your blog then you should make it perfect for looking beautiful. Below paragraph easy tutorial is given on this problems to solve it.

          If your are using latest template Like Simple and Awesome Inc Black then read below link tutorial.

          How Remove Photos/Images Border In Simple Or Awesome Inc Templates Blogger

          When we start blogging then some times we want to remove, delete or changes then image border of a custom blogger template. I will show you how it is easy to make changes to your templates so that you can get rid of useless image borders around all the images which is appear on your all blog posts or images.

          Remember this tutorial is for those blogger which are custom templates and the previous blogger templates. But if you are using now new Blogger Templates with New Interface then my above post is about those templates which is new interface. You can easily manage and done this tutorial in 3 minutes.

          How You Can Remove/Delete and Get Rid of Image Borders in Blogger Posts:

          Now start tutorial with most and very helpful tricks and simple steps.

          Go to Blogger.com.
          Go to Templates.
          Go to Edit HTML.
          First Download your template in your computer. By click download template.
          Find the following code which i given below in your blogger templates.
          Remember that Blogger templates queries varies but this code is only that which you will find on a Blogger Minima Template and most other default Blogger templates.

           .post img {

          padding:4px;

          border:1px solid $bordercolor;

          }


          If you can't find this above code in your blogger templates then you should find the below code.

           img{

          padding: 4px;

          border:1px solid $bordercolor;

          }


          There are two ways to get rid of the unwanted border image code. You can either:

          Remove the following line:

           border:1px solid $bordercolor;
                                                               or
          Change it the following:

          border:0px;

          Click on the Save Template Button. 
          Now you have done your work. 


          If you want to change the border line of your blog post image then i have post a tutorial about this on next day how to change.

          Related Articles:


          Minggu, 17 Maret 2013

          How I Can Write 100% Original Content For Blogger

          This tutorial is tell you how you can write most better and content full blog post to increase traffic. When you want to write the blog post some tips are their which is very useful for you. When your going to write the post on your blog first think about the blog post title because it is very important for you when some going to search some keywords they cannot write single word but they write a two or three words together. Now when you write your post think which keywords are so common when you decide this and find the keywords then your 75% work is done.

          Now when you make the title of your blog post which is more unique content.

          Now Write 100% With These Tips:

          When you make the title of your blog post then copy your title which you make and paste in the Google Search Engine. When you paste the click to search result if your blog post 75% same then remove your title and make new but if your title is 50% same then you can use it as your blog post title. Means if your post title is 10 word and 5 words which you search is same then you can use it in your blog post.
          When you writing your post then make some headings and subheading also to highlight your content.
          When you highlight your content with subheading then your blog post is also highlight in search results it is best tips to write original content.
          When you writing the post then highlight some keywords to make your post beautiful.
          When you writing the post then check your post is better for search results.
          Your focus is totally on your keywords.

          Some Tips For Good Content:

          Write your post totally with your own mind if you are not clear about post which you want to write then you search on Google with your related post and pickup some ideas and then write with your own mind with some changes it is also considered in original content.


          Related Posts:

          Now You can Replace Old Style Templates in Blogger in new one
          Live Traffic Counter Put In Your Blogger Blogspot
          Add A Simple Drop Down Menu To Blogger Blog
          You Should Make Internal Links And Backlinks and Increase in Blogger Blogspot
          The Best Placement of Adsense On Your Blogger Blogspot

          Sabtu, 16 Maret 2013

          How I Can Use Crawlers And Indexing Tool In Blogger

          In this post i will show you how you can use the new tool of blogger Crawlers And Indexing tool in my blog for better indexing of blog for search engine. The crawlers and indexing tool is recently add in blogger it is also very helpful for blogger because it is indexing your blogger very quickly for search engine. It also visible your blogger always in search engine. One most important thing is that when you are going to using this tool then you also see the message which tell you if use this features incorrectly then your blog is ignore by search engine that's why use it correctly. I will use this tool also for my blog Trick Of Blogging and it give me better results. If you want to do this then go with me and make some changes for your blog.

          When you are going to make these changes you already done the previous steps of SEO which i write in my previous articles read them first and make these changes after doing the first steps of SEO. Because it is very important for you to do easily. I give the links below which tell you about beginning steps of Blog SEO.


          Hot And Latest Seo Tips For Blogger
          How to Verify My Blogger Blogspot in Webmaster Tools
          How I Can Make One Most Important Tip For SEO In My Blog

          Now Going To Do The Latest Tools Of Blogger For SEO:

          Go to Blogger.com.
          Go to Setting.
          Go to Search Preferences.
          Their you see the heading write as Crawlers And Indexing.
          Click edit Custom Robot.txt.
          Paste the Robot.txt file their if you have not robot.txt file then copy your robot.txt file Click Here
          When you paste this code then click save. Now you can also see in your webmaster tools there your robot file is also submit. If you want to check this go to webmaster tools and click Health link and go to Block URL but remember it work or show after one day or few hours.

          Now Next Steps Is Indexing:

          When you click edit then you make some changes but do correctly if you don't do correctly then your blog is ignore by search engine then work with full focus.

          First Home Page:
          Tick On All.
          Tick On Noodp.

          Second Archives and Search Pages:
          Tick On Noindex.    Because if you don't do this then search tell you robot it is duplicate link.
          Tick On Noodp.

          Third Default For Post and Pages:
          Tick On All.
          Tick On Noodp.

          All work is done correctly and your blog is visible in few days by search engine and also give your blog rank in under one to three months. You can also check your blog rank in alexa.com.

          Related Post:

          How I Can Optimize the Post Title Mean My Post Show First
          How I Can Import And Export My Blog To Other Blogspot
          How To Make Sitelink For Better SEO
          5 Ways How to Make your Blogger Blog Like WordPress Website
          How To Increase The Website Ranking From Social Bookmarking Sites

          Rabu, 13 Maret 2013

          How I Can Import And Export My Blog To Other Blogspot

          In this tutorial i will show you how you can easily import and export you blogger blogspot to other blog. This mean if you have a good content blog and some error is occur in your Blog or Gmail account then how you can make new blog and import your blog to other Gmail. I am going to tell you about in detail which clear your all concepts.

          If you have a blog with large and original and good content if you think you can't make blog like this then you export your blog in your computer. If you have face an error with your Gmail account and in your blog then you easily make your blog again like this and no hardworking is required. This thing take only one minute or less to make blog your previous corrupted blog. This tool is very useful in today because we have no an enough time to make free blog and take too much time on our blog. Then this tools is work really so good. If you want to do so then go with me and make your blog in second. I have really glad when a boy comment me he say brother how i can make my blog again which have about 126 posts i am not write again 126 posts. I am so worried because my blog take me error. Then i think and i sit front of my computer screen and start write this post.

          How Import And Export Blog To Other Blog:
          If you export your blog which you have already make with large amount of post then download your blog and save to your computer and when you make your new blog then import (upload) your blog to the new blog. When you upload your blog then no changes are required your blog show all the dates in which you write your posts and all the tags and description same as your previous blog.

          Now Going To Export Your Blog:

          Go to Blogger.com.
          Go to Setting.
          Go to Other.
          Go to Blog Tools.
          Click Export Blog and download your blog all posts.

          When you download your blog then if you want to delete this blog then click delete and if you want not to remove and make new blog on your new Gmail account then ready to make. In the below link you have learn how make perfect and good blog in easy ways.

          Make Your Own Free Blog At Blogger.Com
          How to Verify My Blogger Blogspot in Webmaster Tools

          When you make your blog on new Blogger account then repeat all the above steps and import your blog to click import link. When you importing your blog then you give also the path where you save your xml blog posts data. When you upload your xml file then go to post and check your posts work same as your previous blog. 

          Senin, 04 Maret 2013

          How i Can Put Facebook Like Button in Blogger Post

          In this tutorial i am going to learn you about how you can easily put Facebook like button in every blogger post. This tutorial is very easy and you can done in a seconds or minute. This is will not a fan page who like you it simple who like this post and share it to their friends and other peoples. If you want this then start this tutorial. You can put this button below your blogger post and above your blogger post.This share and like button is very good for your blog because people see to this share and like button first then read your article they see this because they estimate that this post is really good because people share it and like it you can also observe this your post which is very important and share many time then it also make more popularity.

          How You Can Easily Add Like Button Below Every Blog Post:

          Go to Blogger.com.
          Go to Blogger Dashboard.
          Go to Template.
          First take a backup of your blogger template which you can setup manually. Because when you make changes in your template if you have make any mistake then you can easily  restore your template. This tips is very helpful for your every time when you going to make some changes in your blogger HTML then pickup your blog template first. It is located on the top right side written as Backup/Restore.
          Now go To Edit HTML.
          Click Expand Widget and find this highlighted code.      <data:post.body/>
          To find this code press CTRL+F and put this code in box you can see below.
          When you find this then paste the Facebook Like Button code below the code which your find in your HTML body of your template. To get Facebook like button code click below link.


          Click Here To Get Your Facebook Like Button Code


          If you want to add the like button in below your post then paste this code below the find code.

          And if you want to add the like button in the above body of your blog post then paste this code above it.

          I have three type of facebook like button show in pictures.


          Horizontal Facebook Like Button With Count                    
          Vertical Facebook Like Button With Count
          Facebook Like Button without Count.


          This is very useful for blogger because some one easily checkout this how many people read and like this and share it this is the way to check out how many people read your post deeply. This is one of the main source to increase blog rank or traffic.

           Related Post:

          Social Bookmarking Button Add To Blogger
          How To Add Facebook Page On Blog To Attract More Visitors
          How To Increase The Website Ranking From Social Bookmarking Sites
          You Can Easily Manage Permalinks Which Is Search Engine Friendly
          How to Add Next Page Or Previous Page Navigation Number For Post In Blogger

          Selasa, 12 Februari 2013

          Use Google Better Keywords Search Engine Friendly For Wordpress

          There are so many SEO keywords tools online to use. But at the end of the day one of the simplest tools is to use Google instant search. Just type in the main topic of your blog post. In as few words as possible, and see what suggestions Google makes for you. Then figure out a way to use these additional keywords in your title and in your blog post so that your post shows up on more pages when users are searching.

          Bonus Tip: 
          After your main keyword phrase, try typing the first letter of each letter in the alphabet to see what search suggestions Google will give to you. For example, if your blog post is about the Google penguin update, then try doing a search for Google penguin  and see what results Google will display for you. In the example below you will see that Google Recommends the search results for you.

          • Google Penguin Algorithm
          • Google Penguin Algorithm Change
          • Google Penguin Anchor Text
          • Google Penguin and Panda

          You Can repeat this process for every letter in the alphabet, and get a long list of very relevant keywords to include in your content for each blog post. And these results come directly from Google, showing you exactly what people are searching for. It is pretty simple.

          Rabu, 16 Januari 2013

          Social Bookmarking Button Add To Blogger

          In this tutorial you will learn how to add an Add This free social Bookmarking button to your blogger blog. By adding this feature to your blog you will enable visitors to your blog to create links to popular social bookmarking sites such as Google, Technorati, Facebook, MySpace, Digg, Stumble Upon, Reddit, Delicious, Furi, Yahoo etc. Adding personal social bookmarking enable visitors to share these links with others there by helping you attract more traffic to your site.

          Add this Share Button This tutorial shows you how to place a social bookmarking button on your site by accessing a free social bookmark and feed button builder service called Add This. Add This will supply you with a simple piece of code which when placed in a widget will insert a social bookmarking button either at the end of each post or in the sidebar. If you wish you can add the social bookmarking button to both as I have done on this site. For those new to blogging don't worry if this sounds complicated as this article gives you step by step instructions suitable for any Blogger user including beginners.

                                                    
          Add This Social Bookmarking Options:
          Steps for Adding a social Bookmarking Button from Add this to Your Blogger Blog.

          1. Register for a free account with Add This 
          Add this sign up for a Free Account Page.


          2. Once you supply a username, email address, password and your website address sign up is pretty much instantaneous.

          3. After sign up is confirmed click on Get your Button. This will take you to the create you Button Page.
                                      
          Add This create a Button Page:
          4. On the create your Button page you will be asked to make some selections
          about your social bookmarking button.

          What Kind of Button? Select sharing / bookmarking Button.
          What Look? Choose any of the six button choices. For this example I am going to select the share button.
                                                         
          Select Add This Share Button:
          Where? Select on a Blog. Blogger Platfrom? Select Blogger
          At this point the information  your have entered should look like the picture below:

          Add This Create a Button Page:
          Once you have confirmed that you have entered the correct information click on the Get your Code button and you will be taken to the Get your Code page.

          5. Form the Get your Code page you will be given the option to preview you button. Do so if you wish or move on the Step 6. Having generated the code for your Add This Social Bookmarking Button you now need to decide where to position it on your Blog. You may either place your new social Bookmarking Button Beneath each post or in the sidebar.


          Instruction for placing a social Bookmarking Button beneath each post of your Blogger Blog;
          Click on Blog Post Button Option.
          Highlight the javascript code supplied by Add This.
          Copy the code to the Clipboard of your computer using Crtl + C command:
          In a new window open your Blogger Blog and sign in.

          Navigate to Layout > HTML
          As a precaution Backup your template in case you inadvertently overwrite some code.
          Once you have backup place a tick in the Expand widget Templates check box.
          Use the Ctrl + F command to open the toolbar which will appear at the bottom of your page while using Blogger. You can close this at any time using the Ctrl + F command or by clicking on the blue cross in the left hand corner. Now highlight the following line of code and using the Ctrl + C command copy and paste code into the Search Box on the toolbar at the bottom of Blogger. This action will quickly locate the code for you in your Blogger template. You will be placing the code immediately before this tag.
                                                         <div class='post-footer'>

          Return to Add This and highlight the JavaScript button code supplied. Copy the code to your clipboard using the Ctrl + C command. Reopen the Blogger window and place the cursor right before the tag that you located earlier. Paste the javascript code from Add This into the Template using the Ctrl + V command. Your Code placement should look like the picture below.

                          
          Code Placement for free social Bookmarking Button from Add This:
          Click on Save Template.
          Now click on view Blog from the top menu and navigate to the end of your first post. If all instruction have been followed you will now have a social bookmarking button at the bottom of each post.

          Instruction For Placing a Social Bookmarking Button in a Sidebar of Your Blogger Blog.
          Follow the Add This automated process by click on Add the Menu to My Blog button. This will place an Add This social bookmarking button in a widget in your sidebar as you see on this site.

          This Blogger Tutorial has covered the steps involved in adding a free Add This Social Bookmarking Button to your Blogger Blog. Grow your Blogger blog today by adding a free Add This social bookmarking button which will enable visitors to bookmark your site and share your posts with others. Add This will provide statistical tracking of social bookmarking activity on your site and help you determine your most popular posts.