Cari Blog Ini

Tampilkan postingan dengan label customize. Tampilkan semua postingan

Minggu, 18 Agustus 2013

Add | Put | Customize Bullet List Style With Colorfull Circle Hover Effect In Blogger Blogspot

In this tutorial i will show you how to add or customize Bullet List with amazing two Color Hover Effect in blog post. In normal position means without place mouse on bullet it looks blue but when you run mouse on bullet links then it is changes into green color which is very good looking and nice effect and reader of your blog post is also feel nice and good. It shows your post as a professional post or blog. These types of small changes in blogger make your blog better and good looking or professional blog.

Add | Put | Customize Bullet List Style With Colorfull Circle Hover Effect In Blogger Blogspot

How To Add Or Customize Bullet Style In Blogger With Simple Steps:


Now we are going to add this effect in our blog if you want to add in your blog then follow the below steps.

Go to Blogger.com.
Go to Template.
Click on Edit HTML.
Press Ctrl+F in HTML Body to appear search box.
When search box is appear in top right corner.
Paste below tag in search box and press enter.

]]></b:skin>

When you find this tag/code in HTML Body then copy below coding and paste above/before the ]]></b:skin> tag.

.post ul { list-style: none; } .post ul li { line-height: 1.4em; background: transparent url(https://blogger.googleusercontent.com/img/b/R29vZ2xl/AVvXsEjXDNMdb6CUpsZRnY-MksJfDdmxcxIXNyJ1mHEdeai_EBJDpJ0Wf8UiYv1x6o9bv9-SwFaayOVGBRj_bwIHLJMZr6pUFl5XTnrxEg8_OvCzQe8gEr6nT0U2eqtRGR79SCGI61AZJyIP8B4/s1600/blue-bullet-icon.png) no-repeat scroll 0 10px; margin: 0.3em 0; padding: 0 0 0.8em 20px; } .post ul li:hover { background: transparent url(https://blogger.googleusercontent.com/img/b/R29vZ2xl/AVvXsEjwJ6du7ne3-tgYsrshfscR73BZoDRPKce9b9eKlAiQCy5_DN5nsg3wk5rf_I5vKfHvzwEPslYdZ7kp3hDEd1dqWuc8PJzLgVZBcJA_1VFb9bN7w-0zc7wbLg88NR2O5kP2Ua1XjmtCrlc/s1600/green-bullet-icon.png) no-repeat scroll 0px 5px; } 


Customization In Above Coding:


If you want to increase the size of hover circle the change the value of 10px with your desire value.

Kamis, 01 Agustus 2013

Best WordPress Setting | Setup For SEO Get Organic Traffic Using Tricks

In this tutorial i will give you some best tips and points for index your Website in Google Search Engine. One most important thing is which niche or website name want to use for better SEO for website. In this post i will discuss the main points related to WordPress and how to get more traffic on your blog with simple steps.

Best WordPress Setting | Setup For SEO Get Organic Traffic Using Tricks
WordPress has been one among the foremost standard platforms for you to make your own blogs or websites. Reason is incredibly straightforward, as a result of it's absolve to use and is extremely custom-built. No marvel it's invariably the primary selection for any blogger within the world. however unhappy to mention that it's a proven fact that bloggers tends to represent the WordPress pitfall that kills SEO as a result of they only use the out of the box default settings. Now, let's start and fix it.

The Top SEO Tips And Tricks To Tweak WordPress Blogs


1. Use Best SEO Permalink Structure:


After the installation of WordPress, by default, your post can accommodates a dynamic universal resource locator, however within the side of best SEO follow, the post ought to have the permalink structure that seems with 'category' and therefore the 'post title' within the universal resource locator.

WordPress Best | Easy Plugins Installation List For SEO And Make Professional Wesbite 

Why ought to we tend to use the most effective SEO Permalink?
This type of permalink structure alter you to introduce a lot of vital keywords into the universal resource locator of your post. By applying this permalink structure, it offers you additional SEO profit if somebody else use that permalink structure to link back to your post.

2. Install The Should Have SEO Plugin:


In order to optimize the search ranking, you need to additionally learn to customise the titles, meta descriptions and keywords. to form issue easier, you'll simply install one straightforward plugin - dead one SEO pack that offer you the benefit to customise for each page or posts.Every page and post that you just produce have a text box at rock bottom wherever you'll enter the vital SEO data.

3. Embody Keyword In Your Title:


This is one among the foremost essential step that you just should follow once doing SEO, however do observe to not be concerned in keyword stuffing activity as a result of you would possibly get blacklist by the programme.

How To Verify My Custom Domain With HTML File Or Meta Tags In Webmaster Tools
How To Verify Custom Domain With Analytic Code In Webmaster Tools

4. Optimize Pictures In Posts And Pages:


By mistreatment the EL and TITLE attributes in pictures enable search engines crawler to decipher [the pictures] the pictures|the photographs} and properly index your images. In further, don't be lazy and consider significant name for your image files.

How To Increase Index Status In Webmaster Tools Tricks For Better SEO

5. Mistreatment Headings Will Count:


One vital purpose to require care after you area unit making a post or page is to use tag just for the titles.

Of course, you ought to additionally attempt to introduce a number of tags and as several tags as you wish for the opposite headings in your posts. By applying this method, it'll enable the search engines to raised index the vital data from your website. an honest article ought to have headings and subheadings so the topic of the page is a lot of clear and elliptic.

6. Produce XML Sitemaps And Search Engines Submission:


XML website maps area unit needed for quicker categorization of the web log contents in search engines. making XML Sitemaps may be a should for contemporary new websites and blogs so search engines can get to grasp regarding the existence of recent pages via XML website maps. one among the foremost helpful WordPress plugin you're install and active is Google Sitemap XML Generator.

7. Speed Up Your Web Log Or Website:


Nobody like websites that looks to be loading forever, particularly once Google has listed Page Speed mutually of many factors to enclosed in its search algorithmic program recently. you'll invariably use of free {website|web website} Speed Checkers found on-line to analysis your site speed and proper them consequently.

8. Content Is King:


Senin, 17 Juni 2013

Use Language And Formatting | Search Preferences | Others Option Setting In Blogger Blogspot

In this tutorial i will show you how to set up the Language And Formatting,Search Preferences for SEO settings in Blogspot with simple and easy tricks. If you make a blog on blogger blogspot then you should first learn everything about blog set up for properly use. In this post i tell you every thing and every heading in details. I also discuss first three headings already in my previous post. And if you want to make all setting prefect then first learn three first heading and its usage and then go next three. Now we are going to discuss the next three main heading about Blogger Best SEO Techniques using Search Preferences and Blogger Tools. Blogger SEO is very important for every blog to get visitors on your blog from search engine. When visitors come form search engine then the worth of these visitors are very high and if you have put PPC programme on your blog or website the you can get more PPC with these tips.

Use Best Blogger Settings Option Basic For SEO And Others Option Links

Language And Formatting:


Language:


In the Language and Formatting heading you can easily change or select the desire formatting for your blog. Here you can also select the language of your blog which you want. It  is just simple by visiting the Language And Formatting link and click on the language button with grey color and select your desire language for your blog.

You can also Enable or Disable the Transliteration for your blog easily by selecting on of them.
First click on Enable and then choose or select the language which you want.


Formatting:


In the Formatting Option you can easily select or choose the Time Zone, Date Header Format, Timestamp Format, Comment Timestamp Format, for your blog. If you want to do so then click on Language and Formatting and changes all these option with your choice.

Use Language And Formatting | Search Preferences | Others Option Setting In Blogger Blogspot
Use Language And Formatting | Search Preferences | Others Option Setting In Blogger Blogspot 1

Search Preference:


Search Preferences is the most important and very useful option in blogger blogspot to make or do better SEO for your blog. Here you can select or make your blog search engine friendly but in the Crawl and Indexing option you can also see the Yellow highlighted Banner written with these words.


Warning! Use with caution. Incorrect use of these features can result in your blog being ignored by search engines.

This is because if you make or do wrong selection for your blog then it is also effect in the search engine and your blog is ignore and left by search engine to show first. If you want to make your blog perfect and also get more visitors from search engine do better SEO according to my tutorial and write original content on your blog then your blog definatly get a lot of visitors in week or in a month. I am also do the same thing and now my blog get thousand of visitors daily.

Meta Tags:


In Search Preferences first of all go to Meta Tags > Description and give your blog description with only 150 Characters because only 150 characters are shown in the search results and more then ignore by search engine that's why select and choose better keywords for your search results.


Errors And Redirection:


In Error and Redirection you can choose, select or customize your Custom Page Not Found means when some one visit your blog with bad link or those link which is not available on your blog. These bad or crawler errors link are formed by using your homepage link first and then any letter or keywords after your homepage blog address. Like below.

https://trickofblogging.blogspot.com/DKERIFD


Add Custom Page Not Found On Your Blogger Blogspot:


For adding this section on your blog is very easy with simple tutorial if you want to do so then follow my below tutorial for doing this amazing tricks.

Go to Settings.
Go to Custom Page Not Found.
Click on Edit link.
Now click below link and copy the code of your Beautiful Custom Page Not Found and also follow the tutorial given in this link.


I have also a tutorial on how you can easily remove your 404 Error in blogger blogspot using webmaster tools by simple steps and it is also very important to remove it as soon as possible because these errors also slow down your blog indexing speed in Google Search Engine and also take effect on your blog health. To Remove this 404 Error visit below link.


Custom Redirects:


What is Custom Redirects?
Custom Redirects is use when you want redirect your blog link to other website or blog easily when some one click on this link. Means if you have a Domain 1 and you want to attract visitor on domain 1 to domain 2 then you give the link of domain 1 in the custom redirect setting of domain 2 and when visitors from search engine or anywhere visit domain 2 they automatically reach on domain 1.

Use Language And Formatting | Search Preferences | Others Option Setting In Blogger Blogspot 2


When you give the domain link of any website or blog when visitor click on this domain or blog then they transfer to other blog.

Now the most important and the best option in blogger to get lot of visitors on your blog just using these Two Option. It also very important for any blog to make blog perfect. Every blogger first set these two option then move next steps.

Crawlers And Indexing:


Crawlers And Indexing is very important for any blog it is also same in Webmasters Tools. Crawlers means Google Search Engine which crawlers the search results and shown on page. If you done this job effectively or better then i sure you get many visitors on your blog. If you are successful to tell about your blog to Google Crawlers or Google Bot then no one defeat you in the race of blogging.

I already tell you about warning message in between my this post. This warning is given by search engine.

Custom Robot .Txt File:


It is very important point or feature in Google Blogger we easily control all our blog content which we want show to search engine and which we not want to show to search engine it is our choice. We can easily Allow or Disallow our content to show or not show in search engine. But now I give you simple robot .txt file which you can easily add in this option. If you want to know about more about Robot .txt file then i have also a big tutorial on it and also proper Blogger SEO Procedure.  How I Can Use Crawlers And Indexing Tool In Blogger


User-agent: Mediapartners-Google
Disallow:
User-agent: *
Disallow: /search
Allow: /
Sitemap: http://trickofblogging.blogspot.com/feeds/posts/default?orderby=UPDATED


Now Just replace the link of my blog with your blog address and paste this robot .txt file in the Custom Robot .text box by click on edit link.

Custom Robots Header Tags:


For better selection of Custom Robots Header Tags i have already write the best and easy tutorial on setup of Robot Header Tags. If you want to also do so the click below link and do according to the tutorial and make your blog Search Engine Friendly.

 
Use Language And Formatting | Search Preferences | Others Option Setting In Blogger Blogspot 3


When you have done this then click on save button and enjoy this trick.


Others:


In the Others option you can make many changes means you can export, import, delete your blog. Also set the Site Feed in this Blog Tools option. Also Open ID, Adult Content or Google Analytic.

If you want to delete the blog address or delete your whole blog for some problems like you not like your home address of your blog and you can also write about too much post which you can not write again the you can easily import your blog first and delete it. And after it you can export your blog to new blog address i have a easy tutorial on it if you want to do so then click below link.


Site Feed:


In Site Feed you can allow Full Site Feed, After Jump Break, Custom Feeds, None or Short Site Feed which you like to show on your Blog Feed Burner or on Blogger Homepage.

Adults Content:


In the Adults Content you can also set this option. If you make a Adults Blog which you want not show to children's then you just Yes or No the blog setting on Adults Content and when some one visit your blog then your blog show the Warning Message for Children to don't visit this site this is only for Adults.

Google Analytics:


In this option you can just paste the Google Analytic ID of your blog. Google Analytics Web Property ID is the Number Code which is located in your analytic account when you make your blog or website analytic account. For this Just Copy the Code from your analytic account and paste here. I have also a tutorial on Proper Analytic Account Creation.


Now i give you six most important steps for blogger SEO and make it perfect using these 6 Headings if you have any question about this then using contact us page contact with me and tell me about your problem and also tell me can you understand my written content or not.


Related Articles:


Senin, 10 Juni 2013

Create | Make Blogger Background Image On Photoshop And Change With Desire Photo

In this tutorial i will show you how to create Image In Photoshop and how to Add or Replace your desire image in blogger background just simple steps and trick. Now this tutorial also teach you how to use Photoshop Features. I have write many post about Blogger and Blogging tips and tricks but now i want discuss a small and best tutorial using Photoshop because it also play and important role in field of blogging. Like if you want to add image in blog post and you want to also add any name or text on this photo/image you want to put on blog post then you can easily add this also like i write my blog name on mostly pictures and when someone view or see this picture they also see our blog name which  is very effective and these people also visit your blog to get proper information about this picture or post.


How To Make Blogger Header Image In Photoshop

How To Make Image/Photo/Picture In Photoshop For Blogger Background:


If you want to add your desire customize picture in blogger background then follow the below tutorial to make image and then add this on your blog.
Create | Make Blogger Background Image On Photoshop And Change With Desire Photo
Create | Make Blogger Background Image On Photoshop And Change With Desire Photo 1

Click on Photoshop Install Software on your computer desktop screen.
Run your Photoshop.
Now go to File.
Go to New.
Click on it.
Like above image which totally reduce your effect just follow the picture.
Now according to below picture.
Customize the Page of Image.

Picture 1 For Customization:


Give the Name in Step 1.
Select Width or Height in Step 2. 
Select Resolution in Step 3.
Select Mode Of Color means RGB, Greyscale, CMYK Color, Or Lab Color.
Now Click OK.
You See the White page after this customization.


Picture 2 For Customization For Patten:


Click on Paint Brush. Like pointed in Step 1.
Go with Step 2 to Select the Patten of the color or background.
Now you have done you also customize simply by adding or cutting picture or other picture to pick the best and beautiful template.

If you want just your blog names appear in the background of blogger template then you also do this. For this Go with Picture 3. 


Create | Make Blogger Background Image On Photoshop And Change With Desire Photo 2


Here Is the Small Tutorial which show you how just write text on Blank White Page or Any image which you put on Photoshop.

Just do same as adding blank white page. Where you customize the page with step1 to step 4.
When you add page then put your desire color using Brush Tool and then write 3D Color Effect Text on blank white, color or any picture.

When you make white page on your Photoshop or select any picture then use below tutorial for writing 3D Effect Text on picture.

Click On Text Writing Tool which is represent by bold T.
Write your blog name or any text which you want to appear behind your template.
Now using image or tutorial both to do easily.

Create | Make Blogger Background Image On Photoshop And Change With Desire Photo 3

Go to Above Tab Like File, Edit, Image, Layers, Select, Filter, View, Windows, Help.
Click on Windows Tab.
Go to Show Layers.
After Click you see the Layer Effect page on right bottom sidebar.
Right click on image and create Duplicate Layer.
Remove Background Layer.
Now again Right Click on Duplicate Layer.
Go to Blending Option.
Now you can see the same thing which you are seeing in the above picture.
Tick same as mine.
Select the Shadow.
Click Ok. Now you have done.
Save your image.

Now You can Replace Old Style Templates in Blogger in new one
5 Ways How to Make your Blogger Blog Like WordPress Website

Add Customize Image In Blogger Background Template:


Go to Blogger.com.
Go to Template.
Click on Customise Orange Button.
Go to Background.
Go to Remove Image and click on the image.
Click Upload Image.
Now by using this option add picture from your computer where you save your customize picture.
Click on Apply To Blog Orange Button right top side.
Click to View Blog.
Now you have done correctly.

If you have face any problem about this tutorial then feel free and give me your comment for make more easy or best.

Related Articles:


Add | Put | Embed Three Or Four Column Footer Widget/Gadget In Blogger Blogspot
Add Facebook Like Box Widget/Gadget On Blogger By Facebook Developer Plugin
Add | Make About Us Page Widget | Gadget On Your Blog Footer Or Sidebar
Add | Put 50 Flag Translator Widget | Gadget On Your Blogger Blogspot
Add | Put Three Tab Gadget/Widget In Blog Layout Sidebar On Blogspot 
Add | Put Best Style Subscribe Box Widget/Gadget For Blogger Sidebar
Tricks To Add Simply/Easily/ PayPal Donate Button To Blogger
Add A Simple Drop Down Menu To Blogger Blog 

Sabtu, 01 Juni 2013

Add | Make About Us Page Widget | Gadget On Your Blog Footer Or Sidebar

In this tutorial i will show you how you can easily make About Us Profile on blog widget or gadget in you footer of in sidebar of you blog. If you feel problem by adding about us page on your blog then forget it and now ready to add this on your blog by simple blogging tricks. About Us page is very important if you want a approval from Google Adsense or Monetize you blog with Google Adsense. Because Google want a info about the Author properly and if you can't put this on your blog i will sure you can't approve any time from Google and Google reject the application of your Google Adsense Account Immediately. I have also many trick to make money online by YouTube Or Chitika Ads.

How I Can Get Approval From Google Adsense My Blog Or Website
Easy | Best | Simple Tricks To Make Money From Youtube | Chitika

If you have not get a lot of visitors on your blog then i have also best and latest tips for Blogger SEO which increase your traffic. You can also get to much traffic from Social Bookmarking Sites.

Best Blogger Tips And Tricks For My Blog SEO Instantly
How I Can Get More Pageviews Using Social Bookmarking.Com

Add Make About Us Page Widget Gadget On Your Blog Footer Or Sidebar
      

How You Can Easily Add This Widget On Your Blog By Simple Steps:


I have a small and best tutorial for you if you want to add this widget on your blog like my profile widget then ready to make it. I share this post only for you .

I have Latest Blogger Widget you can easily add on your blog to increase the Beautiful Look of your blog.

Add Facebook Like Box Widget/Gadget On Blogger
Add Three Or Four Column Footer Widget/Gadget In Blogger
Add CSS Jqeury Drop Down Menu On Blogger
Manage Page Layout In Blogger
Live Traffic Counter Put In Your Blogger Blogspot
Add Twitter Updates Gadget To Blogspot Blogger

Add This Gadget With Below Code Pasting:

Copy the below code and paste it notepad file and customize it according to below tutorial.

<h2 class="title">About Me</h2>
<div class="widget-content">
<!--[if !IE]> -->
<style>
}
#trickofblogging:hover
 {
border:2px solid #ccc;
cursor:pointer;
}
.opacity
{
opacity: 0.5;
margin-right: 50px;
-moz-transition: all 0.5s ease-out;
-o-transition: all 0.5s ease-out;
-webkit-transition: all 0.5s ease-out;
-ms-transition: all 0.5s ease-out;
transition: all 0.5s ease-out;
-moz-transform: rotate(7deg);
-o-transform: rotate(7deg);
-webkit-transform: rotate(7deg);
-ms-transform: rotate(7deg);
transform: rotate(7deg);
}
.opacity:hover
{
-moz-transform: rotate(0deg);
-o-transform: rotate(0deg);
-webkit-transform: rotate(0deg);
-ms-transform: rotate(0deg);
transform: rotate(0deg);
-moz-box-shadow: 1px 1px 4px #000;
-webkit-box-shadow: 1px 1px 4px #000;
box-shadow: 1px 1px 4px #000;
}

</style>
   <!--[endif]---->


<style>
#trickofblogging
{
border:2px solid #888; margin:2px 5px 0px 0px; padding:2px;
}
#profileAditya:hover
 {
border:2px solid #ccc;
cursor:pointer;
}

.opacity:hover
 {
opacity: 1;
-moz-box-shadow: 1px 1px 4px #000;
-webkit-box-shadow: 1px 1px 4px #000;
box-shadow: 1px 1px 4px #000;
}

</style>

<img class="opacity" id="trickofblogging" src="https://blogger.googleusercontent.com/img/b/R29vZ2xl/AVvXsEgDtmsJfQeUMaaTsA1hUC5lAzVEJNQOneW51d9dJaUOxqhaFhkuDhn3p71FuXsP8x9BOx2R5mJpFGjawbJaPR5yQv4Boc_PJdJCUfFehJUoNk9HXSamatCMaVa_YvqlpUwBZsybkHqGsf4/s1600/DSC00108.JPG" width="100" />
<div style="font-family: Arial Tahoma Verdana; font-size: 13px; text-align: justify; ">
<b>Founder & Author:</b> Founder & Author: Hi! I am Umair Noor: Hi guys, Welcome to TrickOfBlogging and let me introduce myself to you. Like any other, I’m a normal guy who is passionate about Computing, Blogging and Internet. I’m Umair Noor student of Software Engineer by education a Blogger by profession and Blogging is my passion<a href="http://trickofblogging.blogspot.com/"> <b>Trick Of Blogging</b></a>is not start of blogging Umair launched his frist Marketing Site in 2010. He is a problogger & running a number of sites from his living room</div><a style="color:#5634;" href="http://trickofblogging.blogspot.com/p/blog-page_2741.html#.UakbF9jIfFwl" target="_blank">...Read More</a><!--![endif]---->
</div>

Changes Required:


Replace the Red highlighted line with your image link which you want to add on About Us page.
Replace the Green highlighted line with your desire Font or Size.
Replace the Orange highlighted line with your Info Text.
Replace the Blue highlighted line with your blog home page link.
Replace the Brown highlighted line with your Blog About Us page link.


When you customize all the required highlighted lines then copy your customize coding and paste this code according to below tutorial. If you want to easily add this in your blog feel free and work now.

Go to Blogger.com.
Go to Layout.
Click On Add A Gadget.
Go to HTML/JavaScript.
Paste your Customize Code In the HTML box.
Save it.
View blog.

 Related Articles:


Social Bookmarking Button Add To Blogger
5 Ways To Make Your Blogger Blog Like WordPress Website
How to Verify My Blogger Blogspot in Webmaster Tools
Submitt Sitemap of Your Blogger To Google And Major Search Engines
How I Can Optimize the Post Title Mean My Post Show First
How I Can Use Webmaster Tools Properly For Blogger
How I Can Boost Traffic With Targeted Country On Blogger
How I Can Make Internal Links In The Blog Post To Increase Rank

Kamis, 30 Mei 2013

Add | Put | Embed Three Or Four Column Footer Widget/Gadget In Blogger Blogspot

In this tutorial i will show you how to easily add Three Column Footer Gadget in blogger. Best blogging tricks are always easy and customize or make many changes easily. To make Blogger beautiful or Good Looking we should spend a lot of time on our blog or website. If you want a lot of visitors daily on your blog or in these visitors you want some visitors are returning people then put all your focus on your blog looking means make best and stunning blogger. When some one visit your blog then he/she just shocked to see your blog and say "What a Nice Blog". Now i am going to tell you how you can easily add the footer widget/gadget in your blog bottom easily with simple tricks. When ever you start blogging your focus should be on SEO, Good Looking Blog, Best Internal Linking, Best Google Page Rank, Good Strength Of Backlinks and Best Alexa Ranking. I have write many post on Manage Page Layout for better blog looking. If you want to also make beautiful blog then start with first adding widget or gadget in blog then add this below footer widget in blog it is the last step of manage page layout.
Add | Put | Embed Three Or Four Column Footer Widget/Gadget In Blogger Blogspot

Now Let's Start The Four Column Footer Adding:


If you want to add the four column footer in blog layout by adding gadget then work according to below tutorial.

Go to Blogger.com.
Go to Template.
Go to Edit HTML.
Now first download your full template in your computer before make changes any time.
Press Ctrl+F in HTML body box. Like i tell in article of Handle New Interface Of Blogger HTML Editor.
Paste this below Code in the search box and press enter.

]]></b:skin>


Now paste the below CSS Code just above/before this code.


/* -----   LOWER SECTION   ----- */
#lower {
       margin:auto;
       padding: 0px 0px 10px 0px;
       width: 100%;
       background:#333434;
} 
#lower-wrapper {
       margin:auto;
       padding: 20px 0px 20px 0px;
       width: 960px;
}
#lowerbar-wrapper {

     border:1px solid #DEDEDE;
       background:#fff;
       float: left;
       margin: 0px 5px auto;
       padding-bottom: 20px;
       width: 32%;
       text-align: justify;
       font-size:100%;
       line-height: 1.6em;
       word-wrap: break-word; 
       overflow: hidden;
}
       .lowerbar {margin: 0; padding: 0;}

       .lowerbar .widget {margin: 0; padding: 10px 20px 0px 20px;}
.lowerbar h2 {

      margin: 0px 0px 10px 0px;
       padding: 3px 0px 3px 0px;
       text-align: left;
       color:#0084ce;
        text-transform:uppercase;
      font: bold 14px Arial, Tahoma, Verdana;
       border-bottom:3px solid #0084ce;
}
.lowerbar ul {

      margin: 0px 0px 0px 0px;
      padding: 0px 0px 0px 0px;
      list-style-type: none;
}
.lowerbar li {

      margin: 0px 0px 2px 0px;
      padding: 0px 0px 1px 0px;
      border-bottom: 1px dotted #ccc
}

Save Template.
You have done.

Improve Content Keywords Significance
Use Custom Robots Tags Selection Blogger For SEO
Best Blogger Tips And Tricks For My Blog SEO Instantly


Add Lower Wrapper Lower Bar Widget From Lowerbar1 to Lowerbar 3 or 4:


By adding Lower Wrapper and Lower Bar we see three or four Add A Gadget Links in the page layout where you can easily add which you want like Blog Author Info, Blog Followers, Google+ Followers and many more option. Now we are going to add this Gadget in template and then go to Layout to check this out.

Go to Blogger.com.
Go to Template.
Paste below tag in search box and find.

</body>


When you find this above tag then copy below code.
Paste below code just above/before this </body> tag.


<div id='lower'>
<div id='lower-wrapper'>
<div id='lowerbar-wrapper'>
<b:section class='lowerbar' id='lowerbar1' preferred='yes'>
</b:section>
</div>
<div id='lowerbar-wrapper'>
<b:section class='lowerbar' id='lowerbar2' preferred='yes'>
</b:section>
</div>
<div id='lowerbar-wrapper'>
<b:section class='lowerbar' id='lowerbar3' preferred='yes'>
</b:section>
</div>
<div style='clear: both;'/>
</div> </div>


Again Save Template.
Your Work is finished and your three column footer is ready for work and if you want to four footer then simply add below code above last two highlighted red background lines correctly.

Make Money Form Links of Amazon Product to Blogger Posts
You Put Chitika Ads to Blogger Blogspot with Simple Steps
Easy | Best | Simple Tricks To Make Money From Youtube | Chitika


<div id='lowerbar-wrapper'>
<b:section class='lowerbar' id='lowerbar4' preferred='yes'>
</b:section>
</div>


And give the lowerbar4 name with your choice number.

Changes And Customization For Footer Column Widget By Color:


If you want to customize or change the color of background text and width and many more then generate the color by using below Color Code Generator Tools and use according to above tutorial.


Color Code Generator Tool:


Change the Background color of your desire by replace the #333434
Change the Widget Width with your desire by replace the  960px 
Change the Background 2 color by replace the  #fff
Change the Widget Width 2 by replace the  32%
Change the of Text by replace the #0084ce 
Change the  Font of Widget just add desire font font: bold 14px Arial, Tahoma, Verdana;
border-bottom:3px solid #0084ce 
Change the Bottom Border Dotted by replace the #ccc.

Now save template and go to layout and check in the footer of your Page Layout you will see three or four column just add which you want and your blog make perfect and beautiful.

Related Articles:


Ready to Make Money With Adsense Keywords and Blogger
Affilate Banner Put Below in your Blogger Post
The Best Placement of Adsense On Your Blogger Blogspot
How To Increase The Website Ranking From Social Bookmarking Sites
How to Verify My Blogger Blogspot in Webmaster Tools
How Use Social Website To Increase Your Website Traffic
How to Remove 404 Errors in Blogger Blogspot
Why I Make More Pages On My Blog To Increase Organic Traffic

Rabu, 15 Mei 2013

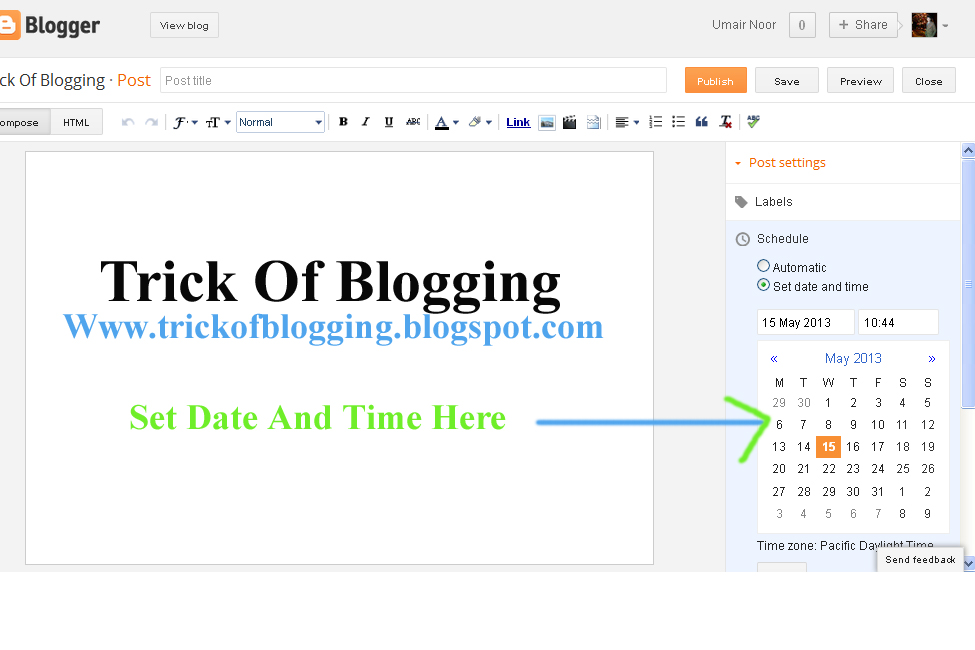
How To Set | Select | Choose | Change Desire Blog Post Date And Time In Blogger

I am gona show you how to Change or Set Blog Post Date and Time in blogger blogspot. To customize the blog post simply using small tutorial and make blog post beautiful by selecting daily or weekly its up to you. Now if you want to show your blog post with arrangement to make perfect then you use this feature. Publish On feature on right hand side of your post page is for that if you have miss some days or forget to write post then make changes and return back your post on that date which you want.

Setup A Different Date Of Your Blog Post:

In Blogger.com we set date easily. Blogger allow a Blog Administrator or Webmaster to set any publication date for a post which they choose. For setting up there are many reason for set a particular publishing date for a blog post. To keep continuity with  sequence for blog articles we use this feature. You also use this feature if you forget to write a post/articles with sequence or you can decide afterwards to add an extra article to the sequence. When we start blogging on our blog we always forget to make About Author Page in blog and after we decide to set up them. It also take you several years back if you want.

Social Bookmarking Button Add To Blogger
5 Ways How to Make your Blogger Blog Like WordPress Website
How Use Social Website To Increase Your Website Traffic 

Tips And Troubleshooting:


  • I suggest you to setup the About Page Date first because it appears first at the beginning of your RSS feeds.
  • Remember when you are posting with changing date that the post will still appear in your recent posts Rss Feeds even you setup this post date in past.
   

How To Setting Up User Defined Publish Date In Blogger Blogspot:

  1. Create a new post of your blog as usual.
  2. Click on the Published On.
  3. Set your desire Date or Time like below picture/image.
  4. Click on Done Link.
  5. Click Update Orange Button.
  6. And preview your blog post it is list in those post where you want.
How To Set | Select | Choose | Change Desire Blog Post Date And Time In Blogger
In this post you will learn how to select or changes the desire post date or time. I have also a big and detailed tutorial about how to make money from blog or website, Blogger SEO Tips and Tricks, Alexa Ranking, Google Page Rank, Get Backlinks, Make Internal links, Get lot of visitors on your blog by Search Engine Optimization, Submitting sitemap of blog or website to Google Search Engine or Major Search Engine.

Related Articles:


Jumat, 01 Maret 2013

How to Add Next Page Or Previous Page Navigation Number For Post In Blogger

In this tutorial you will learn how to add the Next Page or Previous Page navigation widget in your blogger homepage. This tutorial is so easy to work on this Page Navigation Number. If you are ready for this then start this tutorial. When you add this navigation page in your blogger then the visitor which come on your blog is easily manage your blog and check your all previous or next post. This is also better for increase pageviews. 

Let's Go for working on this tutorial:

It is the one of the most important feature of a good blog or site in that it is very easy for the blog visitors to navigate throughout the site. A site which is structured in such a way that the visitors have to take efforts to move from one page to another is seen as poorly designed site. Blogger users are aware of the Newer Posts and Older Posts links at the bottom of the blog.


How To Install This Widget On Your Blogger?

  • Login in your Blogger.com.
  • Go to Template > Edit HTML.
  • Click Expand Widget.
  • Press CTRL + F to find the </body> tag in your html page or Template.
  • When you find the </body> tag then paste the code above this code.

    Your Page Navigation Widget Code Is Here Click This Link To Get Code

      • When you paste this code above the </body> tag then click Save. Your work is done and click the view blog. Check your blog then page navigation is display on your blogger homepage. 
      • You can also customize this widget with your choice if you want to increase your page per post. Just you can find this highlighted code var pageCount =5; or your choice number.
       Related Post: