Cari Blog Ini

Tampilkan postingan dengan label footer. Tampilkan semua postingan

Minggu, 09 Juni 2013

Add | Put Best Style Subscribe Box Widget/Gadget For Blogger Sidebar

In this tutorial i will show you how you can easily Add Stylish Subscribe Us Box widget in blog sidebar or in footer. Subscribe Box is the best way also to increase the blog traffic. Because when people Subscribe your blog then they daily visit your site for getting updated Content or Post on your blog. The heading Subscribe to Get Latest Tutorial Via Email is the one of the best heading which convince to blog reader to get daily updated content. Imagine if your blog readers means subscribe are upto 500 then you can get average daily 100 visitors from this widget by adding in your site or blog. Now i have a good and easy tutorial to explain or embed this widget on your blog in just 5 minutes.

How I Can Boost Traffic With Targeted Country On Blogger
How I Can Make Internal Links In The Blog Post To Increase Rank
How I Can Use Webmaster Tools Properly For Blogger

How And Where I Put Or Add This Gadget:


Add | Put Best Style Subscribe Box Widget/Gadget For Blogger Sidebar
This is your question may be and i have good answer for this question if you want to more subscriber then place this widget or gadget in blog sidebar in between or below where your want and if you also want to put it in the blog footer widget then you also do that its upto you. But my suggestion place this widget in blog sidebar to get better results.

Now we are going to start this easy tutorial.
If you want to add this widget then work according to below tutorial.

Go to Blogger.com.
Go to Layout.
Click on Add A Gadget link.
Go to HTML/JavaScript.
Click on HTML/JavaScript.
And Paste the below code in the HTML Box. But few customization is required which is give below.


<style type="text/css">
#subscribe-wrapper {
background: url(http://softglad.at.ua/images/border.png) repeat scroll 0 0 transparent;
padding: 3px;
}
#subscribe-box {
background: url(http://softglad.at.ua/images/bg.png) repeat scroll 0 0 #F7F7F7;
border-radius: 15px;
padding:5px;
overflow: hidden;
}
a.linkopacity img {
filter:alpha(opacity=75);
-moz-opacity: 0.5;
opacity: 0.5;
-khtml-opacity: 0.5;
-webkit-transition:All .5s ease;
-moz-transition:All .5s ease;
-ms-transition:All .5s ease;
-o-transition:All .5s ease;
transition:All .5s ease;
padding: 3px;
border: 1px solid #999;
}
a.linkopacity:hover img {
filter:alpha(opacity=100);
-moz-opacity: 1;
opacity: 1;
-khtml-opacity: 1;
-moz-box-shadow: 0px 0px 10px 2px rgba(0, 0, 0, 0.44);
-webkit-box-shadow: 0px 0px 10px 2px rgba(0, 0, 0, 0.44);
box-shadow: 0px 0px 10px 2px rgba(0, 0, 0, 0.44);
}
#subscribe-box:hover table {
    top: 0;
}
#subscribe-box h1{
margin-top: 5px;
color: black;
font-family: arial;
font-size: 15px;
margin-bottom: 5px;
line-height: 14px;
font-weight: bold;
text-align: center;
letter-spacing: -1px;
}
#subscribe-box table {
position: relative;
top: 40px;
-webkit-transition:All .5s ease;
-moz-transition:All .5s ease;
-ms-transition:All .5s ease;
-o-transition:All .5s ease;
transition:All .5s ease;
margin-bottom: 0px;
}
#subscribe-box td {
padding: 2px;
}
#subscribe-box input{
background: white;
border: medium none;
font-size: 12px;
padding: 10px;
width: 150px;
color: #666;
font-family: arial;
margin-bottom: 3px;
width: 55%;
}
#subscribe-box input:focus{outline:none;}

#subscribe-box .submit{
background: #E73827;
color: #fff;
cursor: pointer;
font-weight: bold;
text-shadow: 0 1px 2px black;
width: 90px;
font-family: arial;
margin-left: -3px;
font-size: 14px;
}
</style>
<div id="subscribe-wrapper">
<div id="subscribe-box">
<h1>Subscribe to Get Latest Tutorial via email</h1>
<form action="http://feedburner.google.com/fb/a/mailverify" method="post" onsubmit="window.open('http://feedburner.google.com/fb/a/mailverify?uri=Put your feedburner link for verifyication', 'popupwindow', 'scrollbars=yes,width=550,height=520');return true" target="popupwindow">
<center>
<input name="email" onblur="if (this.value == &quot;&quot;) {this.value = &quot;enter your email address...&quot;;}" onfocus="if (this.value == &quot;enter your email address...&quot;) {this.value = &quot;&quot;}" size="20" type="text" value="enter your email address..." />
<input name="uri" type="hidden" value="Trick Of Blogging" />
<input name="loc" type="hidden" value="en_us" />
<input class="submit" type="submit" value="subscribe" /></center></form>
<center>
<table>
<tbody><tr><td><a href="http://feeds.feedburner.com/blogspot/LPkip" class="linkopacity" target="_blank"><img src="http://softglad.at.ua/images/rss.png" /></a></td>
<td>
<a href="http://www.facebook.com/pages/Trick-Of-Blogging/447187668684161" class="linkopacity" target="_blank"><img src="http://softglad.at.ua/images/facebook.png" /></a>
</td>
<td>
<a href="https://twitter.com/trickofblogging" class="linkopacity" target="_blank"><img src="http://softglad.at.ua/images/twitter.png" /></a>
</td>
<td>
<a href="https://plus.google.com/u/0/113224303869289827964/posts" class="linkopacity" target="_blank"><img border="0" src="http://softglad.at.ua/images/Google.png" /></a>
</td>
</tr></tbody></table>
</center>
</div></div>
                      

Customization For Subscribe Box Widget:


Change Red Highlighted Color Text with your desire text. Subscribe to Get Latest Via Email.
Change Orange Highlighted  Color Text with your feed burner verification link. 
Change Sky Water Highlighted Color with your Google Feed Burner link http://feeds.feedburner.com/blogspot/LPkip
Change Pink Highlighted Color with your Blog Facebook Page link http://www.facebook.com/pages/Trick-Of-Blogging/447187668684161
Change Parrot Green Highlighted  Color with your Blog Twitter Page/Profile link https://twitter.com/trickofblogging
Change Purple Highlighted Color Text with your Google+ Profile or Post page link https://plus.google.com/u/0/113224303869289827964/posts

After Customization paste the code in HTML Box and save setting.
Now Select the desire place where you want to add this amazing widget in sidebar.
Again Save Setting.
Click on View Blog.
Now you have done correctly.

And if you want to add this widget in Footer Column then first add the Three Footer Column and this this in the Blog Footer it also looks beautiful.

Add Three Or Four Column Footer Widget/Gadget In Blogger Blogspot

When you add this widget also then just pick your Subscribe Widget and drop the added widget in the Blogger Footer or Bottom. Now view your blog its look perfect now.


Related Articles:


Add | Put Three Tab Gadget/Widget In Blog Layout Sidebar On Blogspot
Add | Put 50 Flag Translator Widget | Gadget On Your Blogger Blogspot
Add | Make About Us Page Widget | Gadget On Your Blog Footer Or Sidebar
Add Facebook Like Box Widget/Gadget On Blogger By Facebook Developer Plugin
Add Manually CSS Jqeury Drop Down Menu On Blogger
Add | Put HTML Color Code Generator Tool To Your Blogger With Easy Tricks
Add Flickr/Picasa Web/Photobucket/Other Albums Slideshow On Blog Easy Tricks
How Easliy/Simple To Manage Page Layout In Blogger Blogspot

Sabtu, 01 Juni 2013

Add | Make About Us Page Widget | Gadget On Your Blog Footer Or Sidebar

In this tutorial i will show you how you can easily make About Us Profile on blog widget or gadget in you footer of in sidebar of you blog. If you feel problem by adding about us page on your blog then forget it and now ready to add this on your blog by simple blogging tricks. About Us page is very important if you want a approval from Google Adsense or Monetize you blog with Google Adsense. Because Google want a info about the Author properly and if you can't put this on your blog i will sure you can't approve any time from Google and Google reject the application of your Google Adsense Account Immediately. I have also many trick to make money online by YouTube Or Chitika Ads.

How I Can Get Approval From Google Adsense My Blog Or Website
Easy | Best | Simple Tricks To Make Money From Youtube | Chitika

If you have not get a lot of visitors on your blog then i have also best and latest tips for Blogger SEO which increase your traffic. You can also get to much traffic from Social Bookmarking Sites.

Best Blogger Tips And Tricks For My Blog SEO Instantly
How I Can Get More Pageviews Using Social Bookmarking.Com

Add Make About Us Page Widget Gadget On Your Blog Footer Or Sidebar
      

How You Can Easily Add This Widget On Your Blog By Simple Steps:


I have a small and best tutorial for you if you want to add this widget on your blog like my profile widget then ready to make it. I share this post only for you .

I have Latest Blogger Widget you can easily add on your blog to increase the Beautiful Look of your blog.

Add Facebook Like Box Widget/Gadget On Blogger
Add Three Or Four Column Footer Widget/Gadget In Blogger
Add CSS Jqeury Drop Down Menu On Blogger
Manage Page Layout In Blogger
Live Traffic Counter Put In Your Blogger Blogspot
Add Twitter Updates Gadget To Blogspot Blogger

Add This Gadget With Below Code Pasting:

Copy the below code and paste it notepad file and customize it according to below tutorial.

<h2 class="title">About Me</h2>
<div class="widget-content">
<!--[if !IE]> -->
<style>
}
#trickofblogging:hover
 {
border:2px solid #ccc;
cursor:pointer;
}
.opacity
{
opacity: 0.5;
margin-right: 50px;
-moz-transition: all 0.5s ease-out;
-o-transition: all 0.5s ease-out;
-webkit-transition: all 0.5s ease-out;
-ms-transition: all 0.5s ease-out;
transition: all 0.5s ease-out;
-moz-transform: rotate(7deg);
-o-transform: rotate(7deg);
-webkit-transform: rotate(7deg);
-ms-transform: rotate(7deg);
transform: rotate(7deg);
}
.opacity:hover
{
-moz-transform: rotate(0deg);
-o-transform: rotate(0deg);
-webkit-transform: rotate(0deg);
-ms-transform: rotate(0deg);
transform: rotate(0deg);
-moz-box-shadow: 1px 1px 4px #000;
-webkit-box-shadow: 1px 1px 4px #000;
box-shadow: 1px 1px 4px #000;
}

</style>
   <!--[endif]---->


<style>
#trickofblogging
{
border:2px solid #888; margin:2px 5px 0px 0px; padding:2px;
}
#profileAditya:hover
 {
border:2px solid #ccc;
cursor:pointer;
}

.opacity:hover
 {
opacity: 1;
-moz-box-shadow: 1px 1px 4px #000;
-webkit-box-shadow: 1px 1px 4px #000;
box-shadow: 1px 1px 4px #000;
}

</style>

<img class="opacity" id="trickofblogging" src="https://blogger.googleusercontent.com/img/b/R29vZ2xl/AVvXsEgDtmsJfQeUMaaTsA1hUC5lAzVEJNQOneW51d9dJaUOxqhaFhkuDhn3p71FuXsP8x9BOx2R5mJpFGjawbJaPR5yQv4Boc_PJdJCUfFehJUoNk9HXSamatCMaVa_YvqlpUwBZsybkHqGsf4/s1600/DSC00108.JPG" width="100" />
<div style="font-family: Arial Tahoma Verdana; font-size: 13px; text-align: justify; ">
<b>Founder & Author:</b> Founder & Author: Hi! I am Umair Noor: Hi guys, Welcome to TrickOfBlogging and let me introduce myself to you. Like any other, I’m a normal guy who is passionate about Computing, Blogging and Internet. I’m Umair Noor student of Software Engineer by education a Blogger by profession and Blogging is my passion<a href="http://trickofblogging.blogspot.com/"> <b>Trick Of Blogging</b></a>is not start of blogging Umair launched his frist Marketing Site in 2010. He is a problogger & running a number of sites from his living room</div><a style="color:#5634;" href="http://trickofblogging.blogspot.com/p/blog-page_2741.html#.UakbF9jIfFwl" target="_blank">...Read More</a><!--![endif]---->
</div>

Changes Required:


Replace the Red highlighted line with your image link which you want to add on About Us page.
Replace the Green highlighted line with your desire Font or Size.
Replace the Orange highlighted line with your Info Text.
Replace the Blue highlighted line with your blog home page link.
Replace the Brown highlighted line with your Blog About Us page link.


When you customize all the required highlighted lines then copy your customize coding and paste this code according to below tutorial. If you want to easily add this in your blog feel free and work now.

Go to Blogger.com.
Go to Layout.
Click On Add A Gadget.
Go to HTML/JavaScript.
Paste your Customize Code In the HTML box.
Save it.
View blog.

 Related Articles:


Social Bookmarking Button Add To Blogger
5 Ways To Make Your Blogger Blog Like WordPress Website
How to Verify My Blogger Blogspot in Webmaster Tools
Submitt Sitemap of Your Blogger To Google And Major Search Engines
How I Can Optimize the Post Title Mean My Post Show First
How I Can Use Webmaster Tools Properly For Blogger
How I Can Boost Traffic With Targeted Country On Blogger
How I Can Make Internal Links In The Blog Post To Increase Rank

Kamis, 09 Mei 2013

Tricks To Add Simply/Easily/ PayPal Donate Button To Blogger

In this tutorial i will show you how to add or put PayPal Donate Button in blog post, sidebar, footer, above post title and below post. PayPal Button widget is manage in commonly sidebar or in footer.


PayPal Account Information What Is That:

Tricks To Add Simply/Easily/ PayPal Donate Button To Blogger
PayPal account is use to receive or sent money and if you want to make a few cents or some bucks from all the hardworking when you are blogging on your Blogger Blog or Website then you should add a PayPal Donate Button to your blogger (Blogspot Blog) or Website. Adding donation button will encourage all those happy readers to say a big thanks you for helping them out but don't think every one donate some money to your blog or website they are few of who will willingly donate some chumps.

Easily adding a gadget to the blogger sidebar or in the footer of your blogger template you can get some money. We will using a widget to contain our PayPal Donate Button and we have not required to changing template of our blog. If you want to add the PayPal Donate Button in between blog post then it is also very easy to do.

The Best Placement of Adsense On Your Blogger Blogspot
How to Verify My Blogger Blogspot in Webmaster Tools
How Can I Make Earning With My Blogger Blogspot  

Add A PayPal Donate Button To Blogger Sidebar Or Blogger Footer:

Create or Make PayPal Account first if you have not already create.
Login to your PayPal account.
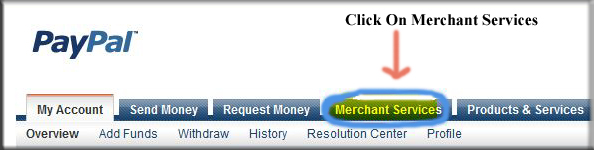
Click on the Merchant Services Tab like shown in the picture.

Tricks To Add SimplyEasily PayPal Donate Button To Blogger 1
Select Donation from the list of keys features displayed in the right sidebar of the PayPal Website Payments Standard Option 3 Payment Solutions. PayPal have changed its interface. You now need to select PayPal Website Payment Standard from Merchant Service drop down and then under the option 1 you will see in ting writing words I must say (There are also Buttons for Donation and Gift certificates). "Click On Donations".

                        
Tricks To Add SimplyEasily PayPal Donate Button To Blogger 2
Select Donation link in PayPal from PayPal Website Payments Standard Option 1 to add a donations button to Blogger Blogspot Blog.
From the PayPal Create a Donation Button Now link (One of Two).

                                 
Tricks To Add SimplyEasily PayPal Donate Button To Blogger 3

Manage the default button which you want and customize it.
Select the Currency which is adjusting by your country or area and depending on your need location.
Select Donors enter their own contribution amount radio button unless you want to have a set amount.

                                 
Tricks To Add SimplyEasily PayPal Donate Button To Blogger 4

Ensure the Secure Merchant ID radio button is selected. This will always prevent spammers getting hold of your email address.
At Step 2 it is worth saving your button.
At Step 3 customize your checkout page by allowing donors to write a short comment by selecting the Yes radio button to special instruction to seller.
Select the No radio button for customer's shipping address. Select the create Button.
When PayPal make or creates the PayPal Donation Button HTML code then copy it on your notepad file to further use. Now Sign out of your PayPal Account. Now next work in blogger.com.

How I Can Add Recent Post Moving In Down And Upward Direction
How to Remove 404 Errors in Blogger Blogspot
Why I Make More Pages On My Blog To Increase Organic Traffic 
Easy | Best | Simple Tricks To Make Money From Youtube | Chitika

Now Working In Blogger When PayPal Donation Button Code Is Get:

In blogger you can make more and more changes you can easily add or put your PayPal Donation Button where you want but i have best placement of paypal button which i already use on my website.


PayPal Button Adding Tutorial In Blogger Sidebar Or Footer:


Go to Blogger.com.
Go to Layout.
Click Add A Gadget.
Select HTML/Javascript widget which is located on 11th no in the list.
Now copy your PayPal Donate Button Code from notepad file where you can save it and paste the HTML code into the HTML coding box.
Now Pick the gadget with mouse and place it sidebar of your template where you want left or right its depends on your choice.
Now give the name of gadget/widget which you want. Like "Donate For My Blog".
Click the save button.
Visit your blog and your PayPal Donation Button is appear in your blog sidebar.
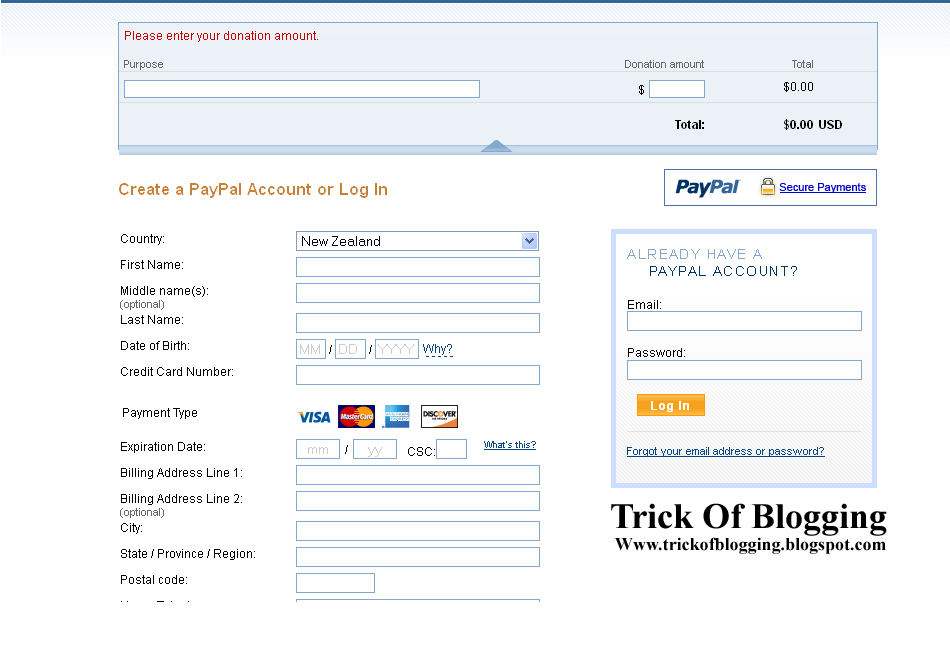
Now for checking donate button will it work or not click your button you can see this type of page which is given below appear after your blog page then its mean your PayPal Account is working for your blog.

               
Tricks To Add SimplyEasily PayPal Donate Button To Blogger 5


PayPal Button Adding Tutorial In Blogger Post Footer After Every New Post:


In this small tutorial you can easily add the PayPal Donation Code in the footer of every post but remember your previous post can not work like future post. Before adding the PayPal Button first copy your button code in HTML form.

Go to Blogger.com.
Go to Setting.
Go to Post and Comments.
Click on Post Template Add links.
Paste the code into the Post Template Box and save it.
Click to Writing New Post you can see the code in Compose form if you want to see the PayPal Donation Button Code then you should go to HTML form to see the code.

How I Can Use Crawlers And Indexing Tool In Blogger
How I Can Get Approval From Google Adsense My Blog Or Website
How I Can Make Internal Links In The Blog Post To Increase Rank


PayPal Button Adding Tutorial In Anywhere In Blog Post:


If you want to add the PayPal Donation Button in between blog post then copy your button code and go to HTML form and where you want to show your button paste this code after breaking the <br> tags and you can easily add the code in your blog post and enjoy it.


Related Articles:

How Easily Delete/Remove/Get Rid Blogger Blog Tricks In Blogspot
How I Remove Or Change Blogger Post Image Border In Blogspot
Best Blogger Tips And Tricks For My Blog SEO Instantly
Easy Trick To Add Twitter Updates Gadget To Blogspot Blogger
How I Make My Blogger Good Looking Best Tricks
Easy Tricks To Get Lot Of Visitors On My Blogger
How I Can Get More Pageviews Using Social Bookmarking.Com
How I Can Import And Export My Blog To Other Blogspot