Cari Blog Ini

Tampilkan postingan dengan label tricks. Tampilkan semua postingan

Kamis, 22 Agustus 2013

How To Stop Articles Stealing In Blogger Using Best CSS Tricks Easily

In this tutorial i will show you and teach how to save your article or post by stole someone if you are worried about them then forget this problem and give a new look of your blog template just using CSS code which is add in your HTML Body and your post always save by stole. If you want to do this then use and follow below tutorial and make your blog perfect and powerful content blog. Think you are working so hard in writing articles and someone without your permission just copy and paste your all blog content on their website or blog and also without adding any credit link, then how would you feel. It is so embracing in my point of view. So don't hesitate and use this beautiful CSS Tricks and keep your blog content save.

How To Stop Articles Stealing In Blogger Using Best CSS Tricks Easily

How To Save Blog Article or Blog Content From Article Thief:


I am going to give you a best trick which save your all content of your blog easily and it is also very simple and good. You can easily do this. This trick is use in HTML Body of your blog i give you some coding which you can add in your blog HTML body and save your article. Follow the below tutorial and do same as below i tell you.

Go to Template.
Click on Edit HTML.
Press Ctrl+F in HTML Body.
When you press Ctrl+F then on top right corner Search Box is appear.
When search box is appear then copy the below code and paste in search box and press enter.


]]></b:skin>

When you find this code then copy below coding which is given in few lines and paste this code above/before this tag ]]></b:skin> .

.post-body {
-webkit-touch-callout: none;
-khtml-user-select: none;
-moz-user-select: -moz-none;
-ms-user-select: none;
user-select: none;

When you paste the coding above ]]><b:skin> tag then after this save your template.
When you save your template.
Click on View Blog.
Now check this out your blog content can not be copy.

Now you have free and keep blogging with content full article and forget about stealing your articles and give the best comment for get further tricks i am waiting for your best and beautiful comment.

Related Articles:


]]>

Jumat, 16 Agustus 2013

Increase Blog Traffic Using H2 Tags For Better SEO Tricks In Every Post

In this tutorial i am going to tell you how to add H2 tag in every post for better optimization and get organic traffic from search engine. Remember always organic traffic get better CPC in Google Adsense it is also a best and good more earning tricks. Now i am going to give you this easy trick.

To change post titles default H3 tag to H2 Heading Tags then follow the steps below.


  • Go To Blogger.com.
  • Go to Template.
  • Go to Edit HTML.
  • Press Ctrl+F for search H3 tag.
  • When you press Ctrl+F in HTML Body the Search box is appear on top right corner.
  • In the box Search for .post h3
  • Replace it with .post h2 (keep replacing that for all occurrences of .post h2)
  • Then search for.

<h3><data:title/></h3

 <h2><data:title/></h2>


Now save your template.

And enjoy you make a big change in your blog and you get organic traffic a lot definitely but this trick take a time also you can also use big heading in your post. These heading tag set for search engine means when you write a post then in search engine your h2 heading is appear.

Now keep visiting my blog and get more details and tricks about blogging and if you can't understand something then give comment on my blog the i must reply with my best answer.


Related Articles:

To change post titles default H3 tag to H2 heading Tag then follow the steps below, - See more at: http://www.helperblogger.com/2012/03/increase-traffic-by-using-h2-tag-as_05.html#sthash.EaKx7n4E.dpuf

Jumat, 26 Juli 2013

Publish Blogger | Website Posts On Facebook | Twitter | LinkedIn | Tumblr Other Social Sites Automatically

In this tutorial i will show you how to Automatically Publish our Blog posts or Website posts on different Social Sites using simple best tricks. If you are not regularly updated your blog post on many of social sites or not share your blog post link on social sites due to less time in your busy life then follow this tutorial and save your time a also share your post on all social site just on click after publishing your post on blogspot or website. And if you can't share your blog post links on social sites then i think you loss a massive traffic from these social sites because social sites are also a big source of too much traffic.

Social Media or Social Sites plays an important role to improve blogger or website SEO. If you have a lot of Subscriber on your social sites account then use this automatically publish posts gadget and get massive traffic from these social sites and improve your ranking in Google Search Engine because Google also like those sites which have more backlinks on other popular or social sites and they also index your blog in search engine quickly and your blog get a lot of organic traffic through these tricks also. For doing this i am going to give you this trick how to use it and publish your posts on different social sites account.

How Use Social Website To Increase Your Website Traffic
Best Blogging Suggestion | Advice For Benefits In Business SEO Professionals

dlvr.it is the best service to publish automatically posts on different social sites and it also free of costs. I am also use this service and feel good. It is also very easy to setup.

Publish Blogger | Website Posts On Facebook | Twitter | LinkedIn | Tumblr Other Social Sites Automatically
Publish Blogger | Website Posts On Facebook | Twitter | LinkedIn | Tumblr Other Social Sites Automatically 1

How To Publish Post Automatically On Different Sites:


Follow below tutorial and done easily without having problem.

Go to divr.it.
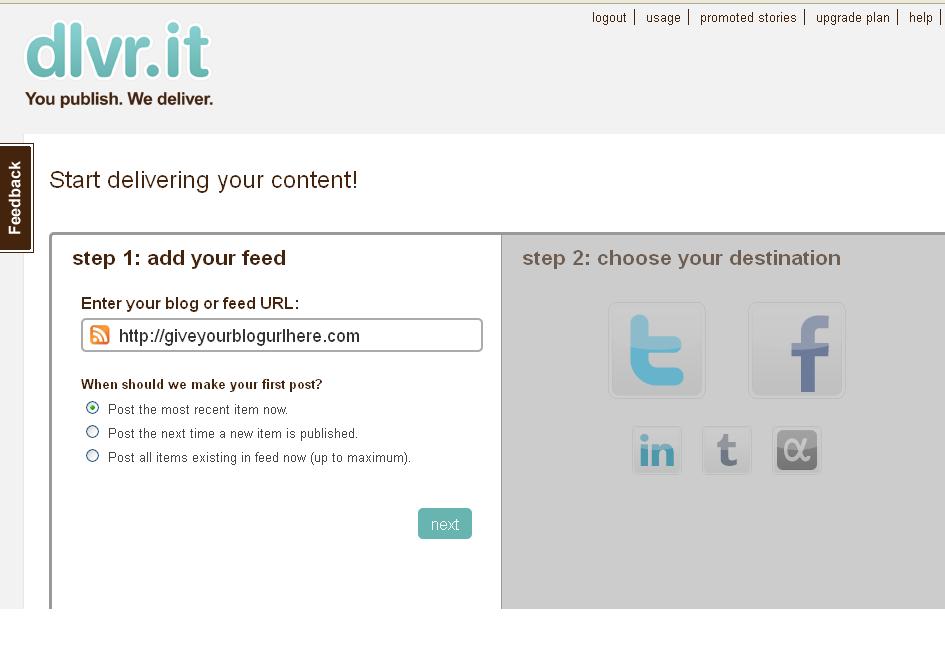
After reaching on this website same above first page is shown.
Give your any Email Address and the Strong Password also and click on Signup Button.
Then this type of page is appear on your screen.

Publish Blogger  Website Posts On Facebook  Twitter  LinkedIn  Tumblr Other Social Sites Automatically 2
Publish Blogger | Website Posts On Facebook | Twitter | LinkedIn | Tumblr Other Social Sites Automatically 2

1) Automatically Publish Post On Twitter:


Here you give your blog link or blog address and click on Next button.
When you press Next button Social Icon Page is highlighted.
Click on Twitter Icon.
And give your account Authorization Access.

Publish Blogger  Website Posts On Facebook  Twitter  LinkedIn  Tumblr Other Social Sites Automatically 3
Publish Blogger | Website Posts On Facebook | Twitter | LinkedIn | Tumblr Other Social Sites Automatically 3

Give your Twitter account Email Address and Password.
Then Click on Authorize App blue button.
When you Press button your blog posts are automatically publish on twitter when you publish your post in blogger same as Google Plus sharing.

How I Can Use Crawlers And Indexing Tool In Blogger
How To Make Backlinks To Other Website To Increas Page Rank


2) Automatically Publish Post On Facebook:


Back To Front Page and Click on Facebook Icon.
Give your Facebook Account Email Address or Fan Page or your blog.
Publish Blogger | Website Posts On Facebook | Twitter | LinkedIn | Tumblr Other Social Sites Automatically  4
Publish Blogger | Website Posts On Facebook | Twitter | LinkedIn | Tumblr Other Social Sites Automatically 4

Also give authorization to Facebook.
And Done.

Now you can repeat this process for all social sites and done easily.
You can also publish your post on LinkedIn or Tumblr.

3) Automatically Publish Post On LinkedIn:


Come Back on front page and click on LinkedIn Icon.
Also give the LinkedIn Account Email or Password.
When you give Email Address then click on blue button Allow Access shown in picture below.

Publish Blogger | Website Posts On Facebook | Twitter | LinkedIn | Tumblr Other Social Sites Automatically 5


 When you press Allow Access button your blog posts also automatically publish on LinkedIn Profile.

4) Automatically Publish Post On Tumblr:


Now do same above tutorial and Click on Tumblr Icon.
Give your Tumblr Account Email or Password and press on login and give access.
Now your work is done.

Do same as last icon i can not give you detail more because this post is already too much long and i am also tired.  If you face any problem then don't forget to comment me and use contact us page for better answer.

Related Articles:


Rabu, 17 Juli 2013

Add | Put Pop Up Ads For Banner | Adsense Or Chitika On Blogger Blogspot Easy Tricks

In this tutorial i will show you how to Add Google Adsense Ads, Chitika Ads, Banner Ads with Popup on Blogger Blog with simple and easy steps and using new Tricks. My tutorial is so easy any one understand easily how to embed these ads on blogspot to get more click to increase Google Adsense Earning and other Advertiser links. If you worried about to get small money then forget this and do as soon as possible for make more money. If you have a blog and not get more click and not too much visitors then don't worry i am going to give you best of best trick to how get more clicks on your blogger ads on your banner ads or chitika and Google Adsense for get more money. I also use this trick but it is not run to many days because some advertising company can not like this pop up ads. Like Google Adsense it is very harmful for your Adsense Account because this is against the Google Adsense Policy if you are ready then you can start using this trick with my below tutorial.

Add | Put Pop Up Ads For Banner | Adsense Or Chitika On Blogger Blogspot Easy Tricks


Best EasyTricks To Monetize Your Blogger Blog With Google Ads Increase CPC | CTR And Earning 
How To Easily Make Money With Affiliate Marketing Blogger

How To Put Ads On Popups Window:


Now i give you a HTML Coding and i tell you where you put the ads code to work with this trick.


<style>
#btftopbar {
height:2px;
width:auto;
background: #005094 url('..');
background-repeat:repeat-x;
text-align:center;
padding-top:2px;
}
#adsground {
height:50;
margin:0 auto;
width: 0px;
background:#fff;
border-bottom:2px #005094 solid;
border-right:2px #005094 solid;
border-left:2px #005094 solid;
text-align:bottom;
padding:2px;
}

#headlineatas {
opacity:1.0;
height:auto;
width:auto;
position:fixed;
top:30px;
left:600px;
border-bottom:4px #005094 solid;
border-bottom:0px blue solid;
color:#333;
padding:0px;
z-index:1001;
font-size:13px;}
</style>
<script type="text/javascript">
function getValue()
{
document.getElementById("headlineatas").style.display = 'none';
}
</script>
<div id="headlineatas">
<div id="btftopbar">
<span style="color:#fff;font-size:10px;font-weight:bold;text-shadow:black 0.1em 0.1em 0.1em;float:right;padding-top:3px;padding-right:10px"><a href="http://trickofblogging.blogspot.com/"></a></span>
</div>
<div id="adsground">
<p align="left"><h3></h3></p>
<p>
<script type="text/javascript"><!--
google_ad_client = "ca-pub-xxxxxxxxxxxxxxxxxx";
google_ad_host = "pub-xxxxxxxxxxxxxxxx";
/* Larget Rectangle  */
google_ad_slot = "xxxxxxxxxxx";
google_ad_width = 160;
google_ad_height = 600;
//-->
</script>
<script type="text/javascript"
src="http://pagead2.googlesyndication.com/pagead/show_ads.js">
</script>

<br/></p></div></div>


When you copy this code on your notepad then change the Orange Highlighted Color coding/Ads with your own Google Adsense Ads. If you want to add Banner ads then also replace this mine ad code with your own Banner Ads code. And if you also want to put Chitika ads then replace again with mine ads code which is highlighted with orange color. Some times chitika ads are not display due to blogger template problem then at this time you can comment me and also give your blog link and template copy with attach notepad file and mail me using contact us form and i will definitely help you and also give you best tricks.

How Optimize Blogger | Website To Increase Or Make Money With Blogging Tricks
Which Website | Blogger Name Give Best CPC | CTR To Make Money With Google Adsense

Customization In Pop-Ups Ads For Better Placement:


I highlighted two digits with Red or Pink color. It is for adjustment of ads where you want change the pixels of the ads for Top and Left and choose your best placement for ads to get more clicks. If you have done also this customization then follow below tutorial and add your ads.

Go to Blogger.com.
Go to Layout.
Click on Add A Gadget.
Go to HTML/JavaScript.
Click on it.
Paste your customize code in HTML Box.
Click on Save.
View your Blog and check your ads.

Now my tutorial is finished and visit my blog till get new tricks for your blogger blogspot to make best blogger and Good Looking Blog for get more visitors also. I also write many article on Blogger SEO, Blogger Widget/Gadget to make perfect blog.

Rabu, 03 Juli 2013

Best | Easy Tricks To Monetize Your Blogger Blog With Google Ads Increase CPC | CTR And Earning

In this tutorial i will show you how you can easily Monetize your Blogspot or Website with using Google Adsense Ads to Make Money with high CPC (Cost Per Click) using high CTR (Click Through Rate). These two points are very important if you want to make more money with your blog or website. Let's suppose if you get 3000 visitors daily then you can easily make 10 to 15 dollars with your blog without high CPC and if you optimize your Google Adsense Ads means your Ads Placement like Above Post Title, Below Post Title, Wrap Ads with your Text Content means Float Left or Right, Below Post or Between the Post and Sidebar Gadget also. And one most important is below Header or Blog Title/Blog Name.


Best | Easy Tricks To Monetize Your Blogger Blog With Google Ads Increase CPC | CTR  And Earning
Best | Easy Tricks To Monetize Your Blogger Blog With Google Ads Increase CPC | CTR  And Earning

In this post i discuss  7 Better Ads and Banner Placement To Increase Earning. First i give you main headings of these 7 points and then we discuss all these headings one by one.

  1. Google Adsense Ads Above Post Title.
  2. Google Adsense Ads Below Post Title.
  3. Google Adsense Ads Wrap or Cover with Post Content means floating ads.
  4. Google Adsense Ads Between Post or Text.
  5. Google Adsense Ads Below Post.
  6. Google Adsense Ads In Sidebar Gadget/Widget.
  7. Google Adsense Ads Below Blog Title/Blog Name.

Now if you have a Google Adsense Account Approved with your blog then use these tricks and increase earning by controlling the CTR and check your earning after doing these tricks. Its really work. It does not matter your account is Youtube (Hosted Google Adsense Account) or Original means (Non-Hosted Google Account) in both situation you can increase your earning. But little difference always in hosted or non-hosted account. Hosted account not give you above 10 dollar in a day. But if you have approved your account with your Custom Domain Or Website which get daily 1000 visitors then you can easily make nearly 30 dollars in a day with CPC $1. If you get 30 clicks in a day approximately then you can get 30 dollars simply. That's why first you get your custom domain removing Blogspot and you can do easily by get your domain with help of Google Blogger using setting option i also give you link if you want to transfer your blogspot to your website or custom domain. Like .COM.

Simple | Easy Tutorial For Transfer Blogspot To Website


1) Google Adsense Ads Above Post Title:


How to add or put Google Adsense Ads above the post title? and answer is.
There are two ways if you want to put or add ads on your blogspot which you approved by Google Adsense or Google Blogger then it just easy. And if you want to put ads on other blogger then i also give you the method of putting them in above your post title.

First For Those Blogger Which Is Approve Already From Blogger.
Second For Those Who Can't Approve From Blogger.

Those Blogger Which Approve:


Now if you Google Adsense Account is Approved by Google Blogger Team then you can easily Monetize it by doing below small steps or tutorial.

Go to Blogger.com.
Go to Layout.
Click on Add A Gadget.
Go to Adsense which is represent with Dollar Sign.
Click on it. If your account is approve then your ads are shown in your blogger.
After this Select or Mix up your ads with your blogger themes.
Add your ads where you want if you want to add in blog post above title then do below steps.
Go to Layout Again.
Click Edit link in Blog Post Body below Header.
And Select your place and add your ads.

How Easliy/Simple To Manage Page Layout In Blogger Blogspot
How To Easily Make Money With Affiliate Marketing Blogger

Those Blogger Who Can't Approve:


Now if your account not approve then you can also add Google Adsense to other blogspot blogger easily above post title by doing below tutorial.

  1. Go to Blogger.com.
  2. Go to Template.
  3. Click on Edit HTML.
  4. Press Ctrl+F to appear Search Box in HTML coding box.
  5. When Search box is appear then copy below code and paste in search box and press enter.
  6. When you find this below code then add your Parse/Convert Google Ads code below or above this code. For parsing Google Ads code click here.  Google Adsense Converter

<div style='float: right; margin: 10px 10px 10px 0;'>
   &lt;script type=&quot;text/javascript&quot;&gt;&lt;!--
google_ad_client = &quot;ca-pub-xxxxxxxxxxxxx&quot;;
google_ad_host = &quot;pub-xxxxxxxxxxxxx&quot;;
/* Trick Of Blogging  */
google_ad_slot = &quot;xxxxxxxxx&quot;;
google_ad_width = 336;
google_ad_height = 280;
//--&gt;
&lt;/script&gt;
&lt;script type=&quot;text/javascript&quot;
src=&quot;http://pagead2.googlesyndication.com/pagead/show_ads.js&quot;&gt;
&lt;/script&gt;

    </div> 

Replace the Red Highlighted Code with your Parse Ads Code and paste above or below the below tag.


<div class='post-header'>

2) Google Adsense Ads Below Post Title:


If you want to add or put your Google Ads below title tag then same as above tutorial but just paste the code below this tag    <div class='post-header'>.

4) Google Adsense Ads Wrap or Cover with Post Content Means Floating Ads:


Now if you want to add the Google Adsense ads with floating left and right then use above 1 point same as and then find below tag and paste the ads code above/before the 3rd or last tag.


<data:post.body/>

Now if you want to float your ad right then write the left/right/center its up to you just change the code with your desire.

Add | Put | Embed Three Or Four Column Footer Widget/Gadget In Blogger Blogspot
Add Facebook Like Box Widget/Gadget On Blogger By Facebook Developer Plugin

5) Google Adsense Ads Below Post:


If you want to add or put the Google Ads below post then copy your parse ad code and replace with Red Highlighted Code adjust the alignment left right or justify it with your desire and paste the Ad code just below/before this tag.  <data:post.body/>.

Tips And Troubleshooting:

Always parse the Adsense Ads Code when you want to add in Blogger HTML Body. If you can't parse the code then it is not work and also first when you pick the ads code first add it in HTML/JavaScript just few second and then parse this code not newly code directly work in blogger HTML Body. If your account is hosted then you must do this first. And if you can't properly understand then contact us and i will definitely guide you with my best answer.

6) Google Adsense Ads In Sidebar Gadget/Widget:


Google Adsense Ads placement in Sidebar is also give you best CTR using the Ad size with 160*600.
Now make ad unit of   160*600 in your adsense account and paste it in the Gadget where you want.

7) Google Adsense Ads Below Blog Title/Blog Name:


Get the Google Adsense Ad Code and follow the below tutorial.

Go to Blogger.com.
Go to Layout.
Click on Add A Gadget.
Go to HTML/JavaScript.
Paste the code in HTML/JavaScript Box.
Pick this gadget and drag it and drop below your Blogger Title/Blog Name.

Now you have done all these steps and if you feel its not working then reply me for better answer. I will available all the daily for your help just feel free and keep comment on my post.

Related Articles:


You Put Chitika Ads to Blogger Blogspot with Simple Steps  
Affilate Banner Put Below in your Blogger Post  
The Best Placement of Adsense On Your Blogger Blogspot  
How Can I Make Earning With My Blogger Blogspot
How I Can Place Adsense Ads Between My Blog Post or Below Title Tags 
Easy Trick To Add Twitter Updates Gadget To Blogspot Blogger  
Best Blogger Tips And Tricks For My Blog SEO Instantly  
Easy Tricks To Get Lot Of Visitors On My Blogger

    Jumat, 14 Juni 2013

    Use Best Blogger Settings Option Basic For SEO And Others Option Links

    In this tutorial i will show you how you can Use the best tricks for your blog SEO in the Setting option in blogger. This is the complete tutorial on Setting Option in Blogger. If you want to do any thing in setting option the read this post and do easily. In setting option you see 6 main heading which is given below. I write many post, on Blogger SEO Tips and Techniques, Blogger Customization with Template, Blogger Plugins, Blogging Software and many more but now i discuss the one of the new thing which is rarely discuss on internet because it is common every one know about this but not properly. People do blogging but they are not a perfect blogger and this is the fact they can not know this blog platform properly. Let's start our easy blogging tutorial.


    1. Basic
    2. Posts and comments
    3. Mobile and Email
    4. Language and Formatting
    5. Search Preferences
    6. Other
    Use Best Blogger Settings Option Basic For SEO And Others Option Links
    Use Best Blogger Settings Option Basic For SEO And Others Option Links 1
    Now i am going to discuss the all of above heading with detail how to use for better SEO and make your blog perfect and how to save it from spamming and how to use redirection, comments, readers, author invitation option and many option which we discuss below paragraph.

    Setting With Basic Option:


    If you make your blog on Blogger.com that is very nice because it is the biggest platform to keep blogging and also every one like this this platform is also very easy same like WordPress but some effort is required to do new thing.

    In the Basic option there are three further option which is given below.

    1. Basic.
    2. Publishing.
    3. Permissions.

    1) Basic:


    1) Title:


    Title is the main heading of your blog which is appear also in search engine and you should select the best keywords for your title tags means SEO Blogger not SEO For Blogger. Remove these keywords from your blog address is, am, for, on, this, that, it, or, and, because these words not count by search engine and they have not worth in front of Google Crawler or Google Bot. Use always best words for your blog address and also blog title.

    2) Description:


    Description is the best way to appear your blog first in search engine because if you use the best and content full keywords in search engine which is not copyright then your blog first appear in search engine. If you give also best and beautiful description which is relevant to your blog title or content then your blog also get more and good traffic from search engine. I have seen many bloggers which put a big mistake on his blogger description they give description totally change by their blog content that's why visitors come on their blog and quickly left their blog. Because they can not find their desire content they click on fake link which give the keywords but not content.

    How to Remove 404 Errors in Blogger Blogspot
    How To Make Sitelink For Better SEO

    3) Privacy:


    Privacy option is use when you want to not show your blog in search engine results means your blog have adults content or many other types of content and you want not show in search results or in Google Blog listing then you click on it and tick on option no and also do same as second.


    2) Publishing:


    In Publishing option here is your choice which link or blog address use for search engine. Like i have a blog with home link http://trickofblogging.blogspot.com/ and i want to change it with my desire one which is available in blogger also and which we purchase with the Help of Google Apps. If i want to change my blog address with .com, .net, .info. and .co then i can easily change it simply by doing this below small tutorial.

    Go to Blogger.com.
    Go to Setting.
    Go to Basic.
    Go to Blog Address.
    Click on Add A Custom Domain.
    Which one you want to use .com or .net or any then select this extension.
    If you have already domain then just click on Switch to Advance Setting.
    And if you have not purchase the domain then click below orange button Check Availability.
    Also click below link to more info how to change blogspot to .com and how to purchase.

    Simple | Easy Tutorial For Transfer Blogspot To Website

    3) Permissions:


    1) Blog Authors:


    In Permissions option you can allow your for new author means Guest Authors and this is add by inviting the Guest Author by using their contacts. If you also want to add author on your blog then you also use this fantastic option. By click on Add Authors and Choose From Contacts button and add your blog guest author easily and enjoy.


    2) Blog Readers:


    Blog Readers is the option which you can use when if you want not every body read your blog just blog author or blog readers ready or view your blog then you can easily use this option. If you want that only readers read your blog then click on Add Readers and then choose from contact and save it. That's all.

    2) Posts and comments:


    Posts: 


    In Posts and Comments option you can select how many post you want to show on your homepage. If you want to show 4 then click on post box and write the number of posts for show on homepage. Now click on Save setting orange button top right corner.

    Post Template: 


    Here you can easily add post template for individual post.

    Show Case Image With Light Box:


    In Show Case Image Light Box option you can easily change your lightbox option by using yes or no option. Light Box is very good option for view image in blog post.It also very easy by just click on image and comeback by using Cross mark. 


    Comments: 


    Comments Location:


    In this option you select or choose one of the best desire option for your blog comment page. Means if some one want to comment on your blog then when they click for adding comment then this option will work. Like when you click on comment adding option then Embedded, Full Page, Pop-up Window or Hide which one you want to use its now up to you. Select any one of them and keep enjoy.   

    Who Can Comment?  


    Who can comment is the option which is used for commenting purpose means if your blog visitors or readers visit your blog or site then which user comment on your blog to avoid spamming then this option works better. Here are four option Anyone, Register Users(included open ID), User With Google Accounts (Gmail) and Only member of this blog. You can just select any one of them and click on save setting. 

    Comment Moderation:


    Comment Moderation is the option which is used when some one comment on your blog the comment can not visible on your blogger blog homepage they visible then blog author moderate or Approve this comment. This option is mainly use for avoid spamming if you think some one comment on your blog to make links on your blog to get visitors and they have not interest on your blog content then you can do this easily. Just go comment moderation tick on your desire option Always, Sometimes, and Never.
    And when visitors of your blog leave a comment on your blog post then they see the message like this "This comment is awaiting for approval".

    Show Word Verification:


    Show word verification is the one of the best option in blog because this is use when human mind comment on your blog. Basically this option is use to avoid spamming means Robot Spamming or Robot Commenting and using Automatically Comment software by some moderation.

    Show Backlinks:


    Show Backlinks option means when some one comment on your blog and they also give the links with href then they also make a backlinks on your blog. Many peoples also increase their backlinks reputation by using this option the find the new blog and effective blog and start comment on their blog and make too much backlinks without and worth. These type of backlinks not give your best Google Page Rank. So this option work as when some give the link with their comment or message then what your want link is visible or not.

    Comment Form Message:


    Here in this option you can embed or write any keywords about thanks for comment which is show above the comment box. Here give the best and beautiful keywords for thanking to your blog readers and commenting people. 


    3) Mobile and Email:


    In Mobile and Email option you can easily posting with your mobile device on your blog and also using Email. First discuss about Mobile Device. By going to Mobile and Email link and then Add A Mobile and when you click on Add A Mobile you see the page like given below picture/image.

    Use Best Blogger Settings Option Basic For SEO And Others Option Links 2
    Use Best Blogger Settings Option Basic For SEO And Others Option Links 2
      
    When box is appear with a 9 letters code you sent this code via text to 256446 which for blogger. The code is written in the Yellow box. When you send verification code then you start easily posting on your mobile by using the same mobile number. If you have Non-US Mobile or Phone Number then you can email the code to go@blogger.com. If your mobile doesn't support  MMS then you can use the first option via text.


    Email: 

    Email is the option where your posting using Email. Here is your Gmail account and before @blogger.com you can give the secret words before posting.  And here is three option Post email Immediately, Second save email as a draft and Third is Disable.


    Comment Notification Email:


    In the Comment Notification Email option you can add your any account to receive the mails and comment from your blogger blog. Here is your Google Account is already embed or put in it. 

    Email Posts To:


    In the Email Posts To option you can add the email account of your friends and also members and you can easily send your post by using email. 


    Now i only discuss three headings in this post now nest three headings discuss in the next post (Part 2) because this post is too much long. In the next post Search Preferences  is the most important heading about SEO for setting of Meta Tags, Description, Enabling Description In the Individual post, Also add the Robot .txt file in the blogger search preferences. Also adjust the Custom Robots Header Tags manually and many more in 6 heading Other Also for Adding Analytic code for proper verification.

    Use Language And Formatting | Search Preferences | Others Option Setting In Blogger Blogspot

    Related Articles:


    How To Added Meta Tag In Your Blogger For Better Optimization  
    Best Tricks To Use Custom Robots Tags Selection Blogger
    How To Improve Content Keywords Significance Easy Tricks To Blog
    How To Make Backlinks To Other Website To Increas Page Rank
    How I Can Write 100% Original Content For Blogger
    How I Can Optimize the Post Title Mean My Post Show First
    Manage Permalinks Which Is Search Engine Friendly
    Submitt Sitemap To Google And Major Search Engines

    Senin, 10 Juni 2013

    Create | Make Blogger Background Image On Photoshop And Change With Desire Photo

    In this tutorial i will show you how to create Image In Photoshop and how to Add or Replace your desire image in blogger background just simple steps and trick. Now this tutorial also teach you how to use Photoshop Features. I have write many post about Blogger and Blogging tips and tricks but now i want discuss a small and best tutorial using Photoshop because it also play and important role in field of blogging. Like if you want to add image in blog post and you want to also add any name or text on this photo/image you want to put on blog post then you can easily add this also like i write my blog name on mostly pictures and when someone view or see this picture they also see our blog name which  is very effective and these people also visit your blog to get proper information about this picture or post.


    How To Make Blogger Header Image In Photoshop

    How To Make Image/Photo/Picture In Photoshop For Blogger Background:


    If you want to add your desire customize picture in blogger background then follow the below tutorial to make image and then add this on your blog.
    Create | Make Blogger Background Image On Photoshop And Change With Desire Photo
    Create | Make Blogger Background Image On Photoshop And Change With Desire Photo 1

    Click on Photoshop Install Software on your computer desktop screen.
    Run your Photoshop.
    Now go to File.
    Go to New.
    Click on it.
    Like above image which totally reduce your effect just follow the picture.
    Now according to below picture.
    Customize the Page of Image.

    Picture 1 For Customization:


    Give the Name in Step 1.
    Select Width or Height in Step 2. 
    Select Resolution in Step 3.
    Select Mode Of Color means RGB, Greyscale, CMYK Color, Or Lab Color.
    Now Click OK.
    You See the White page after this customization.


    Picture 2 For Customization For Patten:


    Click on Paint Brush. Like pointed in Step 1.
    Go with Step 2 to Select the Patten of the color or background.
    Now you have done you also customize simply by adding or cutting picture or other picture to pick the best and beautiful template.

    If you want just your blog names appear in the background of blogger template then you also do this. For this Go with Picture 3. 


    Create | Make Blogger Background Image On Photoshop And Change With Desire Photo 2
    Create | Make Blogger Background Image On Photoshop And Change With Desire Photo 2


    Here Is the Small Tutorial which show you how just write text on Blank White Page or Any image which you put on Photoshop.

    Just do same as adding blank white page. Where you customize the page with step1 to step 4.
    When you add page then put your desire color using Brush Tool and then write 3D Color Effect Text on blank white, color or any picture.

    When you make white page on your Photoshop or select any picture then use below tutorial for writing 3D Effect Text on picture.

    Click On Text Writing Tool which is represent by bold T.
    Write your blog name or any text which you want to appear behind your template.
    Now using image or tutorial both to do easily.

    Create | Make Blogger Background Image On Photoshop And Change With Desire Photo 3
    Create | Make Blogger Background Image On Photoshop And Change With Desire Photo 3

    Go to Above Tab Like File, Edit, Image, Layers, Select, Filter, View, Windows, Help.
    Click on Windows Tab.
    Go to Show Layers.
    After Click you see the Layer Effect page on right bottom sidebar.
    Right click on image and create Duplicate Layer.
    Remove Background Layer.
    Now again Right Click on Duplicate Layer.
    Go to Blending Option.
    Now you can see the same thing which you are seeing in the above picture.
    Tick same as mine.
    Select the Shadow.
    Click Ok. Now you have done.
    Save your image.

    Now You can Replace Old Style Templates in Blogger in new one
    5 Ways How to Make your Blogger Blog Like WordPress Website

    Add Customize Image In Blogger Background Template:


    Go to Blogger.com.
    Go to Template.
    Click on Customise Orange Button.
    Go to Background.
    Go to Remove Image and click on the image.
    Click Upload Image.
    Now by using this option add picture from your computer where you save your customize picture.
    Click on Apply To Blog Orange Button right top side.
    Click to View Blog.
    Now you have done correctly.

    If you have face any problem about this tutorial then feel free and give me your comment for make more easy or best.

    Related Articles:


    Add | Put | Embed Three Or Four Column Footer Widget/Gadget In Blogger Blogspot
    Add Facebook Like Box Widget/Gadget On Blogger By Facebook Developer Plugin
    Add | Make About Us Page Widget | Gadget On Your Blog Footer Or Sidebar
    Add | Put 50 Flag Translator Widget | Gadget On Your Blogger Blogspot
    Add | Put Three Tab Gadget/Widget In Blog Layout Sidebar On Blogspot 
    Add | Put Best Style Subscribe Box Widget/Gadget For Blogger Sidebar
    Tricks To Add Simply/Easily/ PayPal Donate Button To Blogger
    Add A Simple Drop Down Menu To Blogger Blog 

    Jumat, 07 Juni 2013

    Create | Make | Add | Set 404 Error Page In Blogger Blogspot Easily

    In this tutorial i will show you how you can easily Add or Create 404 Error Page in your Blog. This error is drop very bad effect on your blog because visitors can not visit your blog or website properly and they left your blog from this page. To setup this page follow my simple tutorial with best tricks. Blogging is one of the best way to introduce yourself that's why keep blogging with full of joy and make you a perfect blogger. For adding this page on your blog i write a small tutorial for you which help to add this amazing thin on your blog homepage.

    Create | Make | Add | Set 404 Error Page In Blogger Blogspot Easily
    Create | Make | Add | Set 404 Error Page In Blogger Blogspot Easily 1

    What Is 404 Errors:


    404 Error then create if some one visit your blog with your blog link and after your link some keywords are written. This is not effect on your blog health for SEO (Search Engine Optimization Ranking) but it effect on blog readers. If you set this then your visitors are not go without visiting your blog properly.

    Best Blogger Tips And Tricks For My Blog SEO Instantly 

    Add 404 Error Page In Your Search Preferences:


    For adding this 404 Error Page follow below tutorial and work according to which i write. By adding this your visitors also report you about your 404 Error using your Contact Us Page. Also you give the home page link in the Error Page by click on this link your visitors come on your blog home page.

    Add | Make About Us Page Widget | Gadget On Your Blog Footer Or Sidebar
    Customise Blogger Default Template To Make Professional Template
    Add | Put | Embed Three Or Four Column Footer Widget/Gadget In Blogger Blogspot

    Go to Blogger.com.
    Go to Settings.
    Go to Search Preferences.
    Click on Edit. See below picture/image.


    Create | Make | Add | Set 404 Error Page In Blogger Blogspot Easily 2
    Create | Make | Add | Set 404 Error Page In Blogger Blogspot Easily 2


    Now pick/copy the below code and paste in the Custom Page Not Found Box after further customization in your 404 Error page.


    <!-- TOB Default Template -->
    <div class='TOB-404-box'>
      <p style='line-height: 30px'><strong>
    <font color='#ff0000' size='5'>
    Oops What Happen!
    </font> <font color='#666666'>
    My Blog Reader you click a broken link or a page which is removed from this blog now. Please Do any one of the Following.
    </font></strong></p>
      <ol style='line-height: 25px'>
        <li><a href='javascript:history.go(-1)'>&#171; Go Back</a> </li>
        <li>Contact Us to Report this problem <a href='http://trickofblogging.blogspot.com/p/blog-page_1262.html'>Click Here</a>&#160;&#160;&#160; (<em>This will help us to serve you even better</em>) </li>
        <li>Go To Homepage by <a href='http://trickofblogging.blogspot.com/'>Click Here</a>
          <br/></li>
      </ol>
      <p>
        <br/>
        <br/>
        <br/></p>
      <p align='center'><font color='#0080ff' style='font-size: 150px'><strong>404</strong></font></p>
      <p>&#160;</p>
      <p align='center'/>
      <p align='center'><font size='5'>Page Not Found</font></p>
    </div>
          

    Customize the some Features:


    Change the Red Highlighted Color Text with your desire text. Oops What Happen.
    Change the Orange Highlighted Color Text with your desire text.
    Change the Blue Highlighted Color link with your own Contact Us Page link.
    Change the Grey Highlighted Color link with your own Blog Homepage Link.
    Change the Pink Highlighted Color Text with your own desire words. Page Not Found.


    Now your half work is done.
    Now Go to Template.
    Go to Edit HTML.
    In the HTML Body Box.
    Press Ctrl+F to find the below code/tag.

    ]]></b:skin>


    Paste this above code in the search box and press enter.
    When you find this code.
    Copy the below CSS Style sheet Code and paste it below/after this code/tag.

    <b:if cond='data:blog.pageType == &quot;error_page&quot;'>
    <style type='text/css'>
    .status-msg-wrap {
        font-size: 100%;
        margin: none;
        position: static;
        width: 100%;
    }
    .status-msg-border {
        display:none
    }
    .status-msg-body {
        padding: none;
        position: static;
        text-align: inherit;
        width: 100%;
        z-index: auto;
    }
    .status-msg-wrap a {
        padding: none;
        text-decoration: inherit;
    }
    .TOB-404-box {
      background:#B27D00;
      width:98%;
      margin:10px 0px;
      padding:20px 10px;
      border:1px solid #ddd;
      -moz-border-radius:6px;
      -webkit-border-radius:6px;
      border-radius:6px;
      box-shadow: 5px 5px 5px #CCCCCC;
    }
    </style>
    </b:if>

    Now if you want to change the Background Color of your box then change the #B27D00
    Save your Template.
    Now you have done all work.
    Now if you want to check it is working or not write any keywords after your blog homepage link.

    If you want to ask any question about this or about Blogger SEO, Blogger Verification, WordPress, WordPress SEO, Make Money, Blogging Tips, Webmasters Tool Tutorial then just contact us using contact us page and feel free.

    Related Articles:


    How to Remove 404 Errors in Blogger Blogspot
    How I Can Remov Or Fix Broken URL For Google Adsense Crawler
    5 Ways How to Make your Blogger Blog Like WordPress Website
    How To Make Backlinks To Other Website To Increas Page Rank
    Get Google Page Rank With In 1 Month By Simple And Easy Tricks
    Add | Put | Embed Three Or Four Column Footer Widget/Gadget In Blogger Blogspot
    Add Manually CSS Jqeury Drop Down Menu By Replace/Remove Pages On Blogger
    Add Facebook Like Box Widget/Gadget On Blogger By Facebook Developer Plugin